8.5 백업을 위한 Snapshot
실행한 시간 기준으로 File System의 Snapshot을 만들 수 있습니다. 만들어진 Snapshot을 통해 파일 또는 전체를 복구할 수 있습니다.
Snaphot #1
AD 1의 Compute Instance에 접속합니다.
마운트된 File System에 파일 하나를 복사합니다.
[opc@examplelinuxinstance ~]$ sudo su
[root@examplelinuxinstance opc]# cd /mnt/
example/     FSS-Storage/
[root@examplelinuxinstance opc]# cd /mnt/FSS-Storage/
[root@examplelinuxinstance FSS-Storage]# cp ~opc/BigFile_100.zip .
[root@examplelinuxinstance FSS-Storage]# ls -la
total 100361
drwxr-xr-x. 2 root root         2 Feb 19 03:30 .
drwxr-xr-x. 4 root root        40 Feb 19 03:25 ..
-rw-r--r--. 1 root root 102608082 Feb 19 03:30 BigFile_100.zip
-rw-r--r--. 1 root root        19 Feb 19 02:16 hello1.txt
drwxr-xr-x. 2 root root         0 Feb 19 03:30 .snapshot
웹브라우저에서 OCI Console로 이동하여, 앞서 만든 File System의 상세화면으로 이동합니다.
왼쪽아래 Resources >> Snapshots로 이동합니다.
Snapshot을 만들기 위해 [Create Snapshot] 을 클릭합니다.

Snapshot 생성화면

생성확인

Compute Instance에서 확인
마운트된 경로 바로 밑 .snapshot 폴더에 생성된 Snapshot과 파일들이 보입니다.[root@examplelinuxinstance FSS-Storage]# ls -la .snapshot/ total 2 drwxr-xr-x. 3 root root 1 Feb 19 03:32 . drwxr-xr-x. 2 root root 2 Feb 19 03:30 .. drwxr-xr-x. 2 root root 2 Feb 19 03:30 Snapshot-20190219-0331 [root@examplelinuxinstance FSS-Storage]# ls -la .snapshot/Snapshot-20190219-0331/ total 100361 drwxr-xr-x. 2 root root 2 Feb 19 03:30 . drwxr-xr-x. 3 root root 1 Feb 19 03:32 .. -rw-r--r--. 1 root root 102608082 Feb 19 03:30 BigFile_100.zip -rw-r--r--. 1 root root 19 Feb 19 02:16 hello1.txt
Snaphot #2
접속한 Compute Instance에서 마운트된 File System에 파일을 하나 더 복사합니다.
[root@examplelinuxinstance FSS-Storage]# cp ~opc/BigFile_50.zip .
[root@examplelinuxinstance FSS-Storage]# ls -la
total 151561
drwxr-xr-x. 2 root root         3 Feb 19 03:34 .
drwxr-xr-x. 4 root root        40 Feb 19 03:25 ..
-rw-r--r--. 1 root root 102608082 Feb 19 03:30 BigFile_100.zip
-rw-r--r--. 1 root root  51348311 Feb 19 03:34 BigFile_50.zip
-rw-r--r--. 1 root root        19 Feb 19 02:16 hello1.txt
drwxr-xr-x. 3 root root         1 Feb 19 03:34 .snapshot
웹브라우저에서 OCI Console로 이동하여, Snapshot을 하나 더 만듭니다.
Snapshot을 만들기 위해 [Create Snapshot] 을 클릭합니다.
두 번째 Snapshot생성확인
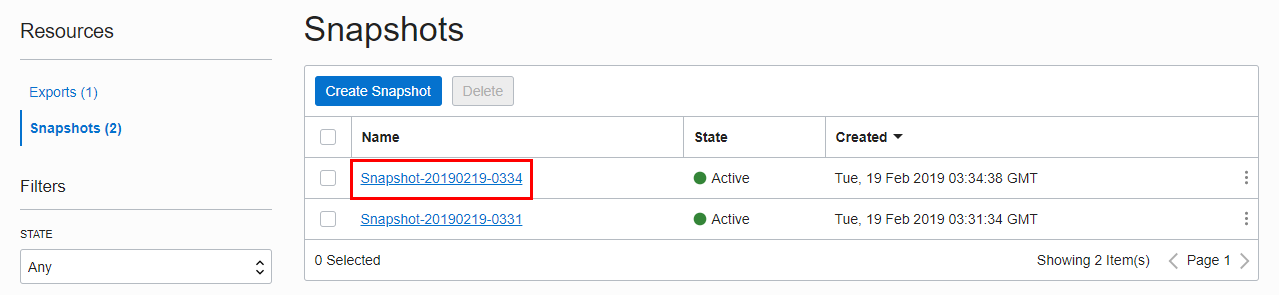
Compute Instance에서 확인
.snapshot 폴더에 생성된 Snapshot과 파일들이 보입니다.[root@examplelinuxinstance FSS-Storage]# ls -la .snapshot/ total 2 drwxr-xr-x. 4 root root 2 Feb 19 03:52 . drwxr-xr-x. 2 root root 3 Feb 19 03:34 .. drwxr-xr-x. 2 root root 2 Feb 19 03:30 Snapshot-20190219-0331 drwxr-xr-x. 2 root root 3 Feb 19 03:34 Snapshot-20190219-0334 [root@examplelinuxinstance FSS-Storage]# ls -la .snapshot/Snapshot-20190219-0331/ total 100361 drwxr-xr-x. 2 root root 2 Feb 19 03:30 . drwxr-xr-x. 4 root root 2 Feb 19 03:34 .. -rw-r--r--. 1 root root 102608082 Feb 19 03:30 BigFile_100.zip -rw-r--r--. 1 root root 19 Feb 19 02:16 hello1.txt [root@examplelinuxinstance FSS-Storage]# ls -la .snapshot/Snapshot-20190219-0334/ total 151561 drwxr-xr-x. 2 root root 3 Feb 19 03:34 . drwxr-xr-x. 4 root root 2 Feb 19 03:34 .. -rw-r--r--. 1 root root 102608082 Feb 19 03:30 BigFile_100.zip -rw-r--r--. 1 root root 51348311 Feb 19 03:34 BigFile_50.zip -rw-r--r--. 1 root root 19 Feb 19 02:16 hello1.txt [root@examplelinuxinstance FSS-Storage]#Snapshot은 읽기 전용 폴더로 Snapshot에 있는 파일 또는 특정 Snapshot을 전체 복사하는 방법을 통해 복구할 수 있습니다.
** 이 글은 개인으로서, 개인의 시간을 할애하여 작성된 글입니다. 글의 내용에 오류가 있을 수 있으며, 글 속의 의견은 개인적인 의견입니다. **