3.6.3 Block Volume에 연결하기
Block Volume 장착 후에 iSCSI 연결을 설정해야 합니다. iscsiadm 명령으로 실행되며 실행해야 할 명령은 장착된 Block Volume에서 제공하므로 복사 후 그대로 실행하면 됩니다.
-
OCI 콘솔에서 내비게이션 메뉴를 엽니다. Compute > Instances 항목으로 이동합니다.
-
앞서 생성한 대상 Instance의 이름을 클릭합니다.
-
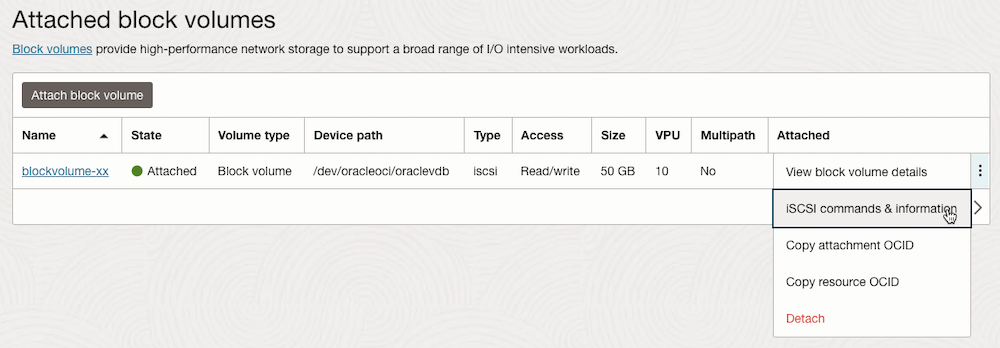
Instance 상세 페이지에서 왼쪽 아래의 Resources > Attached block volumes을 클릭합니다.
-
방금 장착한 Block Volume 옆에 있는 액션 아이콘(우측 점 3개)을 클릭한 다음 iSCSI commands and information을 클릭합니다.
-
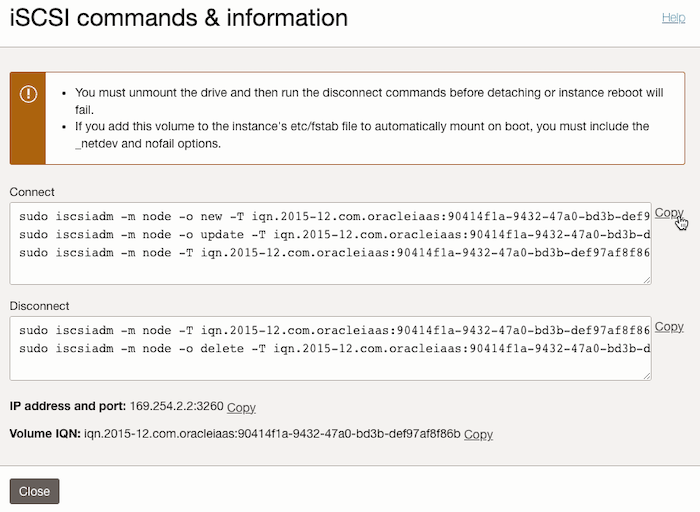
iSCSI commands and information 다이얼로그가 뜹니다. 장착한 Volume에 대한 IP와 Port를 확인할 수 있고, 장착 및 장착해제에 사용될 명령이 보입니다. 명령에는 IP, Port가 이미 입력되어 있으므로 복사해서 그대로 사용하면 됩니다.
연결하기 위한 Connect 항목에 있는 명령을 복사합니다.
-
Attach한 Instance에 접속한 SSH로 접속합니다.
-
Connect Commands의 명령을 복사해서 SSH 세션에서 순서대로 하나씩 실행합니다.
$ ssh -i privateKey opc@144.24.xx.xxx FIPS mode initialized Activate the web console with: systemctl enable --now cockpit.socket Last login: Tue May 2 02:05:11 2023 from 132.145.xx.xx [opc@examplelinuxinstance ~]$ sudo iscsiadm -m node -o new -T iqn.2015-12.com.oracleiaas:90414f1a-9432-47a0-bd3b-def97af8f86b -p 169.254.2.2:3260 New iSCSI node [tcp:[hw=,ip=,net_if=,iscsi_if=default] 169.254.2.2,3260,-1 iqn.2015-12.com.oracleiaas:90414f1a-9432-47a0-bd3b-def97af8f86b] added [opc@examplelinuxinstance ~]$ sudo iscsiadm -m node -o update -T iqn.2015-12.com.oracleiaas:90414f1a-9432-47a0-bd3b-def97af8f86b -n node.startup -v automatic [opc@examplelinuxinstance ~]$ sudo iscsiadm -m node -T iqn.2015-12.com.oracleiaas:90414f1a-9432-47a0-bd3b-def97af8f86b -p 169.254.2.2:3260 -l Logging in to [iface: default, target: iqn.2015-12.com.oracleiaas:90414f1a-9432-47a0-bd3b-def97af8f86b, portal: 169.254.2.2,3260] Login to [iface: default, target: iqn.2015-12.com.oracleiaas:90414f1a-9432-47a0-bd3b-def97af8f86b, portal: 169.254.2.2,3260] successful. -
장착을 위한 iSCSI 명령을 모두 수행이 끝나면, 이제 Linux에서 하드 디스크처럼 사용할 때처럼 포맷 및 마운트 작업을 수행하면 됩니다. 먼저, 장착 여부를 확인하기 위해 다음 명령을 수행합니다.
sudo fdisk -l-
실행결과
- 아래쪽에 보면 Disk /dev/sdb가 장착된 것을 확인 할 수 있습니다.
[opc@examplelinuxinstance ~]$ sudo fdisk -l
Disk /dev/sda: 46.6 GiB, 50010783744 bytes, 97677312 sectors
Units: sectors of 1 * 512 = 512 bytes
Sector size (logical/physical): 512 bytes / 4096 bytes
I/O size (minimum/optimal): 4096 bytes / 1048576 bytes
Disklabel type: gpt
Disk identifier: 812F8A56-E8ED-417C-BD3D-661E60705756

Device       Start      End  Sectors  Size Type
/dev/sda1     2048   206847   204800  100M EFI System
/dev/sda2   206848  2303999  2097152    1G Linux filesystem
/dev/sda3  2304000 97675263 95371264 45.5G Linux LVM


Disk /dev/mapper/ocivolume-root: 35.5 GiB, 38088474624 bytes, 74391552 sectors
Units: sectors of 1 * 512 = 512 bytes
Sector size (logical/physical): 512 bytes / 4096 bytes
I/O size (minimum/optimal): 4096 bytes / 1048576 bytes


Disk /dev/mapper/ocivolume-oled: 10 GiB, 10737418240 bytes, 20971520 sectors
Units: sectors of 1 * 512 = 512 bytes
Sector size (logical/physical): 512 bytes / 4096 bytes
I/O size (minimum/optimal): 4096 bytes / 1048576 bytes


Disk /dev/sdb: 50 GiB, 53687091200 bytes, 104857600 sectors
Units: sectors of 1 * 512 = 512 bytes
Sector size (logical/physical): 512 bytes / 4096 bytes
I/O size (minimum/optimal): 4096 bytes / 1048576 bytes
-
이 글은 개인으로서, 개인의 시간을 할애하여 작성된 글입니다. 글의 내용에 오류가 있을 수 있으며, 글 속의 의견은 개인적인 의견입니다.