Console 접근을 위한 방화벽에 등록할 주소 찾기
-
OCI Documentation 기준으로 아래 주소에 대한 등록이 필요합니다.
-
방화벽, Proxy Server 등으로 외부 인터넷 접근을 통제하는 곳에서 Console 접근을 위해 아래 주소를 등록요청합니다.
-
OCI Documentation - Allowing Access to the Console from Your Network
-
OCI Console과 통신은 HTTP (80), HTTPS (443) 사용
*.oracle.com *.oraclecloud.com *.oracleinfinity.io oracle.112.2o7.net consent.trustarc.com (Console cookie preferences) -
문서 내용외 추가로 등록이 필요한 주소가 있는 지 검증
Squid Proxy Server 설치하기
-
Compute VM을 생성합니다.
-
Squid Proxy Server를 설치합니다.
sudo yum install -y squid -
squid.conf 파일 설정
sudo vi /etc/squid/squid.conf-
설치후 기본값
-
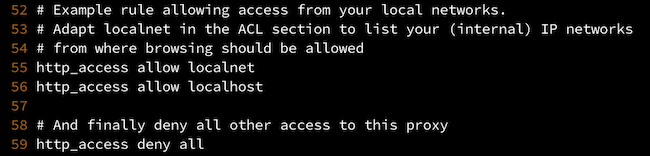
아래와 같이 변경
# Example rule allowing access from your local networks.
# Adapt localnet in the ACL section to list your (internal) IP networks
# from where browsing should be allowed
#http_access allow localnet
http_access allow localhost

# And finally deny all other access to this proxy
http_access deny all
-
-
Squid가 사용하는 포트를 방화벽에서 개방합니다.
sudo firewall-cmd --permanent --add-port=3128/tcp sudo firewall-cmd --reload -
Security List에서도 Ingress에 해당 포트를 등록합니다.
-
서버 시작 및 활성화
sudo systemctl start squid
sudo systemctl enable squid
테스트 클라이언트(Windows) 설정
-
Window Server로 Compute VM을 생성합니다.
-
현재는 모든 웹이 접속이 가능한 상태입니다.
-
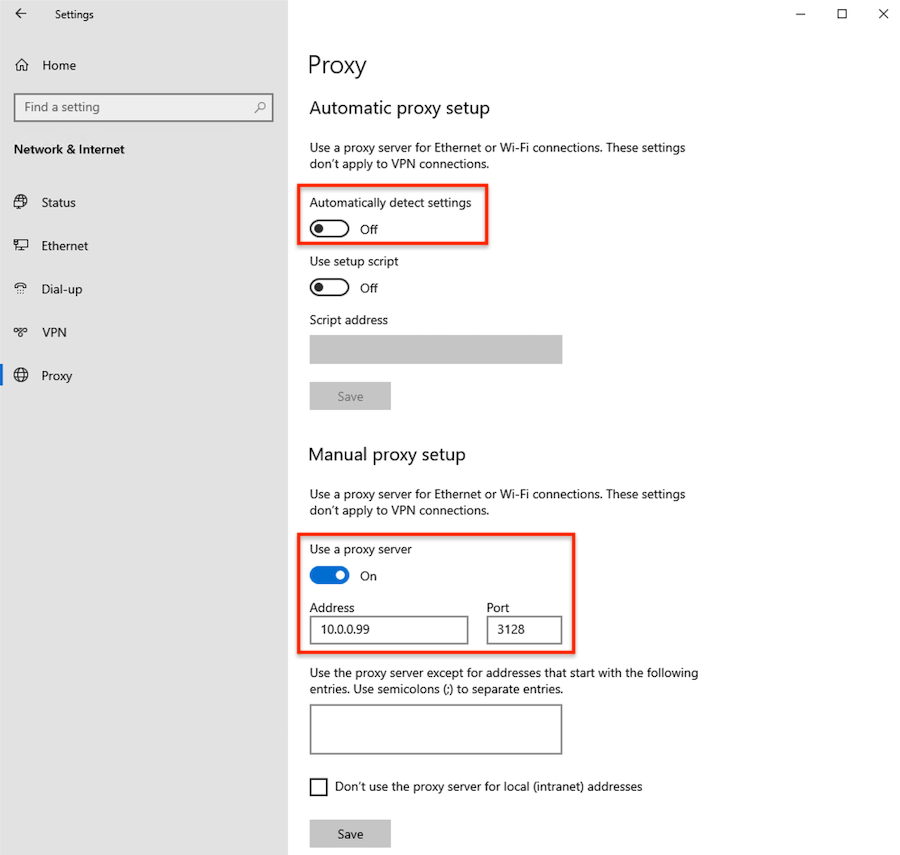
Setting > Network & Internet > Proxy 으로 이동하여 설정합니다.
- Automatically detect settings: Off
- Use a proxy server: On
- Address: Squid Proxy Server의 IP
- Port: Squid 기본 포트 3128
-
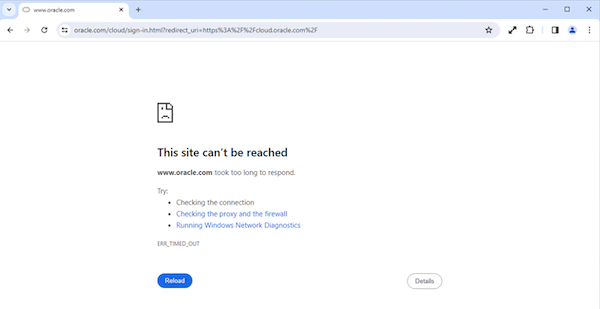
다시 브라우저로 접속해 보면 Proxy Server에 의해 막혀서 접속이 되지 않습니다.
Squid Proxy Server에 Console 접속을 위한 주소 등록 및 테스트
-
squid.conf 파일 설정 (/etc/squid/squid.conf)
- 문서 상의 나와있던 주소를 추가해줍니다.
... #http_access allow localnet http_access allow localhost # For OCI Console acl oci_console_acl dstdomain .oracle.com .oraclecloud.com .oracleinfinity.io oracle.112.2o7.net http_access allow oci_console_acl # And finally deny all other access to this proxy http_access deny all ... -
Squid 재시작
sudo systemctl restart squid -
테스트 클라이언트 상의 브라우저에서 OCI Console에 다시 접속해 봅니다. 잘 접속되는 것을 확인할 수 있습니다.
-
Console에서 사용할 서비스들을 조회해 봅니다.
-
그중 OCIR의 경우 아래와 같이 Repository가 조회되지 않고,
Cannot read properties of undefiend (reading 'toString')의 오류가 발생합니다.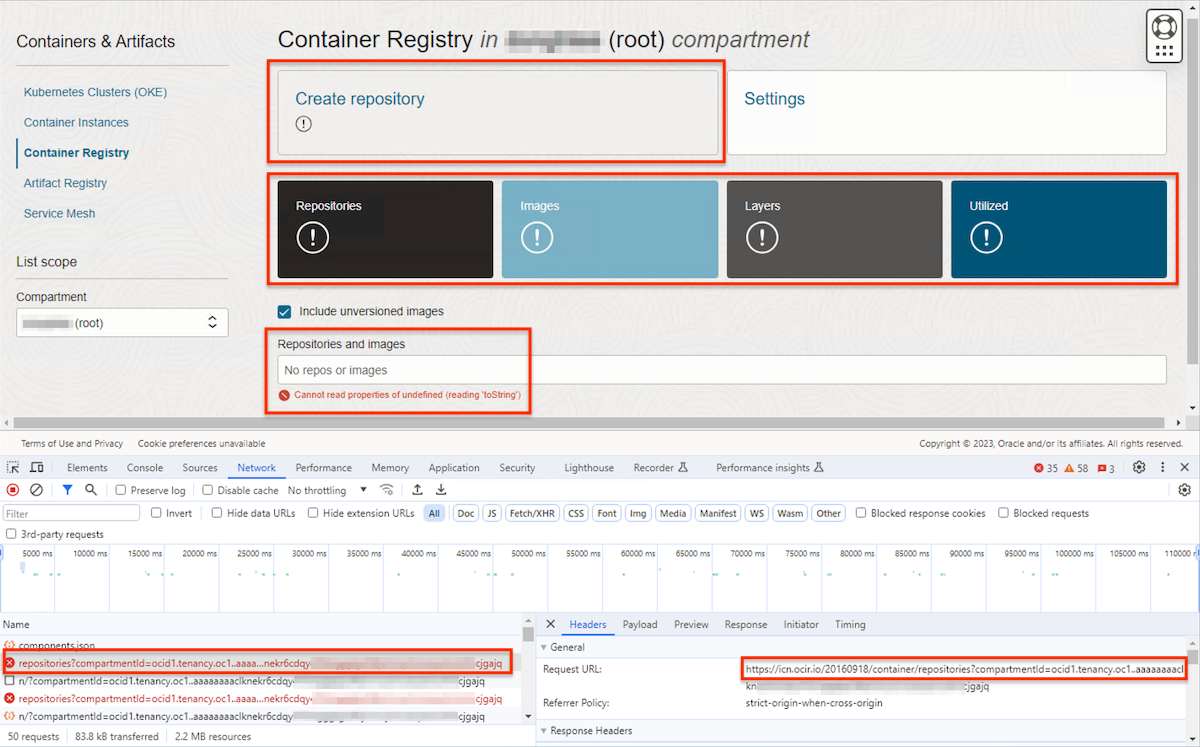
-
브라우저의 Developer Tools을 실행합니다. 아래 툴 중에서 네트워크 탭을 열어 오류 내역을 보면, https://icn.ocir.io 에 접속시 오류가 발생하는 것을 알 수 있습니다.
-
방화벽 등록을 위해 squid.conf 파일에
.ocir.io를 추가합니다. (/etc/squid/squid.conf)... #http_access allow localnet http_access allow localhost # For OCI Console acl oci_console_acl dstdomain .oracle.com .oraclecloud.com .oracleinfinity.io oracle.112.2o7.net acl oci_console_additional_acl dstdomain .ocir.io http_access allow oci_console_acl http_access allow oci_console_additional_acl # And finally deny all other access to this proxy http_access deny all ... -
Squid 재시작
sudo systemctl restart squid -
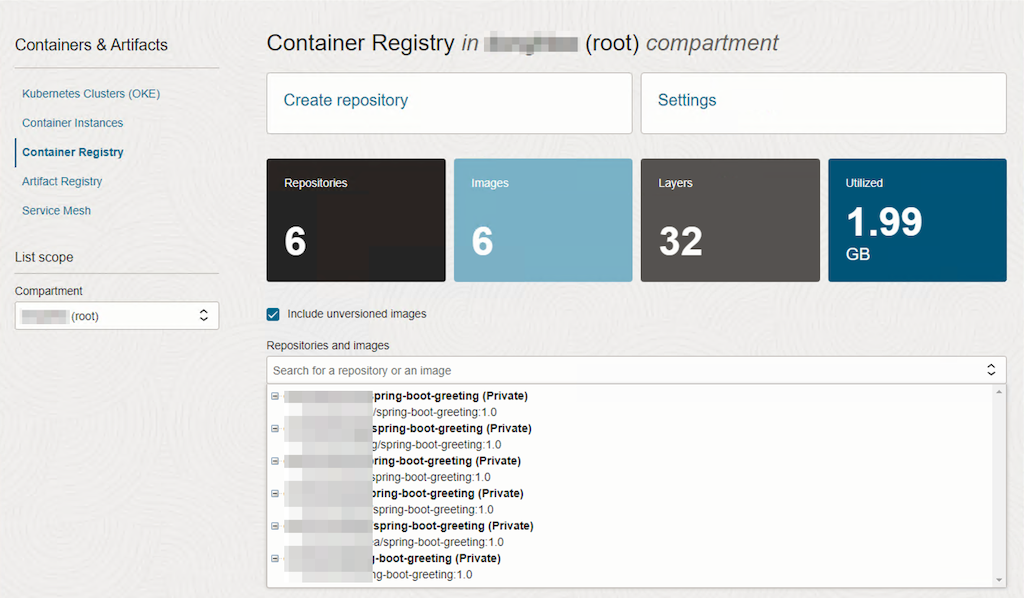
테스트 클라이언트에서 다시 OCI Console에서 OCIR 화면으로 이동합니다. 이제 아래와 같이 잘 보이는 것을 알 수 있습니다.
-
이처럼 방화벽 등록에 필요한 주소가 혹시 추가적으로 필요할 수 있으니, 필요시 위와 같은 방법으로 사전 확인할 수 있습니다.
이 글은 개인으로서, 개인의 시간을 할애하여 작성된 글입니다. 글의 내용에 오류가 있을 수 있으며, 글 속의 의견은 개인적인 의견입니다.