2.2 OKE 클러스터 만들기 - Virtual Nodes
Virtual Nodes를 위한 OCI IAM Policy 만들기
-
OKE Serverless 서비스가 Virtual Nodes 생성할 있도록 권한을 줍니다. 사용중인 테넌시내에서 Virtual Nodes을 사용하겠다고 알려주는 것이기 때문에, 아래 내용을 변경없이 그대로 복사해서 Policy를 만들면 됩니다. 각자 테넌시 환경에 맞게 변경하는 내용이 아닙니다.
- OCI Documentation > Container Engine > Required IAM Policies for Using Virtual Nodes
- Name: 예, oke-virtual-nodes-policy
define tenancy ske as ocid1.tenancy.oc1..aaaaaaaacrvwsphodcje6wfbc3xsixhzcan5zihki6bvc7xkwqds4tqhzbaq

define compartment ske_compartment as ocid1.compartment.oc1..aaaaaaaa2bou6r766wmrh5zt3vhu2rwdya7ahn4dfdtwzowb662cmtdc5fea

endorse any-user to associate compute-container-instances in compartment ske_compartment of tenancy ske with subnets in tenancy where ALL {request.principal.type='virtualnode',request.operation='CreateContainerInstance',request.principal.subnet=2.subnet.id}

endorse any-user to associate compute-container-instances in compartment ske_compartment of tenancy ske with vnics in tenancy where ALL {request.principal.type='virtualnode',request.operation='CreateContainerInstance',request.principal.subnet=2.subnet.id}

endorse any-user to associate compute-container-instances in compartment ske_compartment of tenancy ske with network-security-group in tenancy where ALL {request.principal.type='virtualnode',request.operation='CreateContainerInstance'}
OKE Serverless 클러스터 만들기
-
OCI 콘솔에 로그인합니다.
-
좌측 상단 햄버거 메뉴에서 Developer Services > Containers & Artifacts > Kubernetes Clusters (OKE)로 이동합니다.
-
클러스터 생성을 위해 Create Cluster 버튼을 클릭합니다.
-
빠른 클러스터 생성을 위해 기본선택된 Quick Create 모드를 이용하여 생성합니다.
-
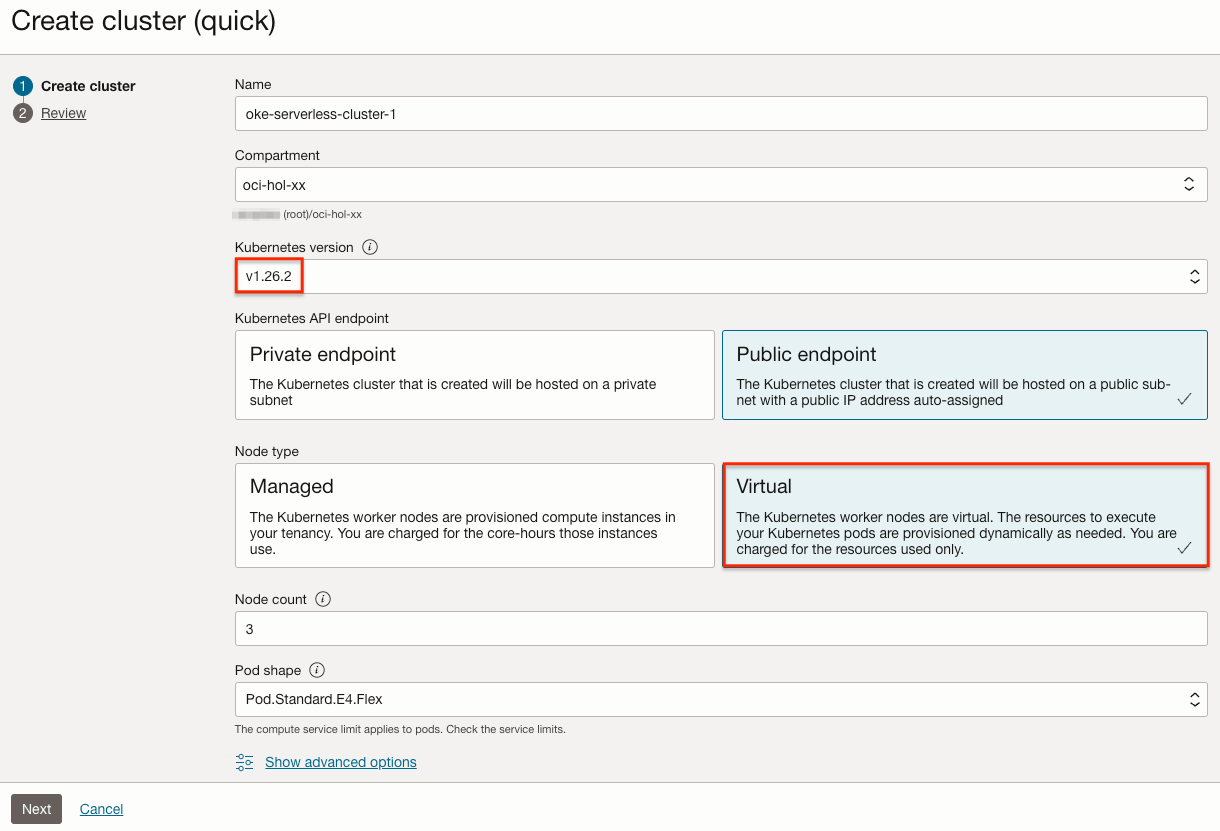
Name
- 예) oke-serverless-cluster-1
-
Kubernetes API Endpoint
- Public API로 접속할 수 있게 기본 선택된 Public Endpoint를 그대로 사용
-
Kuberentes version
-
Virtual Nodes는 v1.25.4 이상에서 지원됩니다.
-
Virtual Nodes는 아직 버전 업그레이드를 지원하지 않으므로, 사용을 원하는 버전을 선택합니다.
-
-
Node type: Virtual을 선택합니다.
-
Node count: 기본값인 3을 그대로 사용합니다.
-
Pod shape: Pod개 배포될 Shape을 선택합니다. E3.Flex, E4.Flex Shape 중에 선택합니다.
- Managed Nodes 처럼 Worker Node의 Compute 인스턴스의 Shape을 고정하는 것이 아닙니다.
- Pod 자원 요청시 지정하는 requests, limits에 따라 자원이 할당되며, Serverless로 OKE가 관리합니다.
-
입력한 정보를 리뷰하고 클러스터를 생성합니다.
-
Quick Create로 클러스터를 생성시 기본 네트워크 자원이 함께 생성됩니다.
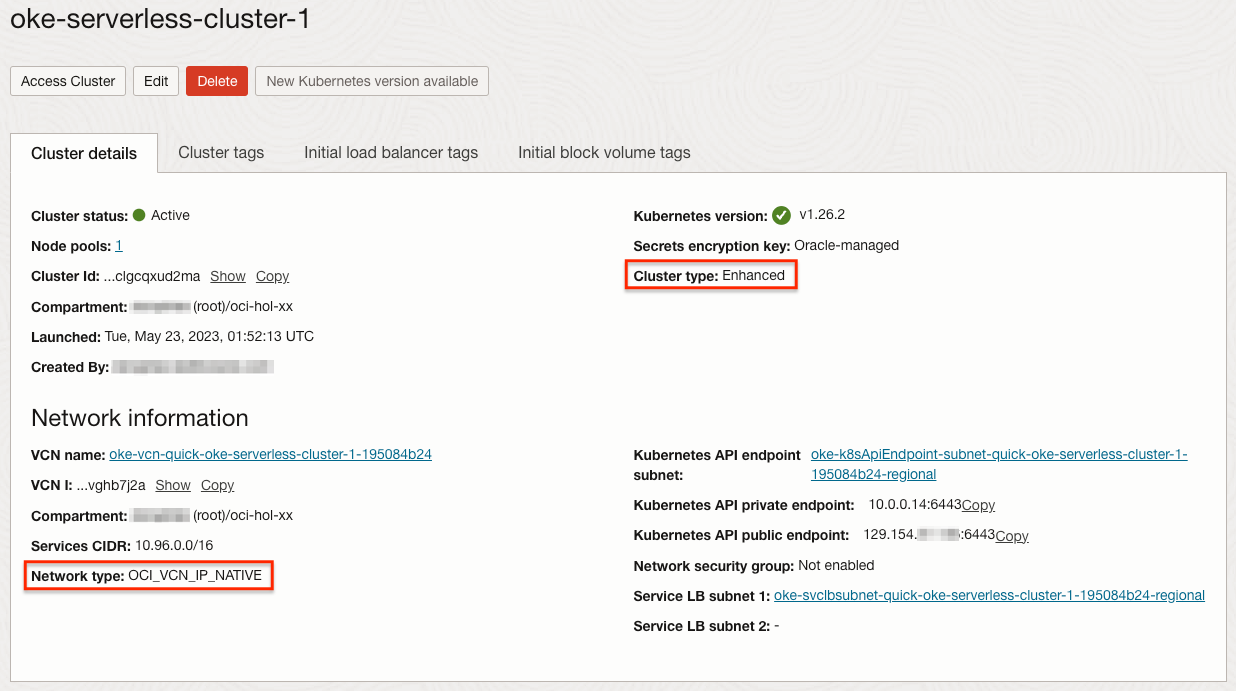
클러스터 생성 확인
-
생성된 클러스터 상세정보를 그림과 같이 Enhanced Cluster이며, Network 타입은 VCN-Native Pod Networking을 사용합니다. Flannel CNI는 지원하지 않습니다.
-
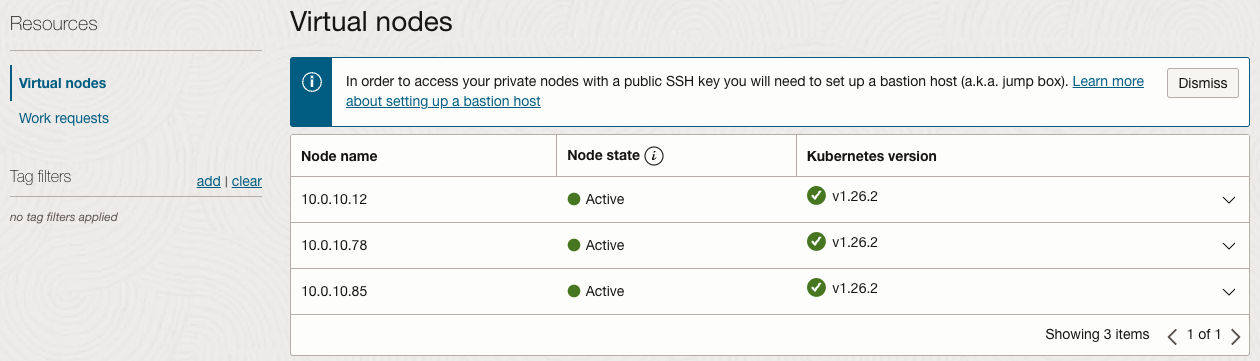
Node Pool 상세 정보에서 Resources > Nodes 정보를 보면 생성된 Worker Nodes를 확인할 수 있습니다. Virtual Nodes로 Pod가 위치할 가상 노드로, Compute 인스턴스가 따라 생성되지 않습니다.
OKE Serverless 클러스터 연결하기
-
연결하는 방법은 기존 OKE 클러스터를 연결하는 방법과 동일합니다.
-
생성한 OKE 클러스터 상세 페이지로 이동하여, Access Cluster를 클릭합니다. 가이드에 따라 사용환경에서 클러스터에 연결합니다.
-
노드 정보를 조회해 봅니다.
$ kubectl get nodes -o wide
NAME         STATUS   ROLES    AGE     VERSION                        INTERNAL-IP   EXTERNAL-IP   OS-IMAGE    KERNEL-VERSION   CONTAINER-RUNTIME
10.0.10.12   Ready    <none>   3m52s   v1.26.2-0.2.169-230516185737   10.0.10.12    <none>        <unknown>   <unknown>        <unknown>
10.0.10.78   Ready    <none>   3m47s   v1.26.2-0.2.169-230516185737   10.0.10.78    <none>        <unknown>   <unknown>        <unknown>
10.0.10.85   Ready    <none>   3m53s   v1.26.2-0.2.169-230516185737   10.0.10.85    <none>        <unknown>   <unknown>        <unknown>
이 글은 개인으로서, 개인의 시간을 할애하여 작성된 글입니다. 글의 내용에 오류가 있을 수 있으며, 글 속의 의견은 개인적인 의견입니다.