1.8.1.2 마이크로서비스 앱에 Istio 적용하기
istioctl, Helm 또는 매뉴얼로 설치가 가능합니다. 여기서는 OKE 문서에서 예시로 설명하고 있는 istioctl 기준으로 설치하고 Istio 문서에 따라 서비스에 적용하는 것을 확인해보겠습니다.
- 공식 문서
Istio 설치
-
Cloud Shell 또는 작업환경에 접속합니다.
-
Istio 다운로드
curl -L https://istio.io/downloadIstio | ISTIO_VERSION=1.18.0 TARGET_ARCH=x86_64 sh - -
Istio 경로로 이동
cd istio-1.18.0 -
PATH 환경 변수에 추가
export PATH=$PWD/bin:$PATH -
사전검증 실행
istioctl x precheck -
설치
istioctl install --set profile=demo --set components.cni.enabled=true -y -
스케일
pod’s disruption budget 기본 1로 설정되어 있는 업그레이드를 고려하여 2개 이상으로 스케일합니다.
kubectl scale --replicas=2 deployment -n istio-system istio-egressgateway
kubectl scale --replicas=2 deployment -n istio-system istio-ingressgateway
kubectl scale --replicas=2 deployment -n istio-system istiod
Istio Enable
productpage 서비스 Istio Enable
-
Istio sidecar 추가하여 재배포
istioctl kube-inject 명령으로 productpage 앱에만 sidecar를 추가합니다.
curl -s https://raw.githubusercontent.com/istio/istio/release-1.18/samples/bookinfo/platform/kube/bookinfo.yaml | istioctl kube-inject -f - | sed 's/replicas: 1/replicas: 3/g' | kubectl apply -l app=productpage,version=v1 -f - -
결과 확인
product Pod내에 istio-proxy 컨테이너가 추가된 것을 볼 수 있습니다.
$ kubectl get pod NAME READY STATUS RESTARTS AGE details-v1-6997d94bb9-8hc7b 1/1 Running 0 24m details-v1-6997d94bb9-cjsn7 1/1 Running 0 24m details-v1-6997d94bb9-sv2p5 1/1 Running 0 24m productpage-v1-5d95bbdf4-hc57h 2/2 Running 0 31s productpage-v1-5d95bbdf4-np89w 2/2 Running 0 39s productpage-v1-5d95bbdf4-r2vsm 2/2 Running 0 35s ratings-v1-b8f8fcf49-2njx4 1/1 Running 0 24m ratings-v1-b8f8fcf49-4x5fj 1/1 Running 0 24m ratings-v1-b8f8fcf49-xmfwq 1/1 Running 0 24m reviews-v1-5896f547f5-47fmg 1/1 Running 0 24m reviews-v1-5896f547f5-8f5dk 1/1 Running 0 24m reviews-v1-5896f547f5-hkhtq 1/1 Running 0 24m sleep-bc9998558-j4nfn 1/1 Running 0 16m $ kubectl describe pod productpage-v1-5d95bbdf4-hc57h Name: productpage-v1-5d95bbdf4-hc57h ... Containers: productpage: Container ID: cri-o://db9f656afa376e55c5a826a678f8aa440de22f47187f61ed70b6b34406e0df7d Image: docker.io/istio/examples-bookinfo-productpage-v1:1.17.0 ... istio-proxy: Container ID: cri-o://546cfa16ea4df577548cd6705e07a4cc757e7bcd820f505fe89fa2f9d592e5c3 Image: docker.io/istio/proxyv2:1.18.0 -
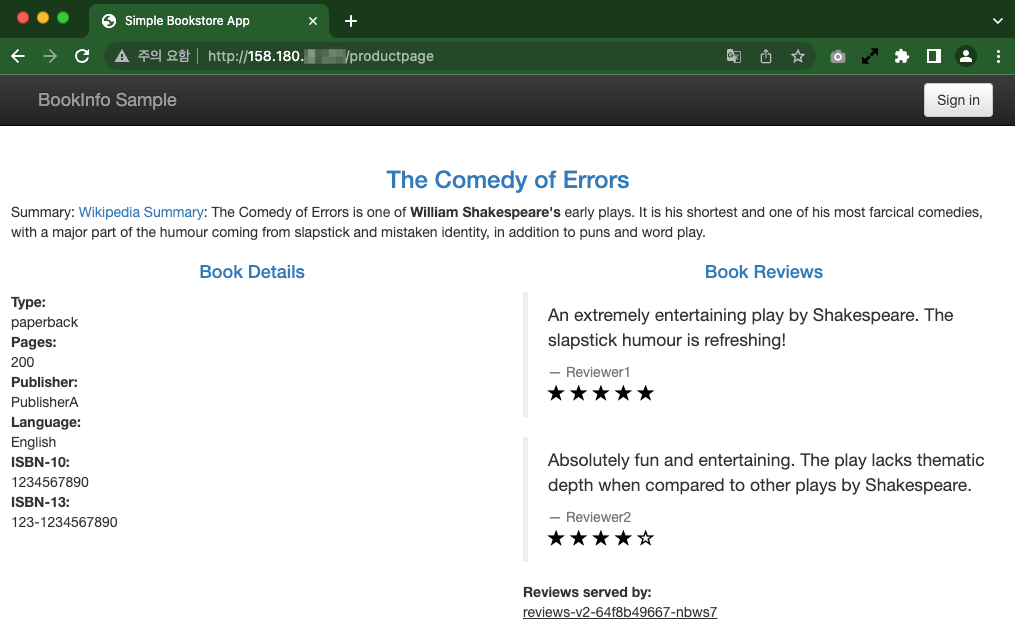
앞서와 동일하게 productpage 페이지를 접속합니다.
- http://{productpage external ip}:9080/productpage
-
istio-proxy 로그 확인
웹페이지가 이전과 동일하게 접속이 되고 추가적으로 istio-proxy를 통해서 거쳐가는 것을 알 수 있습니다.
$ kubectl logs -l app=productpage -c istio-proxy -f
...
[2023-07-05T04:53:41.213Z] "GET /details/0 HTTP/1.1" 200 - via_upstream - "-" 0 178 2 1 "-" "Mozilla/5.0 (Macintosh; Intel Mac OS X 10_15_7) AppleWebKit/537.36 (KHTML, like Gecko) Chrome/114.0.0.0 Safari/537.36" "3bbac68e-a868-97f2-a325-2c9a94783a4a" "details:9080" "10.244.0.146:9080" outbound|9080||details.default.svc.cluster.local 10.244.0.32:37298 10.96.74.5:9080 10.244.0.32:54698 - default
[2023-07-05T04:53:41.221Z] "GET /reviews/0 HTTP/1.1" 200 - via_upstream - "-" 0 358 480 480 "-" "Mozilla/5.0 (Macintosh; Intel Mac OS X 10_15_7) AppleWebKit/537.36 (KHTML, like Gecko) Chrome/114.0.0.0 Safari/537.36" "3bbac68e-a868-97f2-a325-2c9a94783a4a" "reviews:9080" "10.244.0.151:9080" outbound|9080||reviews.default.svc.cluster.local 10.244.0.32:35808 10.96.29.37:9080 10.244.0.32:35886 - default
[2023-07-05T04:53:41.205Z] "GET /productpage HTTP/1.1" 200 - via_upstream - "-" 0 4294 520 520 "-" "Mozilla/5.0 (Macintosh; Intel Mac OS X 10_15_7) AppleWebKit/537.36 (KHTML, like Gecko) Chrome/114.0.0.0 Safari/537.36" "3bbac68e-a868-97f2-a325-2c9a94783a4a" "129.154.60.198:9080" "10.244.0.32:9080" inbound|9080|| 127.0.0.6:41455 10.244.0.32:9080 10.244.0.1:10500 - default
전체 서비스 Istio Enable
-
다음 명령을 통해 Review v2와 나머지 서비스들에도 Istio를 활성화합니다.
curl -s https://raw.githubusercontent.com/istio/istio/release-1.18/samples/bookinfo/platform/kube/bookinfo.yaml | istioctl kube-inject -f - | kubectl apply -l app!=reviews -f - curl -s https://raw.githubusercontent.com/istio/istio/release-1.18/samples/bookinfo/platform/kube/bookinfo.yaml | istioctl kube-inject -f - | kubectl apply -l app=reviews,version=v1 -f - curl -s https://raw.githubusercontent.com/istio/istio/release-1.18/samples/bookinfo/platform/kube/bookinfo.yaml | istioctl kube-inject -f - | kubectl apply -l app=reviews,version=v2 -f - -
실행결과
Istio-proxy가 추가 되어 Pod당 컨테이너가 2개로 보이면, bookinfo.yaml이 재적용되어 replica=1임을 참고합니다.
$ kubectl get pod NAME READY STATUS RESTARTS AGE details-v1-654f694d5-tpwnm 2/2 Running 0 37s productpage-v1-5d95bbdf4-np89w 2/2 Running 0 4m42s ratings-v1-7596d9bcfc-ktnrk 2/2 Running 0 36s reviews-v1-7d74558c8d-t9j5l 1/1 Running 0 28s reviews-v2-64f8b49667-nbws7 2/2 Running 0 15s sleep-bc9998558-j4nfn 1/1 Running 0 20m -
참고
아래와 같이 istio-injection 레이블을 달면 해당 네임스페이스에 배포되는 pod는 자동으로 istio sidecar가 추가됩니다.
kubectl label namespace <NAMESPACE_NAME> istio-injection=enabled
Istio Ingress Gateway 설정
앞서 다른 장에서 Ingress Controller로 nginx ingress controller를 사용하였습니다. 마이크로 서비스들에 대한 컨트롤을 위해 서비스들에 대해서 Istio의 Ingress Gateway를 사용하도록 설정합니다.
-
참고문서
-
Gateway: 서비스 메쉬로 들어오고 나가는 트래픽에 대한 로드 밸런서 정보를 기술합니다.
-
VirtualService: 트래픽에 대한 라우팅 규칙을 지정합니다.
-
아래 내용으로 예제인 book-info에 대한 Istio Ingress Gateway를 생성합니다.
kubectl apply -f - <<EOF apiVersion: networking.istio.io/v1alpha3 kind: Gateway metadata: name: bookinfo-gateway spec: selector: istio: ingressgateway # use Istio default gateway implementation servers: - port: number: 80 name: http protocol: HTTP hosts: - "*" --- apiVersion: networking.istio.io/v1alpha3 kind: VirtualService metadata: name: bookinfo spec: hosts: - "*" gateways: - bookinfo-gateway http: - match: - uri: exact: /productpage - uri: exact: /login - uri: exact: /logout - uri: prefix: /static route: - destination: host: productpage port: number: 9080 EOF -
Istio Ingress Gateway를 통한 접속을 위해 IP를 확인합니다.
$ kubectl get svc -n istio-system NAME TYPE CLUSTER-IP EXTERNAL-IP PORT(S) AGE istio-egressgateway ClusterIP 10.96.158.40 <none> 80/TCP,443/TCP 17m istio-ingressgateway LoadBalancer 10.96.152.102 158.180.xx.xxx 15021:32155/TCP,80:30404/TCP,443:30195/TCP,31400:31326/TCP,15443:31202/TCP 17m istiod ClusterIP 10.96.202.142 <none> 15010/TCP,15012/TCP,443/TCP,15014/TCP 17m -
접속 확인
Metric 모니터링
-
Prometheus & Grafana 설치
kubectl apply -f https://raw.githubusercontent.com/istio/istio/release-1.18/samples/addons/prometheus.yaml kubectl apply -f https://raw.githubusercontent.com/istio/istio/release-1.18/samples/addons/grafana.yaml -
설치된 Grafana 대쉬보드를 외부에서 접근
- 옵션 #1:
- istioctl dashboard grafana 명령으로 로컬 프락시를 통해 접속할 수 있습니다. Cloud Shell는 Public IP 및 외부 접속을 허용하지 않아, 외부 접속이 필요하면 관련 설정이 필요합니다.
- 옵션 #2:
- Istio Ingress Gateway를 통한 외부 접속을 설정할 수 있습니다.
- 설정을 통해 외부 접속 설정- https://istio.io/latest/docs/tasks/observability/gateways/
- 옵션 #1:
-
공식 문서를 참고하여 외부 접속을 설정합니다.
-
외부 접속 설정 예시
-
설정을 위한 도메인 설정
-
Istio Ingress Gateway의 External IP를 확인하여, DNS 서버에 설정하거나, 클라이언트의 /etc/hosts 파일의 설정합니다. 사용할 도메인 주소를 입력합니다.
export INGRESS_DOMAIN="istio.thekoguryo.xyz"
-
-
외부 접속 오픈
cat <<EOF | kubectl apply -f - apiVersion: networking.istio.io/v1alpha3 kind: Gateway metadata: name: grafana-gateway namespace: istio-system spec: selector: istio: ingressgateway servers: - port: number: 80 name: http-grafana protocol: HTTP hosts: - "grafana.${INGRESS_DOMAIN}" --- apiVersion: networking.istio.io/v1alpha3 kind: VirtualService metadata: name: grafana-vs namespace: istio-system spec: hosts: - "grafana.${INGRESS_DOMAIN}" gateways: - grafana-gateway http: - route: - destination: host: grafana port: number: 3000 --- apiVersion: networking.istio.io/v1alpha3 kind: DestinationRule metadata: name: grafana namespace: istio-system spec: host: grafana trafficPolicy: tls: mode: DISABLE --- EOF -
-
테스트 데이타 발생
- productpage의 Istio Ingress Gateway를 통해 접속하여 테스트 데이타를 발생시킵니다.
- 테스트 앱 페이지 예시, http://158.180.xxx.xx/productpage
- productpage의 Istio Ingress Gateway를 통해 접속하여 테스트 데이타를 발생시킵니다.
-
Grafana 접속
-
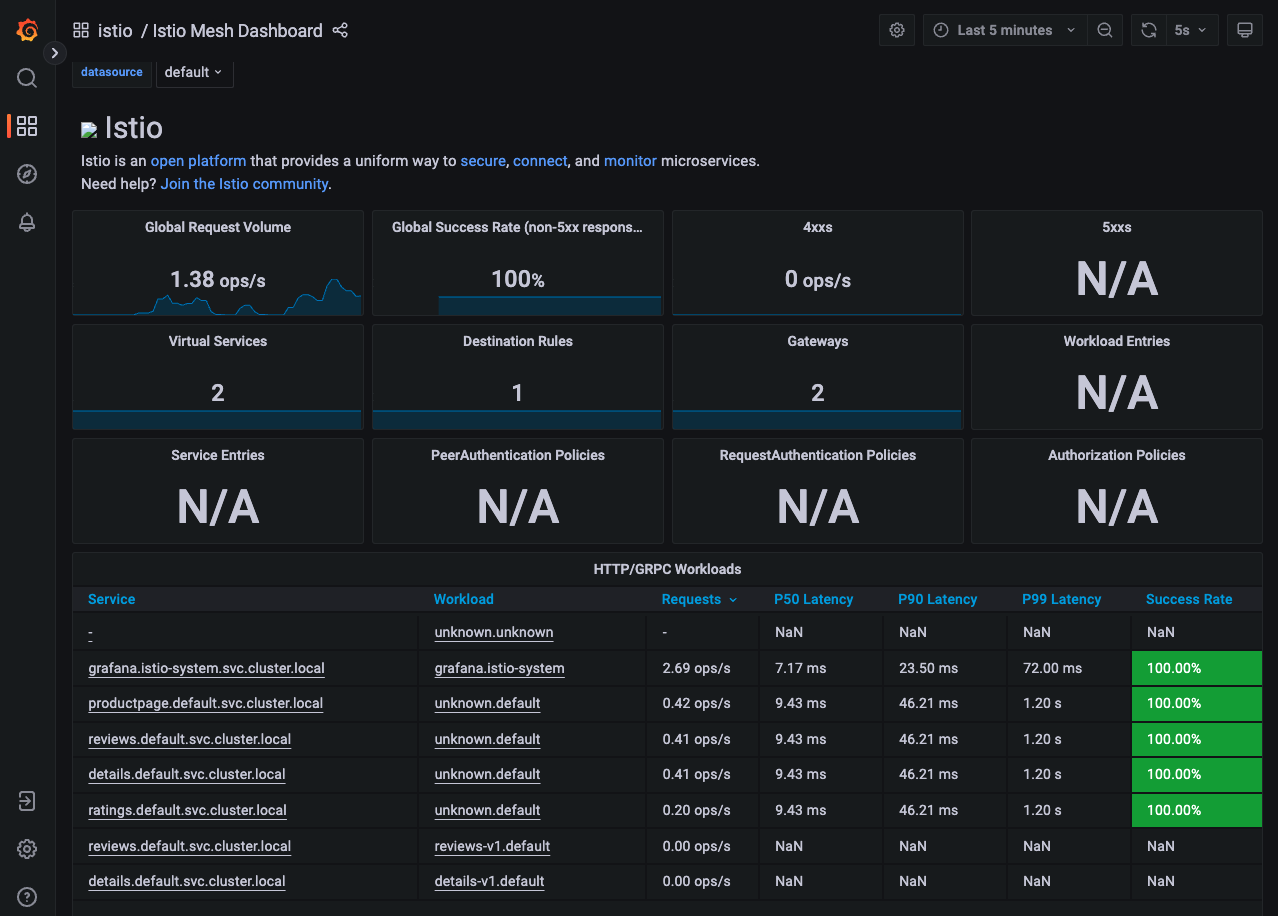
설정한 주소로 접속하면 Istio에서 제공하고 있는 기본 대쉬보드를 확인할 수 있습니다.
-
Grafana 대쉬보드를 보면 각 서비스의 처리 청보를 확인할 수 있습니다.
분산 추적(Distributed Tracing)
마이크로 서비스는 클라이언트의 요청을 분산된 서비스를 통해 처리한 후 클라이언트에게 응답합니다. 예시로 사용하고 있는 Bookinfo 앱도 productpage 서비스가 뒷단 서비스에서 취합한 정보를 클라이언트에게 제공하고 있습니다. 이러한 분산환경에서 클라이언트의 요청에 대한 서비스 들간의 호출 정보를 추적하기 위한 여러가지 툴들이 있습니다. Istio에서는 Envoy의 분산 추적에 대한 기능을 활용하여, Jaeger, Zipkin, LightStep 등의 툴을 활용할 수 있습니다. 여기서는 Zipkin을 통한 방법을 확인해 보겠습니다. 그외 툴들은 관련 페이지를 참고하세요.
Zipkin
-
Zipkin 설치
kubectl apply -f https://raw.githubusercontent.com/istio/istio/release-1.18/samples/addons/extras/zipkin.yaml -
설치된 Zipkin 페이지를 외부에서 접근
- Grafana와 동일하게 옵션 #2: 외부 접속을 사용합니다.
- 공식 문서를 참고하여 외부 접속을 설정합니다.
-
외부 접속 설정 예시
-
설정을 위한 도메인 설정
export INGRESS_DOMAIN="istio.thekoguryo.xyz" -
외부 접속 오픈
cat <<EOF | kubectl apply -f - apiVersion: networking.istio.io/v1alpha3 kind: Gateway metadata: name: tracing-gateway namespace: istio-system spec: selector: istio: ingressgateway servers: - port: number: 80 name: http-tracing protocol: HTTP hosts: - "tracing.${INGRESS_DOMAIN}" --- apiVersion: networking.istio.io/v1alpha3 kind: VirtualService metadata: name: tracing-vs namespace: istio-system spec: hosts: - "tracing.${INGRESS_DOMAIN}" gateways: - tracing-gateway http: - route: - destination: host: tracing port: number: 80 --- apiVersion: networking.istio.io/v1alpha3 kind: DestinationRule metadata: name: tracing namespace: istio-system spec: host: tracing trafficPolicy: tls: mode: DISABLE --- EOF -
-
테스트 데이타 발생
- productpage의 Istio Ingress Gateway를 통해 접속하여 테스트 데이타를 발생시킵니다.
-
Zipkin 페이지 접속합니다.
-
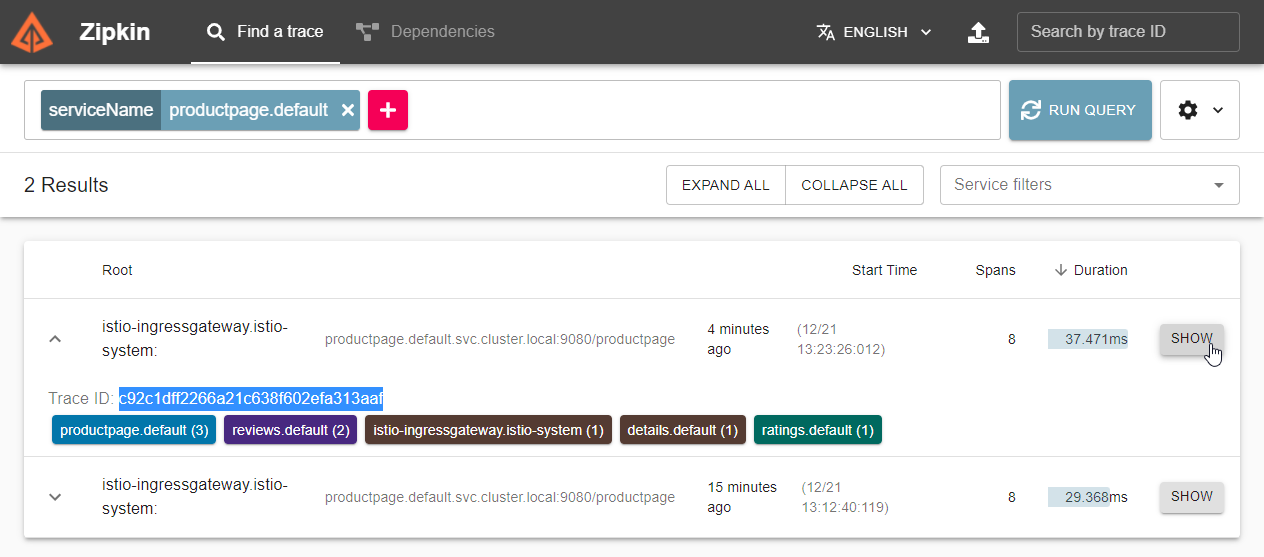
서비스 추적 테스트
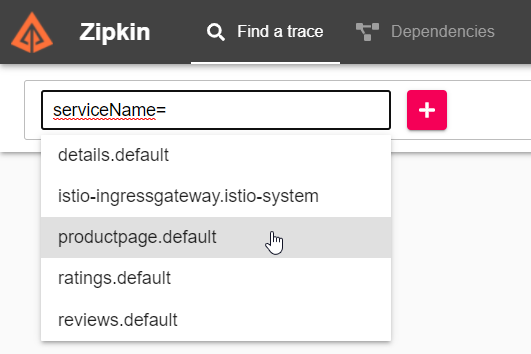
- Find a trace 화면에서 빨간 플러스 기호를 클릭하여 검색할 서비스를 설정하고 쿼리를 실행합니다.
-
조회 결과를 확인하고 추적할 건에 대해서 오른쪽 SHOW를 클릭합니다.
-
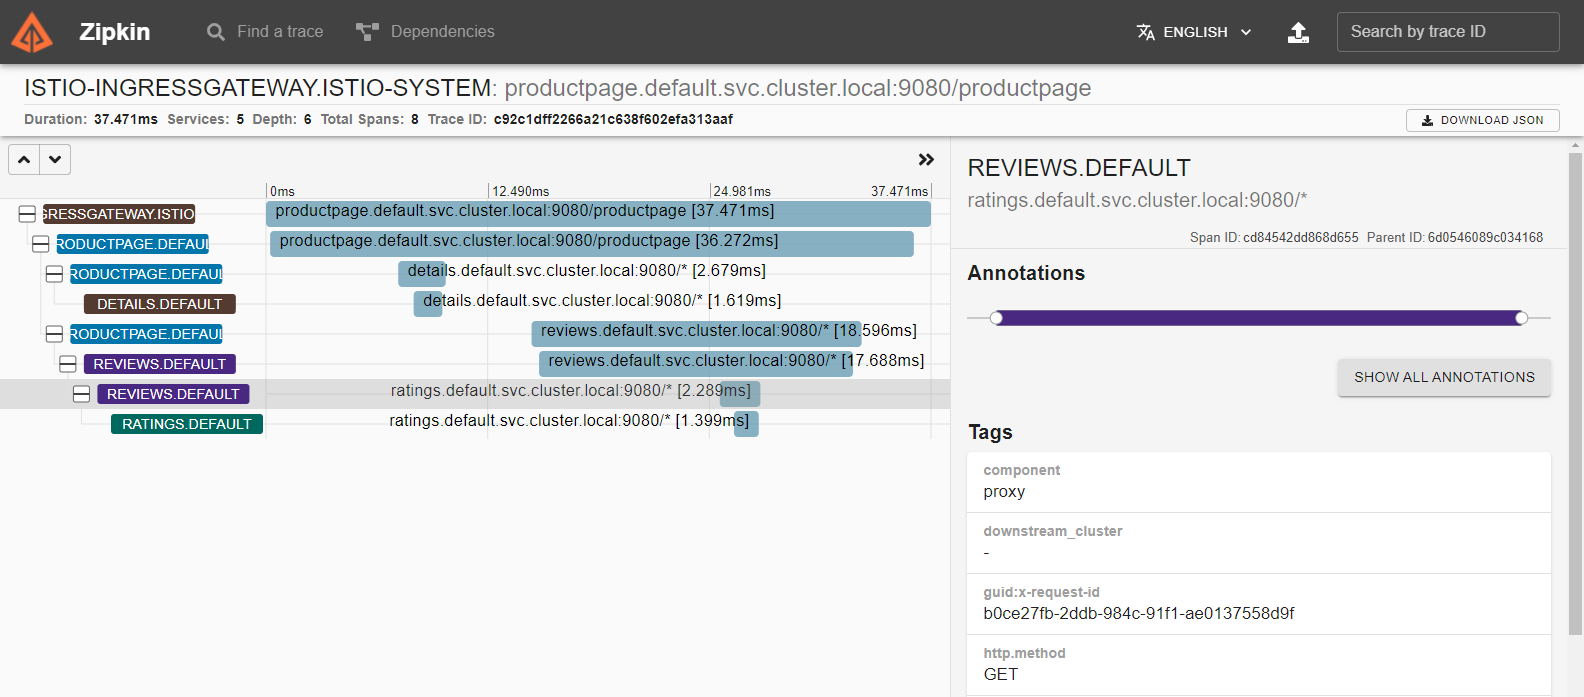
해당 요청건에 대한 서비스간 호출 관계, 시간 및 각 서비스에 대한 태그 정보를 볼 수 있습니다.
-
Trace ID로 추적
-
각 요청건에 대해서 Span ID(Trace ID)를 통해 추적할 수 있습니다. 로그에서 확인할 수 있습니다.

-
화면 오른쪽 상단의 Trace ID 검색창을 통해서 바로 검색하면, 해당 요청건을 바로 확인할 수 있습니다.

-
서비스 메쉬 시각화
마이크로 서비스는 클라이언트의 요청을 분산된 서비스를 통해 처리한 후 클라이언트에게 응답합니다. 예시로 사용하고 있는 Bookinfo 앱도 productpage 서비스가 뒷단 서비스에서 취합한 정보를 클라이언트에게 제공하고 있습니다. 이러한 분산환경에서 클라이언트의 요청에 대한 서비스 들간의 호출 정보를 시각화를 Kiali를 통해 제공하고 있습니다.
-
Kiali 설치
kubectl apply -f https://raw.githubusercontent.com/istio/istio/release-1.18/samples/addons/kiali.yaml -
설치된 Kiali 페이지를 외부에서 접근
- Grafana와 동일하게 옵션 #2: 외부 접속을 사용합니다.
- 공식 문서를 참고하여 외부 접속을 설정합니다.
-
외부 접속 설정 예시
-
설정을 위한 도메인 설정
export INGRESS_DOMAIN="istio.thekoguryo.xyz" -
외부 접속 오픈
cat <<EOF | kubectl apply -f - apiVersion: networking.istio.io/v1alpha3 kind: Gateway metadata: name: kiali-gateway namespace: istio-system spec: selector: istio: ingressgateway servers: - port: number: 80 name: http-kiali protocol: HTTP hosts: - "kiali.${INGRESS_DOMAIN}" --- apiVersion: networking.istio.io/v1alpha3 kind: VirtualService metadata: name: kiali-vs namespace: istio-system spec: hosts: - "kiali.${INGRESS_DOMAIN}" gateways: - kiali-gateway http: - route: - destination: host: kiali port: number: 20001 --- apiVersion: networking.istio.io/v1alpha3 kind: DestinationRule metadata: name: kiali namespace: istio-system spec: host: kiali trafficPolicy: tls: mode: DISABLE --- EOF -
-
테스트 데이타 발생
- productpage의 Istio Ingress Gateway를 통해 접속하여 테스트 데이타를 발생시킵니다.
-
Kiali 대쉬보드 접속합니다.
-
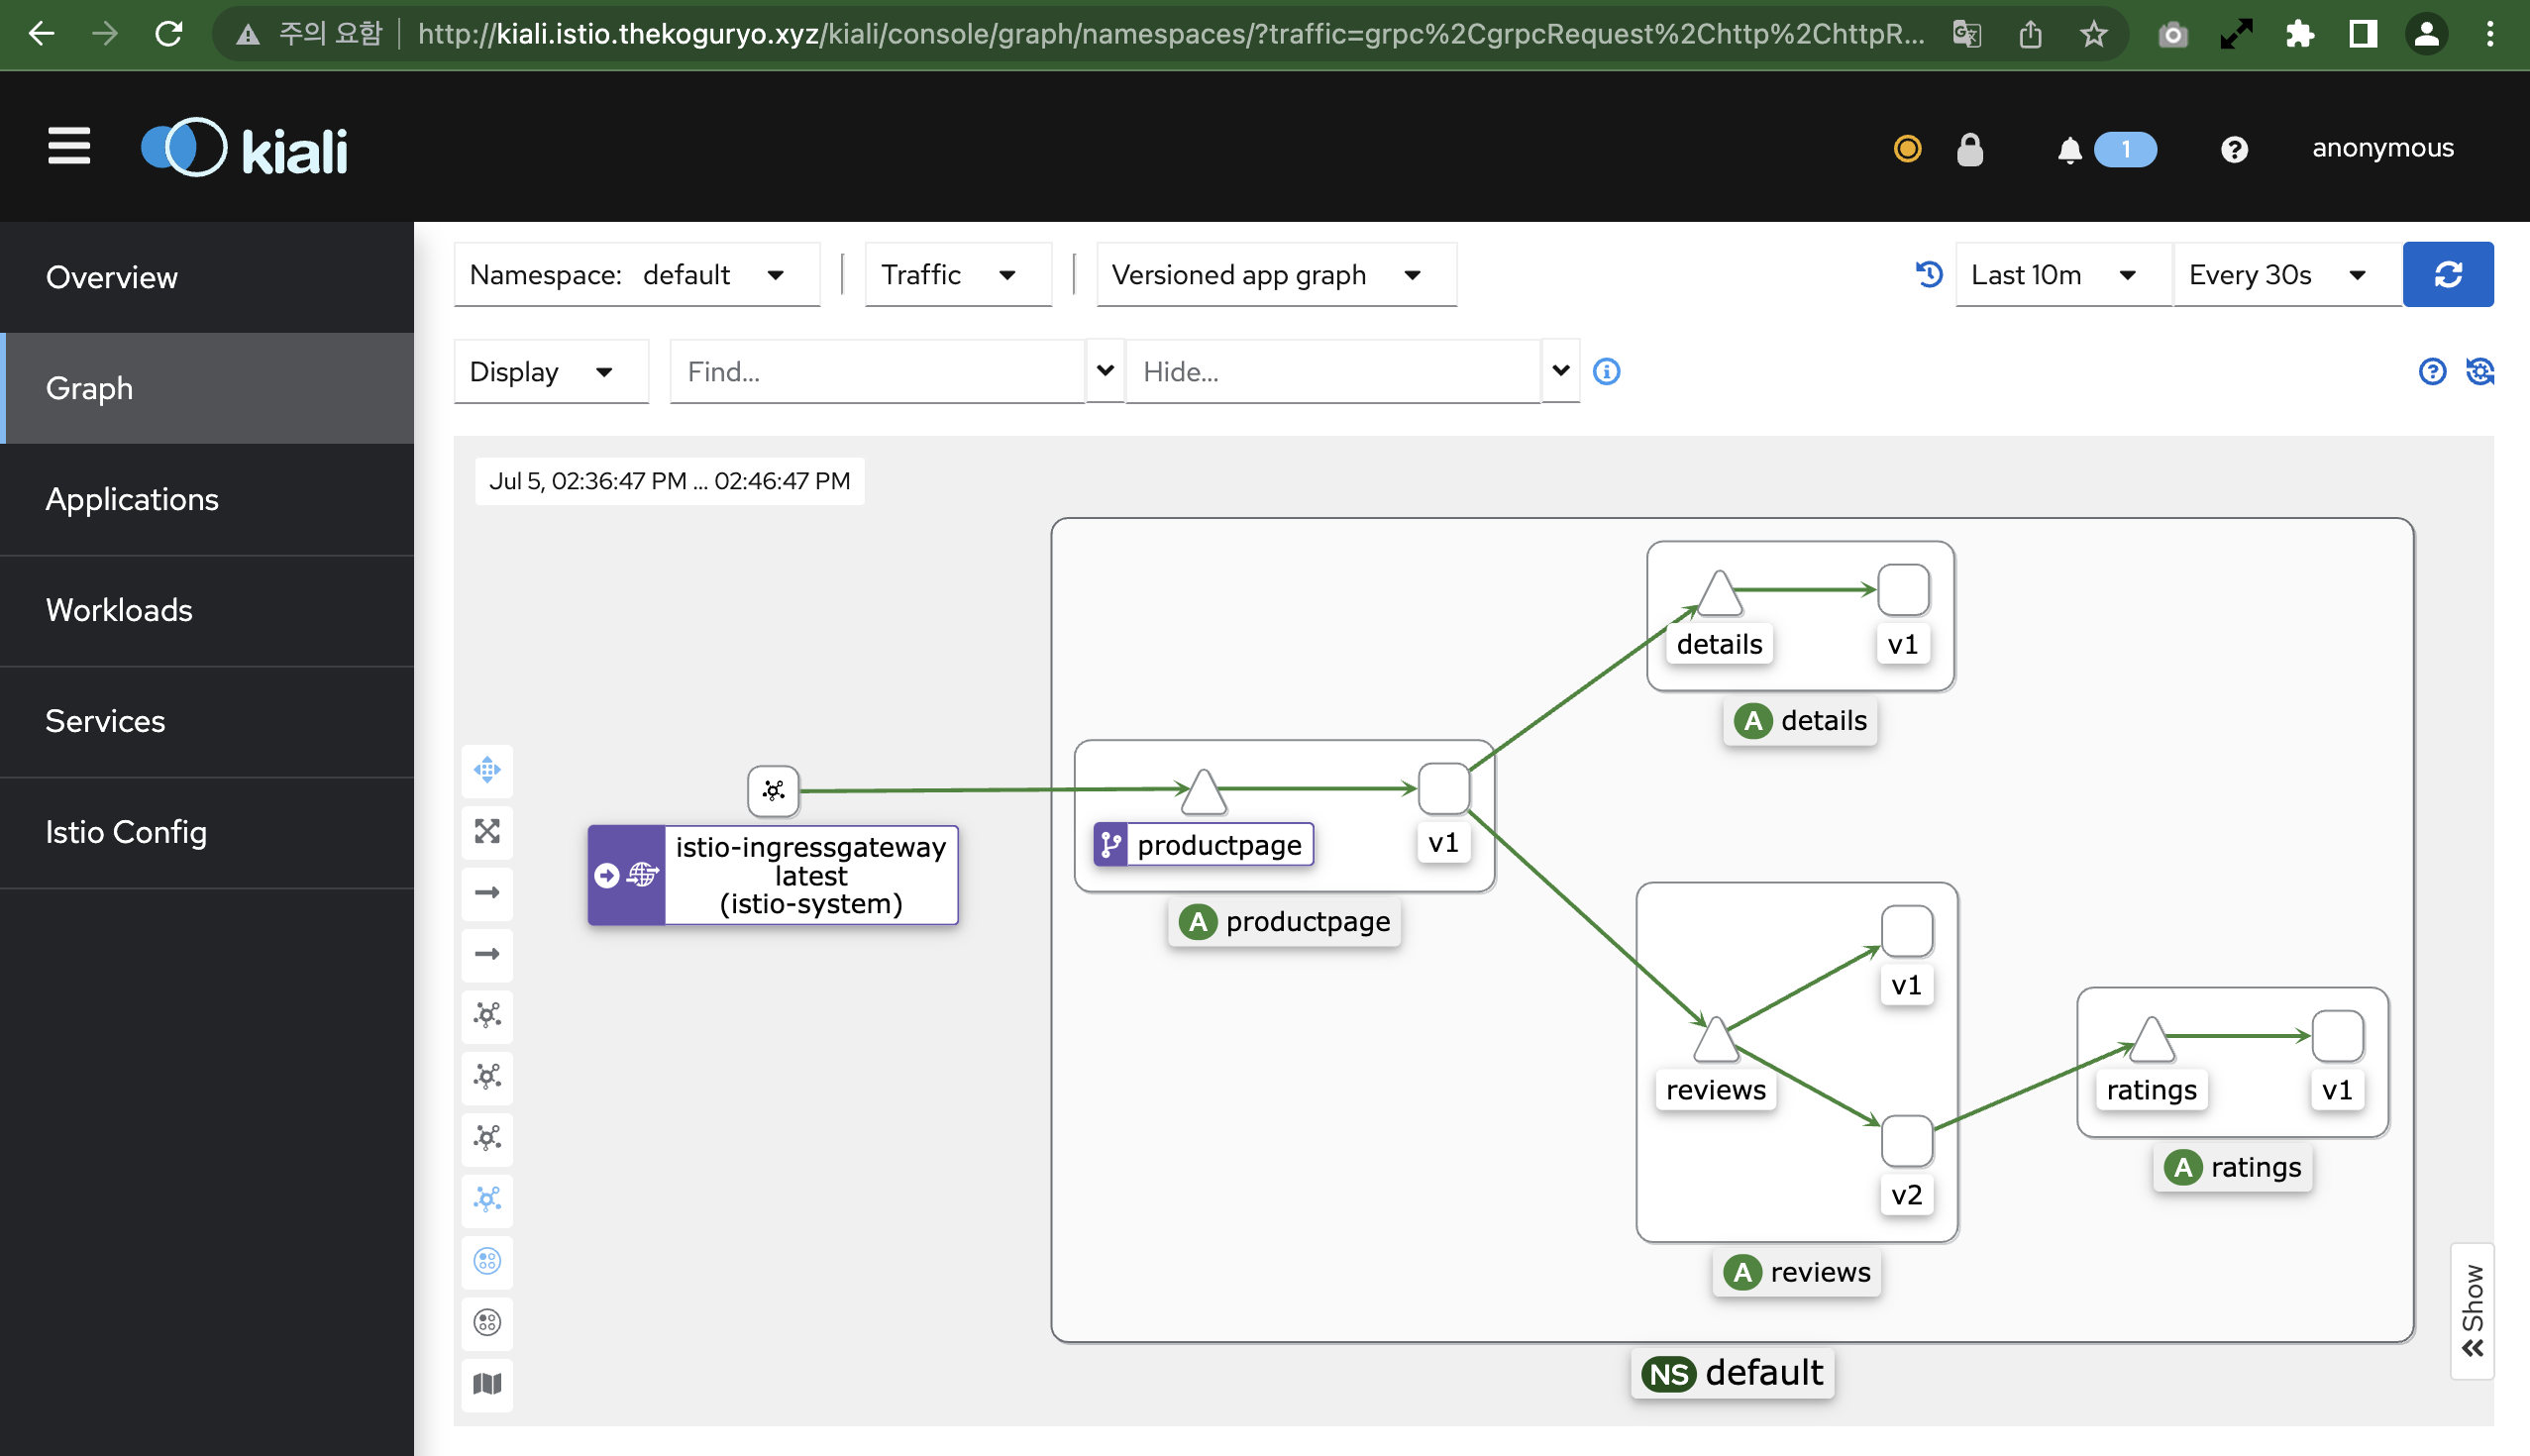
내비게이션 메뉴에서 Graph를 클릭하면, 서비스 간의 호출 정보를 시각화해서 볼 수 있습니다.
Reviews 새 버전 배포
Reviews v3 배포
-
Reviews v3 버전을 배포합니다.
Istio가 활성화 된 상태에서 버전 업데이트를 가정하여 v3를 배포합니다.
curl -s https://raw.githubusercontent.com/istio/istio/release-1.18/samples/bookinfo/platform/kube/bookinfo.yaml | istioctl kube-inject -f - | kubectl apply -l app=reviews,version=v3 -f - -
배포 결과 확인
$ kubectl get pod NAME READY STATUS RESTARTS AGE ... reviews-v2-64f8b49667-bhh6j 2/2 Running 0 14m reviews-v3-6566d5c446-frgfc 2/2 Running 0 41s ... -
productpage의 Istio Ingress Gateway를 통해 접속하여 테스트합니다.
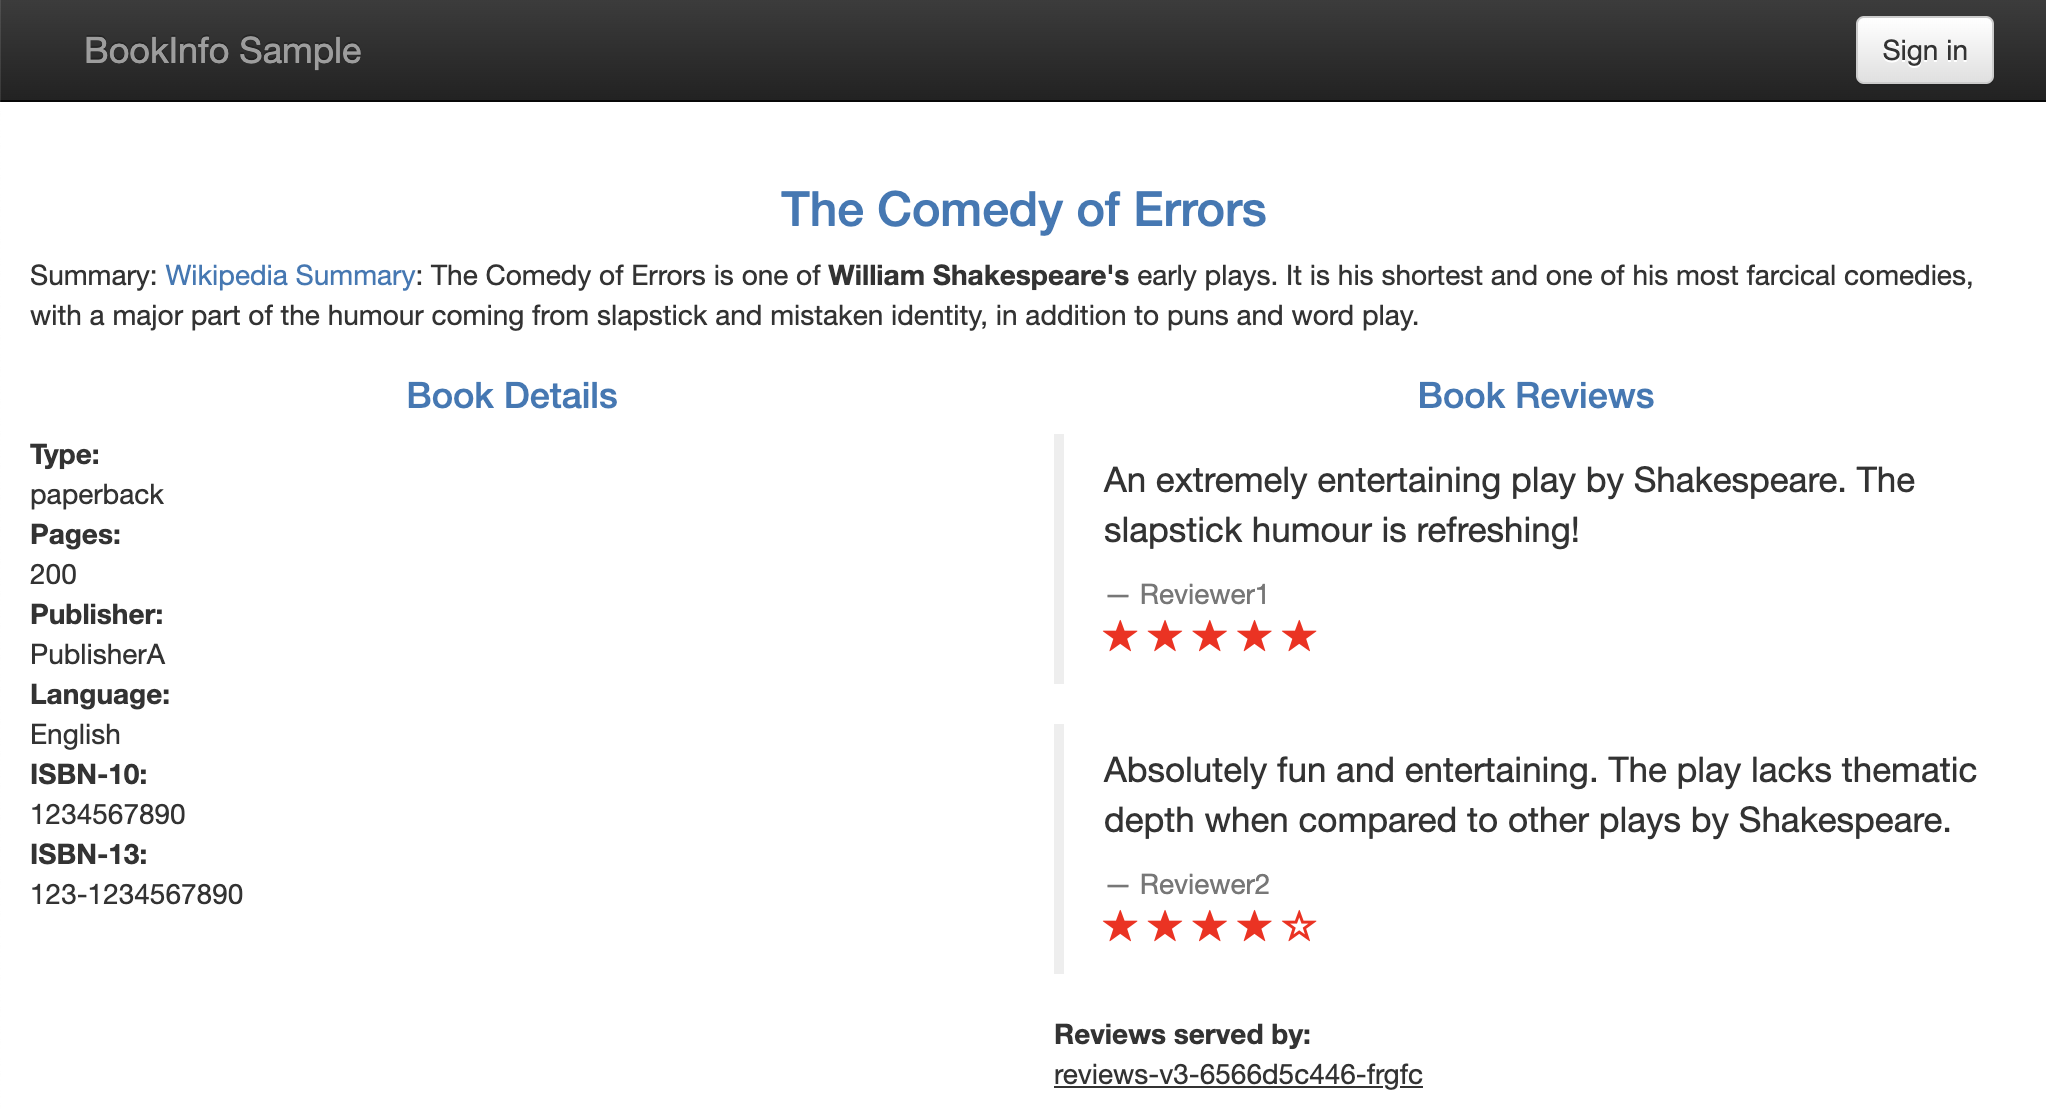
- Reviews v2과 Reviews v3는 각각 Pod 하나로 분배규칙을 따라 설정하지 않았기 때문에, 한번씩 라우팅됩니다. Reviews v2(검은 별점)과 Reviews v3(빨간 별점)이 한번시 표시되는 것을 볼수 있습니다.
가중치 기반 라우팅
신규 버전의 완전한 서비스 전에 검증을 위해 가중치 기반의 일부 요청만 라우팅되도록 하는 시나리오를 확인 해 봅니다.
-
배포된 Reviews Pod의 버전 레이블을 확인합니다. 각각 version=v2, version=v3이 할당되어 있습니다.
$ kubectl get pod -L version NAME READY STATUS RESTARTS AGE VERSION details-v1-654f694d5-7xs5d 2/2 Running 0 26m v1 productpage-v1-5d95bbdf4-thlpj 2/2 Running 0 26m v1 ratings-v1-7596d9bcfc-g7srf 2/2 Running 0 26m v1 reviews-v2-64f8b49667-bhh6j 2/2 Running 0 25m v2 reviews-v3-6566d5c446-frgfc 2/2 Running 0 11m v3 sleep-bc9998558-j4nfn 1/1 Running 0 84m -
레이블 기준으로 라우팅을 위해 Istio에 필요한 아래 설정을 배포합니다.
- DestinationRule: 서비스 엔드포인트에 대해서 labels로 필터링. 테스트 예제에서는 Service Type이 아닌, Pod에만 version label이 있음. Pod의 label로 하는 것 같음
- VirtualService: 정의한 destination에 대해서 weight 기준으로 분배함. weight의 총합은 100이어야함. 100번 중에 90번, 10번 이렇게 정확한 분배가 아닌, 확률로 추측됨.
kubectl apply -f - <<EOF apiVersion: networking.istio.io/v1alpha3 kind: VirtualService metadata: name: reviews spec: hosts: - reviews http: - route: - destination: host: reviews subset: v2 weight: 90 - destination: host: reviews subset: v3 weight: 10 --- apiVersion: networking.istio.io/v1alpha3 kind: DestinationRule metadata: name: reviews spec: host: reviews subsets: - name: v1 labels: version: v1 - name: v2 labels: version: v2 - name: v3 labels: version: v3 EOF -
아래와 같이 반복 테스트합니다.
ISTIO_INGRESS_LB_IP=`kubectl get svc istio-ingressgateway -n istio-system -o jsonpath='{.status.loadBalancer.ingress[0].ip}'` counter=1; \ while [ $counter -lt 20 ]; \ do curl -s http://${ISTIO_INGRESS_LB_IP}/productpage | grep color | head -1; counter=$(( $counter + 1 )); \ done -
테스트 결과
20중에 18번 검은색 별표, 2번 빨간색 별표임을 알수 있습니다. 확률로 정확이 딱 안 맞을 수 있습니다.
$ ISTIO_INGRESS_LB_IP=`kubectl get svc istio-ingressgateway -n istio-system -o jsonpath='{.status.loadBalancer.ingress[0].ip}'` )$ $ counter=1; \ > while [ $counter -lt 20 ]; \ > do > curl -s http://${ISTIO_INGRESS_LB_IP}/productpage | grep color | head -1; > counter=$(( $counter + 1 )); \ > done <font color="black"> <font color="black"> <font color="black"> <font color="black"> <font color="black"> <font color="black"> <font color="black"> <font color="black"> <font color="black"> <font color="red"> <font color="black"> <font color="black"> <font color="black"> <font color="red"> <font color="black"> <font color="black"> <font color="black"> <font color="black"> <font color="black"> -
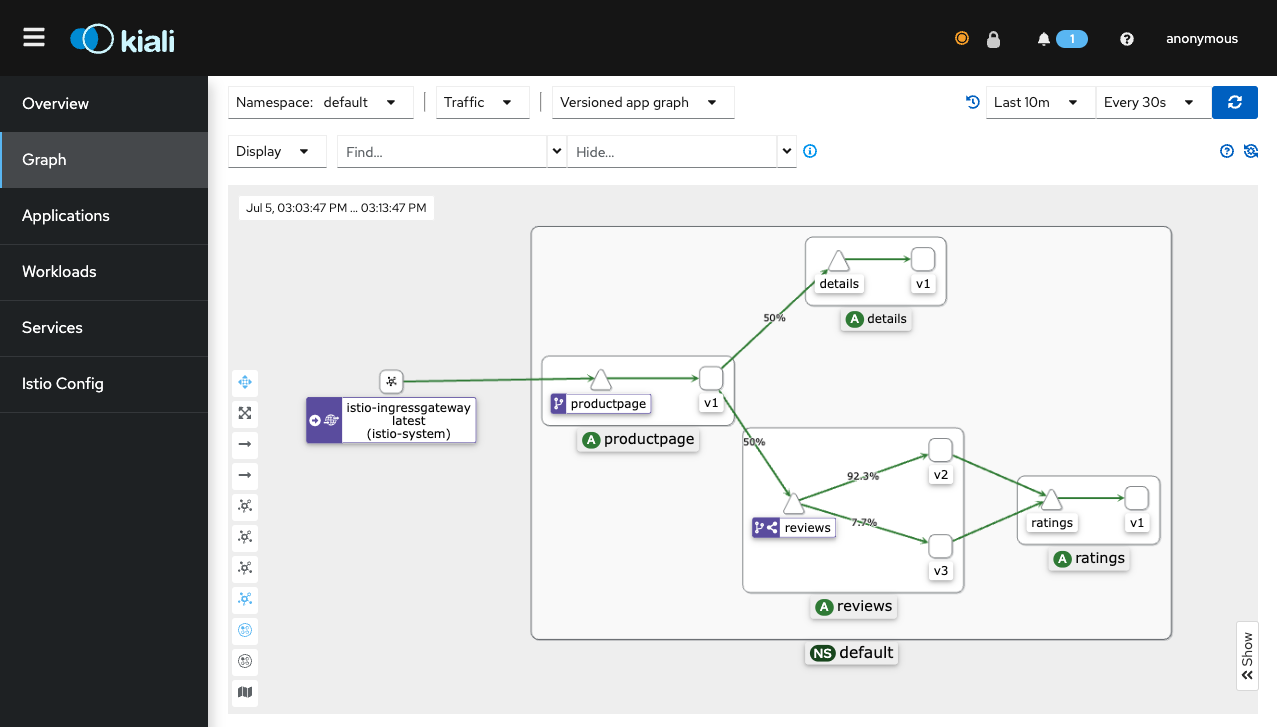
Kiali에 호출 흐름 확인
아래그림에서 보듯이 Reviews v2, v3에 설정한 가중치에 맞게 분배되는 것을 볼 수 있습니다.
이 글은 개인으로서, 개인의 시간을 할애하여 작성된 글입니다. 글의 내용에 오류가 있을 수 있으며, 글 속의 의견은 개인적인 의견입니다.