1.3.4 Cluster Autoscaler를 Cluster Add-on으로 설치하기
Kubernetes Cluster Autoscaler는
- 리소스가 요구하는 자원이 있는 Pod에 대해, Pod에게 할당할 자원이 부족하여 Pod를 스케줄할 수 없는 경우, 해당 노드 풀에 Worker Node를 추가합니다.
- 장시간 동안 Worker Node의 활용도가 낮고 Pod를 다른 노드에 배치할 수 있는 경우, 노드 풀에서 Worker Node를 제거합니다.
Kubernetes Cluster Autoscaler는 매뉴얼하게 직접 설치하거나, Cluster Add-On으로 설치할 수 있습니다. 여기서는 Cluster Add-On 설치하는 것을 기준합니다. Cluster Add-On은 Enhanced Cluster에서만 지원합니다.
Step 1: Cluster Autoscaler가 노드 풀에 접근할 수 있도록, Workload Identity Principal 설정하기
Cluster Autoscaler가 필요한 OCI 자원을 관리할 수 있도록 권한을 부여합니다. Instance Principal 또는 Workload Identity Principal을 사용할 수 있습니다. Enhanced Cluster에서 사용할 수 있는 Workload Identity Principal을 여기서는 편의상 사용합니다.
Kubernetes Cluster Autoscaler와 Workload Identity Principal 조합은 Enhanced Cluster 및 Kubernetes Cluster Autoscaler 1.26 이상 버전에서 지원합니다.
-
OCI 콘솔에 로그인합니다.
-
OKE 클러스터의 OCID를 확인합니다.
-
좌측 상단 햄버거 메뉴에서 Identity & Security > Identity > Policies로 이동합니다.
-
아래 규칙을 가진 Policy를 만듭니다
- Name: 예, oke-cluster-autoscaler-grp-policy
<compartment-name>: 대상 OKE Cluster가 위치한 compartment 이름<cluster-ocid>: 대상 OKE 클러스터의 OCID
Allow any-user to manage cluster-node-pools in compartment <compartment-name> where ALL {request.principal.type='workload', request.principal.namespace ='kube-system', request.principal.service_account = 'cluster-autoscaler', request.principal.cluster_id = '<cluster-ocid>'}
Allow any-user to manage instance-family in compartment <compartment-name> where ALL {request.principal.type='workload', request.principal.namespace ='kube-system', request.principal.service_account = 'cluster-autoscaler', request.principal.cluster_id = '<cluster-ocid>'}
Allow any-user to use subnets in compartment <compartment-name> where ALL {request.principal.type='workload', request.principal.namespace ='kube-system', request.principal.service_account = 'cluster-autoscaler', request.principal.cluster_id = '<cluster-ocid>'}
Allow any-user to read virtual-network-family in compartment <compartment-name> where ALL {request.principal.type='workload', request.principal.namespace ='kube-system', request.principal.service_account = 'cluster-autoscaler', request.principal.cluster_id = '<cluster-ocid>'}
Allow any-user to use vnics in compartment <compartment-name> where ALL {request.principal.type='workload', request.principal.namespace ='kube-system', request.principal.service_account = 'cluster-autoscaler', request.principal.cluster_id = '<cluster-ocid>'}
Allow any-user to inspect compartments in compartment <compartment-name> where ALL {request.principal.type='workload', request.principal.namespace ='kube-system', request.principal.service_account = 'cluster-autoscaler', request.principal.cluster_id = '<cluster-ocid>'}
Step 2: Cluster Autoscaler Add-on 설정파일 설정하기
-
설정 파일 만들기 - 파일명
cluster-autoscaler-add-on.json{ "addonName": "ClusterAutoscaler", "configurations": [ { "key": "nodes", "value": "1:5:{{ node pool ocid 1 }}" }, { "key": "authType", "value": "workload" } ] }-
"key": "nodes"포맷은 아래와 같습니다. nodepool-ocid에 Cluster Autoscaler가 관리할 Node Pool의 OCID를 입력합니다.
"value": "<min-nodes>:<max-nodes>:<nodepool-ocid>"-
2개 이상의 Node Pool을 관리하는 경우는 value 값에 CSV 형식으로 추가합니다.
"value": "2:4:ocid1.nodepool.oc1.iad.aaaaaaaaae____ydq, 1:5:ocid1.nodepool.oc1.iad.aaaaaaaaah____bzr"
-
-
다른 파라미터 추가 예시
Cluster Autoscaler add-on add-on configuration arguments에서 전체 설정 가능한 파라미터를 확인할 수 있으며, 아래 예시와 같이 설정할 수 있습니다.
{
  "configurations": [
    {
      "key": "nodes",
      "value": "2:4:ocid1.nodepool.oc1.iad.aaaaaaaaae____ydq, 1:5:ocid1.nodepool.oc1.iad.aaaaaaaaah____bzr"
    },
    {
      "key": "numOfReplicas",
      "value": "3"   # Default: 1
    },
    {
      "key": "maxNodeProvisionTime",
      "value": "15m" # Default: 15m
    },
    {
      "key": "scaleDownDelayAfterAdd",
      "value": "15m" # Default: 10m
    },
    {
      "key": "scaleDownUnneededTime",
      "value": "10m" # Default: 10m
    },
    {
      "key": "annotations",
      "value": "{\"prometheus.io/scrape\":\"true\",\"prometheus.io/port\":\"8086\"}"
    }
  ]
}
-
-
설정파일을 저장합니다.
Step 3: OKE 클러스터에 Cluster Autoscaler Add-on 배포하기
oci cli 또는 클라우드 콘솔에서를 통해 Add-on을 배포할 수 있습니다. oci cli에서는 Step 2에서 작성한 JSON 파일을 이용해 배포하고, 클라우드 콘솔에서는 UI 설정을 통해 배포할 수 있습니다. 여기서는 클라우드 콘솔에서 설정하는 방법을 사용하도록 하겠습니다.
-
OCI 콘솔에 로그인합니다.
-
Cluster Autoscaler가 관리할 Node Pool의 OCID를 확인합니다.
-
좌측 상단 햄버거 메뉴에서 Developer Services > Container Artifacts > Kubernetes Clusters (OKE)로 이동합니다.
-
대상 클러스터를 선택합니다.
-
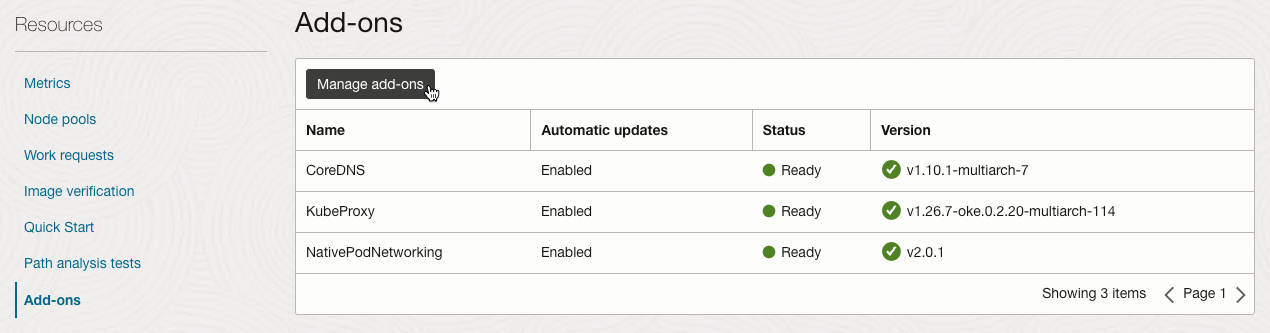
클러스터 상세정보에서 Resources > Add-ons를 클릭합니다.
-
Manage add-ons를 클릭합니다.
-
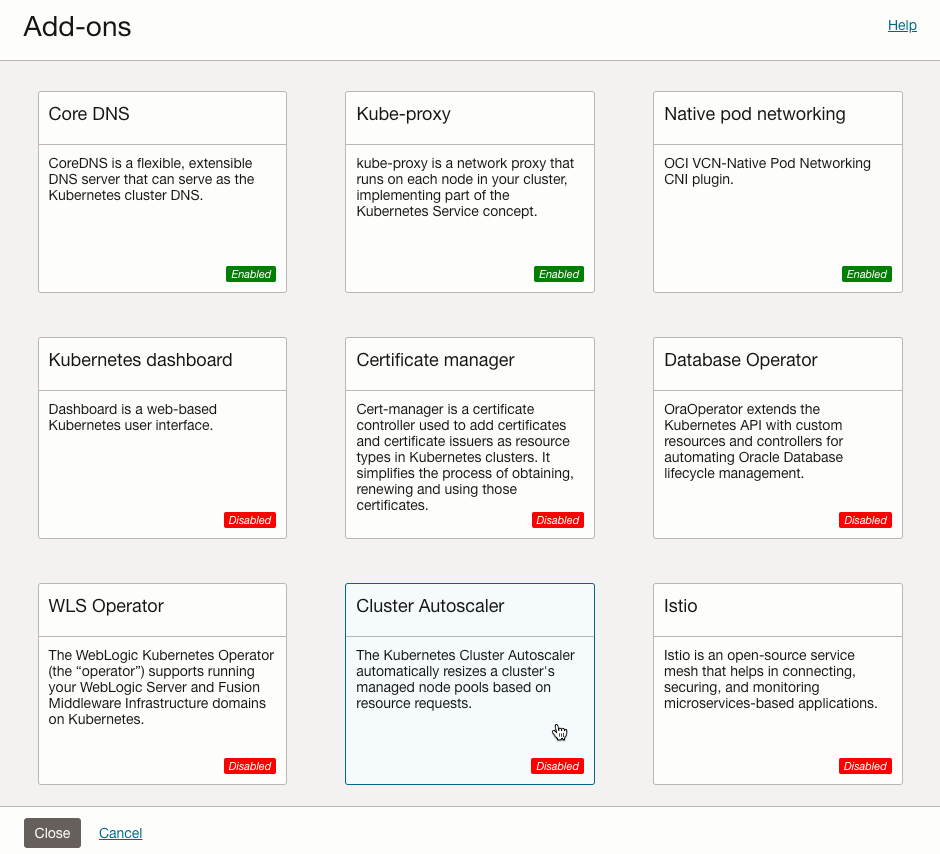
Clustaer Autoscaler를 클릭합니다.
-
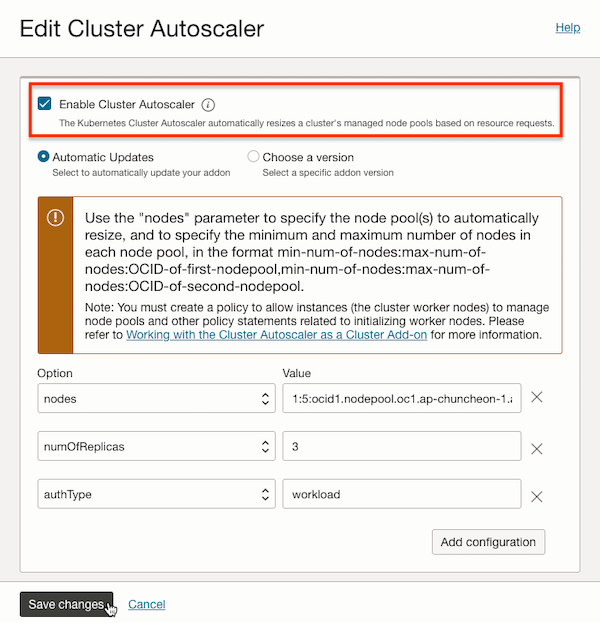
Cluster Autoscaler Add-on을 설정합니다. 사용을 활성화합니다. 다른 값은 기본값을 사용하고, 관리할 Node Pool 정보, Workload Identity Principal 사용하기, Pod 수만 조정한 예시입니다. Add-on을 사용하면, 그림과 같이 추후 버전이 업데이트 되면 자동으로 업데이트하거나, 사용자가 버전을 선택하여 사용하는 기능을 제공합니다.
-
배포결과를 확인하기 위해 로그를 확인합니다.
kubectl -n kube-system logs -f -l app=cluster-autoscaler-
배포가 성공하면 다음과 같은 로그가 보입니다.
$ kubectl -n kube-system logs -f -l app=cluster-autoscaler
I0129 02:48:12.687628       1 leaderelection.go:248] attempting to acquire leader lease kube-system/cluster-autoscaler...
I0129 02:48:13.007616       1 leaderelection.go:248] attempting to acquire leader lease kube-system/cluster-autoscaler...
I0129 02:48:13.398224       1 oci_manager.go:79] using workload identity
I0129 02:48:14.964758       1 oci_manager.go:179] static node spec constructed: &{manager:<nil> kubeClient:<nil> id:ocid1.nodepool.oc1.ap-chuncheon-1.aaaaaaaabtavqjthmpeivjj5dj7i4yttl74y7ncnvoxgxn7kqna6xzvlolbq minSize:1 maxSize:5}
I0129 02:48:16.346753       1 oci_manager.go:230] Refreshed NodePool list, next refresh after 2024-01-29 02:49:16.346746352 +0000 UTC m=+64.429249192
I0129 02:48:16.346964       1 node_instances_cache.go:156] Start refreshing cloud provider node instances cache
I0129 02:48:16.346987       1 node_instances_cache.go:168] Refresh cloud provider node instances cache finished, refresh took 10.92µs
W0129 02:48:26.348084       1 clusterstate.go:429] AcceptableRanges have not been populated yet. Skip checking
I0129 02:49:17.520140       1 oci_manager.go:230] Refreshed NodePool list, next refresh after 2024-01-29 02:50:17.520133017 +0000 UTC m=+125.602635857
...
-
-
Kubernetes Cluster Autoscaler Pod 세 개 중 어느 Pod가 실제 동작하고 있는 지 확인해 봅니다.
$ kubectl get pod -l app=cluster-autoscaler -n kube-system NAME READY STATUS RESTARTS AGE cluster-autoscaler-f7d79b66-g5v4d 1/1 Running 0 2m59s cluster-autoscaler-f7d79b66-lpnsd 1/1 Running 0 2m59s cluster-autoscaler-f7d79b66-w49cr 1/1 Running 0 2m59s $ kubectl -n kube-system get lease cluster-autoscaler NAME HOLDER AGE cluster-autoscaler cluster-autoscaler-f7d79b66-lpnsd 3m6s -
Kubernetes Cluster Autoscaler의 상태를 확인하기 위해 Config Map을 확인해 봅니다
kubectl -n kube-system get cm cluster-autoscaler-status -o yaml -
필요하면, Cluster Add-on을 통해 배포된 Deployment 설정을 확인해 봅니다.
kubectl get deploy -n kube-system cluster-autoscaler -o yaml
Step 4: 클러스터 오토스케일링 동작 확인해 보기
-
현재 Worker Node 상태를 확인합니다.
$ kubectl get nodes NAME STATUS ROLES AGE VERSION 10.0.10.158 Ready node 10d v1.26.7 10.0.10.42 Ready node 2d5h v1.26.7 10.0.10.43 Ready node 2d5h v1.26.7 -
샘플 애플리케이션 배포 파일 예시입니다.
requests.cpu를 기본 200 밀리코어까지 사용할 수 있게 지정하였습니다. 0.2 코어로 설정한 예시
# nginx.yaml apiVersion: apps/v1 kind: Deployment metadata: name: nginx-deployment spec: selector: matchLabels: app: nginx replicas: 2 template: metadata: labels: app: nginx spec: containers: - name: nginx image: nginx:latest ports: - containerPort: 80 resources: requests: cpu: 200m -
샘플을 배포합니다.
kubectl apply -f nginx.yaml -
Pod의 수를 늘립니다.
kubectl scale deployment nginx-deployment --replicas=40 -
Deployment 상태를 확인합니다. 배포하다가, 자원을 다 쓰고 더 이상 Pod를 생성하지 못하고 멈춰있게 됩니다.
$ kubectl get deployment nginx-deployment --watch NAME READY UP-TO-DATE AVAILABLE AGE nginx-deployment 21/40 40 21 19s nginx-deployment 22/40 40 22 19s nginx-deployment 23/40 40 23 19s nginx-deployment 24/40 40 24 20s -
이벤트 로그를 확인해 보면, CPU 부족으로 Pod 스케줄링에 실패한 것을 볼 수 있습니다. 이로 인해 Cluster Scale 이벤트가 발생하고, 노드가 3개에서 5개로 늘어납니다.
$ kubectl get events --sort-by=.metadata.creationTimestamp ... 70s Warning FailedScheduling pod/nginx-deployment-694bc9bdb8-t2b5x 0/3 nodes are available: 3 Insufficient cpu. preemption: 0/3 nodes are available: 3 No preemption victims found for incoming pod.. ... 58s Normal TriggeredScaleUp pod/nginx-deployment-694bc9bdb8-hz89v pod triggered scale-up: [{ocid1.nodepool.oc1.ap-chuncheon-1.aaaaaaaabtavqjthmpeivjj5dj7i4yttl74y7ncnvoxgxn7kqna6xzvlolbq 3->5 (max: 5)}] $ kubectl get nodes NAME STATUS ROLES AGE VERSION 10.0.10.108 NotReady <none> 1s v1.26.7 10.0.10.158 Ready node 11d v1.26.7 10.0.10.204 NotReady <none> 18s v1.26.7 10.0.10.42 Ready node 2d19h v1.26.7 10.0.10.43 Ready node 2d19h v1.26.7 -
확장된 Worker Node가 Ready 상태가 되면 나머지 Pod에 대한 스케줄링이 진행됩니다.
$ kubectl get nodes
NAME          STATUS   ROLES   AGE     VERSION
10.0.10.108   Ready    node    3m1s    v1.26.7
10.0.10.158   Ready    node    11d     v1.26.7
10.0.10.204   Ready    node    3m18s   v1.26.7
10.0.10.42    Ready    node    2d19h   v1.26.7
10.0.10.43    Ready    node    2d19h   v1.26.7

$ kubectl get deployment nginx-deployment --watch
NAME               READY   UP-TO-DATE   AVAILABLE   AGE
nginx-deployment   24/40   40           24          20s
...
...
...
nginx-deployment   24/40   40           24          6m15s
...
nginx-deployment   40/40   40           40          6m32s
Step 5: 정리 및 Scale In 확인하기
-
배포한 샘플 애플리케이션을 삭제합니다.
kubectl delete deployment nginx-deployment -
scale-down-unneeded-time=10m설정값에 따라 10분 뒤에 ScaleDown 이벤트가 발생한 것을 확인할 수 있습니다.$ kubectl get events --sort-by=.metadata.creationTimestamp -n default ... 16m Normal Killing pod/nginx-deployment-694bc9bdb8-lbz2r Stopping container nginx 6m18s Normal ScaleDown node/10.0.10.108 marked the node as toBeDeleted/unschedulable 5m58s Normal NodeNotSchedulable node/10.0.10.108 Node 10.0.10.108 status is now: NodeNotSchedulable 5m15s Normal NodeNotReady node/10.0.10.108 Node 10.0.10.108 status is now: NodeNotReady 5m12s Normal DeletingNode node/10.0.10.108 Deleting node 10.0.10.108 because it does not exist in the cloud provider 5m10s Normal RemovingNode node/10.0.10.108 Node 10.0.10.108 event: Removing Node 10.0.10.108 from Controller 87s Normal ScaleDown node/10.0.10.204 marked the node as toBeDeleted/unschedulable 56s Normal NodeNotSchedulable node/10.0.10.204 Node 10.0.10.204 status is now: NodeNotSchedulable 15s Normal NodeNotReady node/10.0.10.204 Node 10.0.10.204 status is now: NodeNotReady 12s Normal DeletingNode node/10.0.10.204 Deleting node 10.0.10.204 because it does not exist in the cloud provider 9s Normal RemovingNode node/10.0.10.204 Node 10.0.10.204 event: Removing Node 10.0.10.204 from Controller -
노드의 상태를 조회해봅니다. 해당 노드가 삭제되고 원래대로 3개의 노드로 남았습니다.
Cluster Autoscaler 배포시
<min-nodes>을 1로 설정해도, Node Pool 생성시 지정한 수가 더 큰 경우, 그 수 만큼은 유지하는 것으로 보입니다.$ kubectl get nodes NAME STATUS ROLES AGE VERSION 10.0.10.158 Ready node 11d v1.26.7 10.0.10.42 Ready node 2d20h v1.26.7 10.0.10.43 Ready node 2d20h v1.26.7
이 글은 개인으로서, 개인의 시간을 할애하여 작성된 글입니다. 글의 내용에 오류가 있을 수 있으며, 글 속의 의견은 개인적인 의견입니다.