Warning
This content has been generated by machine translation. The translations are automated and have not undergone human review or validation.
4.1.4 TLS termination on NGINX Ingress Controller (feats. Let’s Encrypt)
Check the settings for SSL external ingress in the Ingress Controller.
Using Self-Signed Certificates
Learn how to create and use Self-Signed certificates for testing purposes. In a real environment, a certificate issued by an authorized certification authority is used. Only the self-signed certificate issuance process is replaced, and the TLS Secret registration process is the same.
References
Create a certificate
Create a certificate with the following command in Cloud Shell or your environment. It is not necessary to use a certificate issued by an authorized certification authority.
openssl req -x509 -nodes -days 365 -newkey rsa:2048 -keyout tls.key -out tls.crt -subj "/CN=nginxsvc/O=nginxsvc"Create a TLS Secret.
kubectl create secret tls tls-secret --key tls.key --cert tls.crtExecution result
oke_admin@cloudshell:~ (ap-seoul-1)$ openssl req -x509 -nodes -days 365 -newkey rsa:2048 -keyout tls.key -out tls.crt -subj "/CN=nginxsvc/O=nginxsvc"
Generating a 2048 bit RSA private key
*************************************************************************************************************************************************************+++++
****************************************************************************************************************************+++++
writing new private key to 'tls.key'
-----
oke_admin@cloudshell:~ (ap-seoul-1)$ kubectl create secret tls tls-secret --key tls.key --cert tls.crt
secret/tls-secret created
Deploy TLS Ingress resources
Deploy the sample app for testing. Use the same app you used for PATH-based routing.
kubectl create deployment nginx-blue --image=thekoguryo/nginx-hello:blue
kubectl expose deployment nginx-blue --name nginx-blue-svc --port 80
kubectl create deployment nginx-green --image=thekoguryo/nginx-hello:green
kubectl expose deployment nginx-green --name nginx-green-svc --port 80
Write the ingress setup YAML (
tls-termination.yaml).- Use the self-signed certificate name you created earlier as spec.tls.secretName.
apiVersion: networking.k8s.io/v1
kind: Ingress
metadata:
  name: ingress-tls-termination
  annotations:
    kubernetes.io/ingress.class: nginx
spec:
  tls:
  - secretName: tls-secret
  rules:
  - host: blue.ingress.thekoguryo.ml
    http:
      paths:
      - path: /
        pathType: Prefix
        backend:
          service:
            name: nginx-blue-svc
            port:
              number: 80
  - host: green.ingress.thekoguryo.ml
    http:
      paths:
      - path: /
        pathType: Prefix
        backend:
          service:
            name: nginx-green-svc
            port:
              number: 80
Delete the existing test ingress and deploy the created
tls-termination.yaml.oke_admin@cloudshell:~ (ap-seoul-1)$ kubectl apply -f tls-termination.yaml ingress.networking.k8s.io/ingress-tls-termination created oke_admin@cloudshell:~ (ap-seoul-1)$ kubectl get ingress NAME CLASS HOSTS ADDRESS PORTS AGE ingress-tls-termination <none> blue.ingress.thekoguryo.ml,green.ingress.thekoguryo.ml 80, 443 5s
Validate TLS application result
Connect to each host name applied in the ingress rule and check the result.
As shown below, you will be connected via https and a warning message will appear due to the Self-Signed certificate.
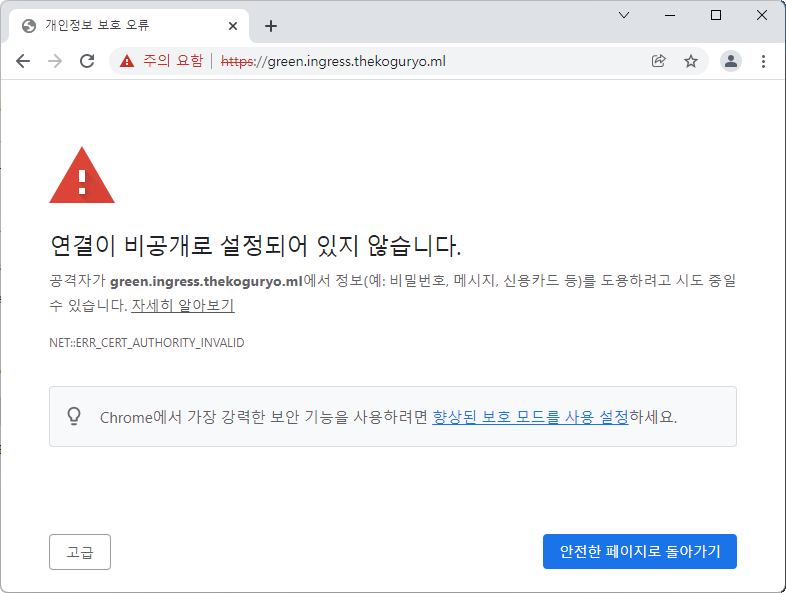
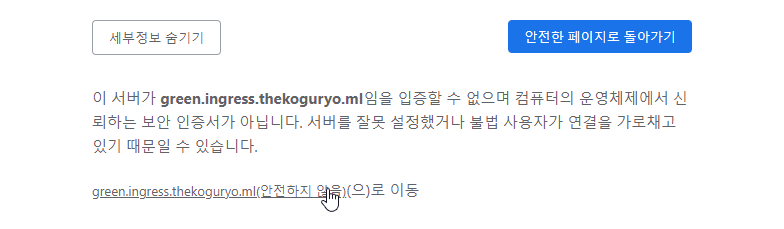
Click Advanced and select Go to that page.
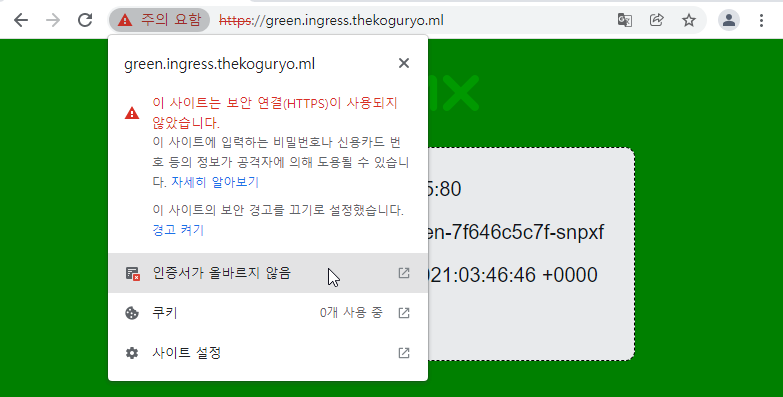
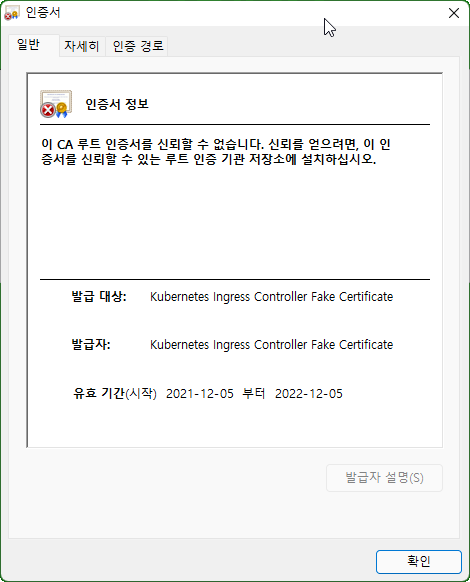
Check the certificate information through the browser address bar menu. With Self-Signed Certificates, you can see warnings that the root certificate is not trusted.
Using Let’s Encrypt & Cert Manager
Let’s Encrypt is a free certificate issuing site where you can get a certificate to use for TLS. Instead, it is only valid for 90 days and must be renewed before expiration. Kubernetes can automatically renew through Cert Manager.
Installation notes
Deploy Cert Manager
Deploy Cert Manager in Cloud Shell or in your environment.
kubectl apply -f https://github.com/jetstack/cert-manager/releases/download/v1.6.1/cert-manager.yamlCheck the installation
Check that the resources in the cert-manager namespace are running normally.
oke_admin@cloudshell:~ (ap-seoul-1)$ kubectl get all -n cert-manager
NAME                                          READY   STATUS    RESTARTS   AGE
pod/cert-manager-55658cdf68-sk5nj             1/1     Running   0          18s
pod/cert-manager-cainjector-967788869-b77w2   1/1     Running   0          18s
pod/cert-manager-webhook-7b86bc6578-pnxtg     1/1     Running   0          18s

NAME                           TYPE        CLUSTER-IP     EXTERNAL-IP   PORT(S)    AGE
service/cert-manager           ClusterIP   10.96.100.11   <none>        9402/TCP   19s
service/cert-manager-webhook   ClusterIP   10.96.212.15   <none>        443/TCP    19s

NAME                                      READY   UP-TO-DATE   AVAILABLE   AGE
deployment.apps/cert-manager              1/1     1            1           19s
deployment.apps/cert-manager-cainjector   1/1     1            1           19s
deployment.apps/cert-manager-webhook      1/1     1            1           19s

NAME                                                DESIRED   CURRENT   READY   AGE
replicaset.apps/cert-manager-55658cdf68             1         1         1       19s
replicaset.apps/cert-manager-cainjector-967788869   1         1         1       19s
replicaset.apps/cert-manager-webhook-7b86bc6578     1         1         1       18s
Configure Let’s Encrypt Issuer
In this example, Staging Issuer and Production Issuer provided by Let’s Encrypt can be used. Here we will use the Staging Issuer for testing purposes.
Let’s Encrypt Staging Issuer Setup
In the https://cert-manager.io/docs/tutorials/acme/example/staging-issuer.yaml file, only the email part is modified and reflected.
Use the ClusterIssuer type for use with the entire Kubernetes cluster, rather than an Issuer used only for namespaces.
apiVersion: cert-manager.io/v1
kind: ClusterIssuer
metadata:
  name: letsencrypt-staging
spec:
  acme:
    # The ACME server URL
    server: https://acme-staging-v02.api.letsencrypt.org/directory
    # Email address used for ACME registration
    email: user@example.com
    # Name of a secret used to store the ACME account private key
    privateKeySecretRef:
      name: letsencrypt-staging
    # Enable the HTTP-01 challenge provider
    solvers:
    - http01:
        ingress:
          class: nginx
Let’s Encrypt Production Issuer
The Production Issuer can be installed in the same way using the https://cert-manager.io/docs/tutorials/acme/example/production-issuer.yaml file. However, if you repeat deletion and creation due to usage limit, you may be hit by the rate limit.
Apply settings
oke_admin@cloudshell:$ (ap-seoul-1)$ kubectl create --edit -f https://cert-manager.io/docs/tutorials/acme/example/staging-issuer.yaml
issuer.cert-manager.io/letsencrypt-staging created
Deploy TLS Ingress resources
Use the test app as it was before.
Write the ingress setup YAML (
tls-termination-cert-manager.yaml).- As of the document creation date (STAGING) Due to the expiration of the Doctored Durian Root CA, the certificate may appear as invalid even when using a staging issuer. The cert manager issuer will use the production issuer. Instead, the production issuer may hit the limit if it repeats the creation.
- cert-manager.io/cluster-issuer: letsencrypt-staging config we just created, use cluster-issuer not issuer.
- Specify the storage name to store tls under spec.tls and the domain name to be issued and used
apiVersion: networking.k8s.io/v1
kind: Ingress
metadata:
  name: ingress-tls-termination-cert-manager
  annotations:
    kubernetes.io/ingress.class: nginx
    cert-manager.io/cluster-issuer: "letsencrypt-staging"
spec:
  tls:
  - secretName: ingress-thekoguryo-ml-tls
    hosts:
    - green.ingress.thekoguryo.ml
    - blue.ingress.thekoguryo.ml
  rules:
  - host: green.ingress.thekoguryo.ml
    http:
      paths:
      - path: /
        pathType: Prefix
        backend:
          service:
            name: nginx-green-svc
            port:
              number: 80
  - host: blue.ingress.thekoguryo.ml
    http:
      paths:
      - path: /
        pathType: Prefix
        backend:
          service:
            name: nginx-blue-svc
            port:
              number: 80
Delete the existing test ingress and distribute the created
tls-termination-cert-manager.yaml.oke_admin@cloudshell:ingress-nginx (ap-seoul-1)$ kubectl apply -f tls-termination-cert-manager.yaml ingress.networking.k8s.io/ingress-tls-termination-cert-manager created oke_admin@cloudshell:ingress-nginx (ap-seoul-1)$ kubectl get ingress NAME CLASS HOSTS ADDRESS PORTS AGE ingress-tls-termination-cert-manager <none> blue.ingress.thekoguryo.ml,green.ingress.thekoguryo.ml 80, 443 9sConfirm issuance of the certificate
A secret is created with the specified spec.tls.secretName, and when the certificate status (READY) becomes True, it was issued normally.
oke_admin@cloudshell:ingress-nginx (ap-seoul-1)$ kubectl get secret
NAME                        TYPE                                  DATA   AGE
default-token-jbv7p         kubernetes.io/service-account-token   3      3d19h
ingress-thekoguryo-ml-tls   kubernetes.io/tls                     2      15m
letsencrypt-staging         Opaque                                1      16m
oke_admin@cloudshell:ingress-nginx (ap-seoul-1)$ kubectl get certificate
NAME                        READY   SECRET                      AGE
ingress-thekoguryo-ml-tls   True    ingress-thekoguryo-ml-tls   16m
Validate TLS application result
Connect to each host name applied in the ingress rule and check the result.
As shown below, it is accessed via https and is displayed as a valid certificate without warning unlike Self-Signed certificates.
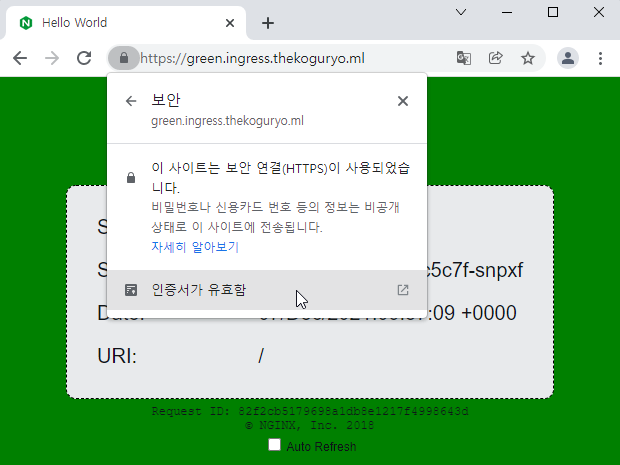
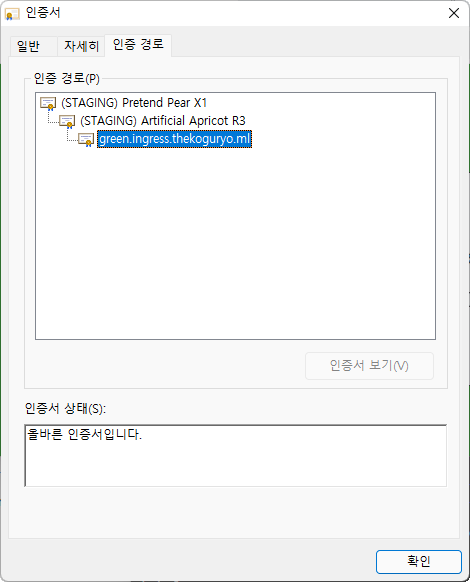
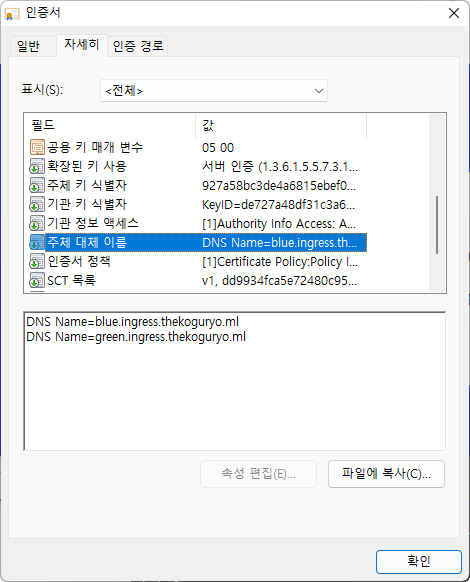
All the requested hosts are registered in the DNS alternative address, and the blue app is also connected without an authentication error.
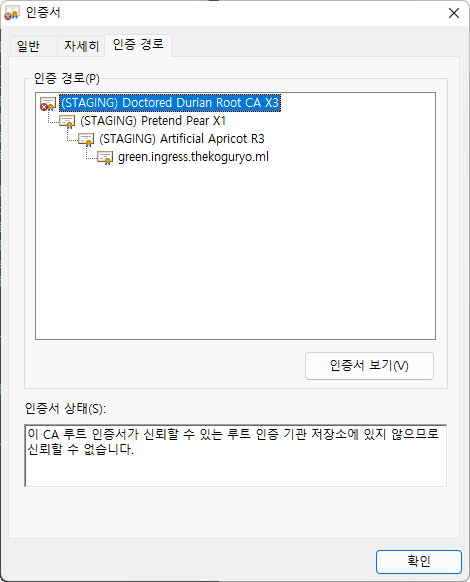
Resolve authentication error due to Let’s Encrypt Root CA change
When using Staging Issuer, an authentication error may occur when accessing a web browser due to the expiration of (STAGING) Doctored Durian Root CA X3. Production Issuers don’t have that issue.
If this error occurs, download the changed new Root CA from the let’s encrypt site and register it in the browser.
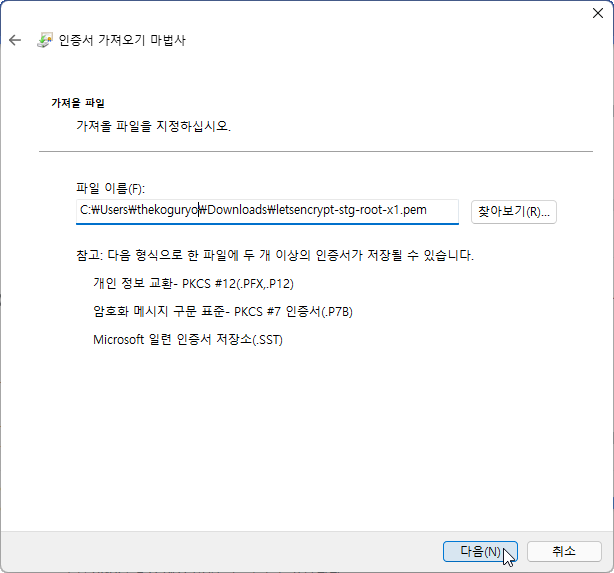
Download the file
https://letsencrypt.org/certs/staging/letsencrypt-stg-root-x1.pem
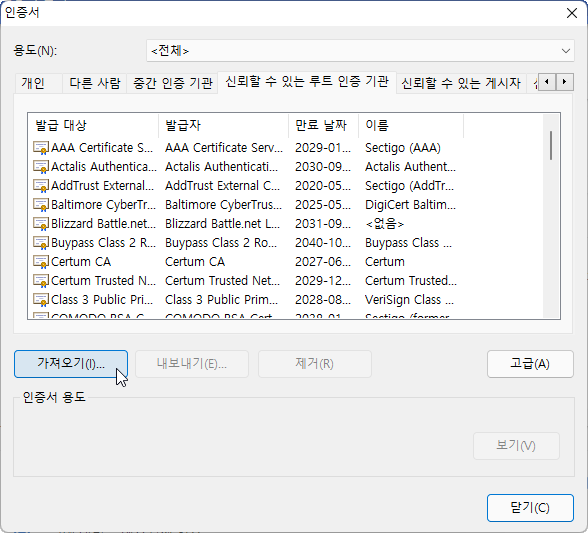
Add the downloaded Root CA to your browser (based on Chrome browser)
Go to Chrome Browser > Settings > Privacy & Security > Certificate Management
Click Import Certificate
Select the downloaded file
Install certificate

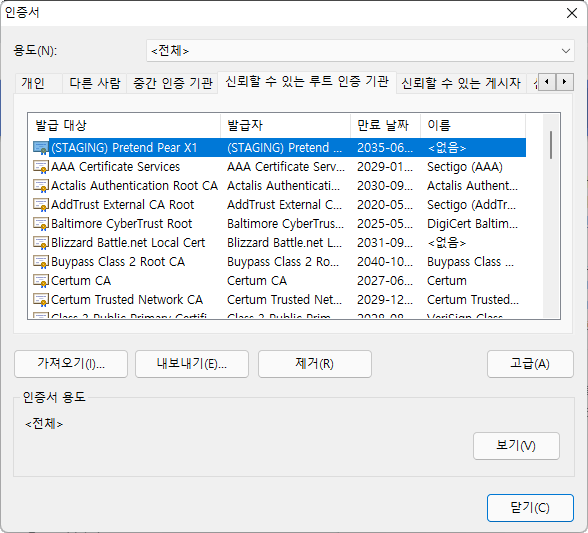
Check after certificate registration
I see the certificate I just enrolled (STAGING) with Trusted Root Certification Authorities
If you access the web page of the app again after the certificate is registered, no authentication error occurs and the authentication path is displayed as shown below.
As an individual, this article was written with my personal time. There may be errors in the content of the article, and the opinions in the article are personal opinions.