Warning
This content has been generated by machine translation. The translations are automated and have not undergone human review or validation.
1.7 Kubernetes Supported Versions and Upgrades
Kubernetes supported version
Kubernetes version is expressed as x.y.z, where x stands for major, y for minor, and z for patch version, respectively. Open source Kubernetes also supports the current version and up to two previous versions. OKE also supports the latest version supported by OKE, up to two previous minor versions. The supported versions as of today are as follows.
- 1.20.11
- 1.19.15
- 1.18.10
We support the previous version only for 30 days after the new version is released. For example, 1.20.11 and 1.19.15 from OKE were released on October 8, 2021, and the existing versions 1.20.8 and 1.19.12 will only be supported until November 7, 2021, 30 days later, respectively. Please refer to the following link for the current supported version.
Version control unit
OKE cluster consists of Control Plane and Worker Node. Once the version of Control Plane is decided, Worker Node can use the same or lower version of Control Plane. As long as it’s compatible, of course.
A worker node can have a version per node pool. You can create multiple node pools, each with a different version.
Upgrade version
When a new version of OKE is released, the version upgrade is as follows:
- Control Plane Upgrade
- Upgrading the OKE cluster unit from the OCI service console only upgrades the Control Plane
- Automatically upgraded with no downtime to Oracle-managed areas
- If you upgrade the OKE cluster, i.e. the Control Plane upgrades, you cannot downgrade back to the previous version.
- Upgrade Worker Nodes
- Upgrade by node pool unit in OCI service console
- Upgrade method
- in-place upgrade
- The target existing node pool is version upgraded in the OCI console, actual nodes are not automatically upgraded
- Prevent new containers from being created on a specific node with the kubectl drain command
- Terminate the drained node from the OCI service console
- A new node is automatically created by node self-healing, and the created new node is the upgraded version specified in the node pool
- Proceed in order for existing nodes
- out-of-place upgrades
- Add new version of Node Pool
- Remove nodes from the existing node pool with the kubectl command. When all containers are moved by Kubernetes, the nodes are deleted one by one.
- When all existing nodes are removed, the existing node pool is deleted.
- in-place upgrade
Mixing Node Pool Unit Versions
For testing purposes, with the 1.18.10, 1.19.12, 1.19.15, ,1.20.8, and 1.20.11 versions available, the test is conducted based on the 1.19.12 version of the OKE cluster.
- test environment
- OKE cluster - oke-cluster-1 version: 1.19.12
- Control Plane Version: 1.19.12
- Node Pool - poo1 Version: 1.19.12
Go to the OKE cluster detail screen.
Go to Resources > Node Pools in the lower left.

Currently pool1 has version 1.19.12. Click Add Node Pool to create an additional Node Pool.
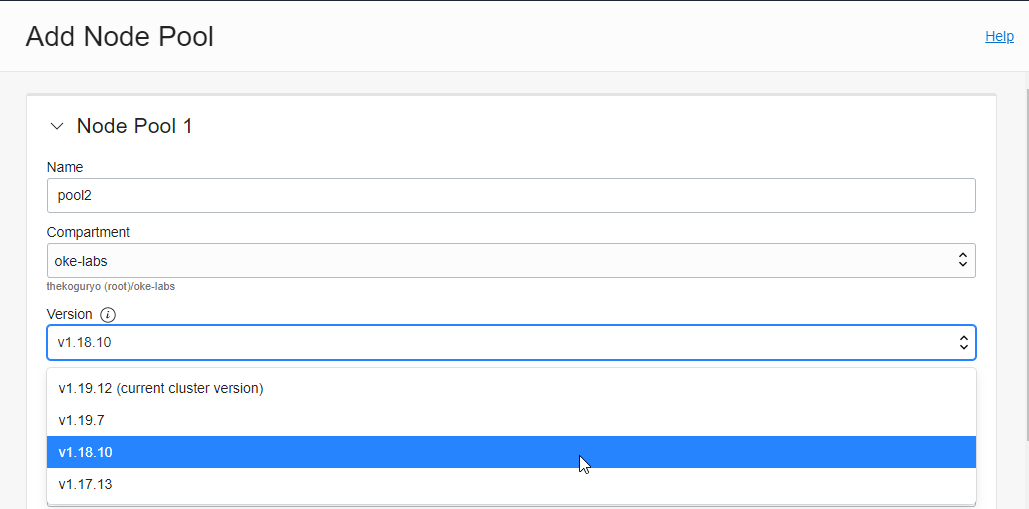
Enter the information for creating a new Node Pool.
- Name: new Node Pool name
- Version: Select version 1.18.10 to see the generic version mix.
- If you look at the available versions, you can see that only the current OKE cluster version or lower can be selected. Currently, available versions 1.19.15, ,1.20.8, and 1.20.11 are not visible when creating an OKE cluster.
- Input the necessary information when creating similarly to when creating for the first time. Here is an example.
- Shape: VM.Standard.E3.Flex
- Placement Configuration: Specify the AD where the worker node is located and the subnet for the node
- Advanced Options:
- Add an SSH Key: Publich Key for SSH access to Node
When you request creation, the actual Node VM is created, and it takes a little time until it is ready, as in the previous installation.
If you create an additional Node Pool, as shown in the figure, mixing of the two versions is supported in the same OKE cluster, so you can vary the VM size and location (AD, subnet) per pool, as seen when adding a Node Pool.

Querying the node with kubectl gives the same result.
oke_admin@cloudshell:~ (ap-seoul-1)$ kubectl get nodes
NAME          STATUS   ROLES   AGE     VERSION
10.0.10.185   Ready    node    23h     v1.19.12
10.0.10.226   Ready    node    23h     v1.19.12
10.0.10.234   Ready    node    6m53s   v1.18.10
10.0.10.43    Ready    node    6m30s   v1.18.10
10.0.10.44    Ready    node    23h     v1.19.12
10.0.10.78    Ready    node    6m41s   v1.18.10
Upgrade OKE cluster version
Upgrade Control Plane
As above, it is assumed that a new version has been released while using version 1.19.12. Then, as described above, the existing version is supported for 30 days according to the technical support policy, so you need to upgrade after verifying the version in the meantime.
If upgrade is available, the Upgrade Available button is activated on the OKE cluster detail screen.
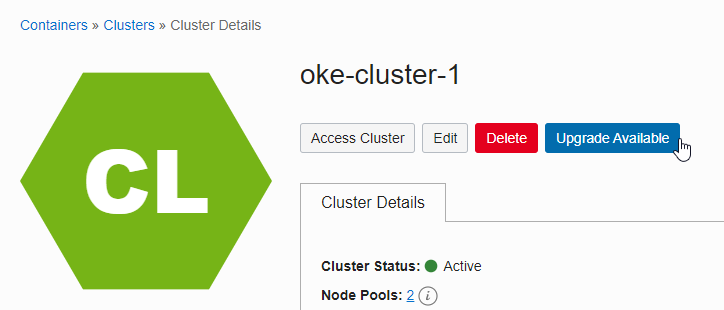
If you click the Upgrade Available button, you can start the upgrade with the following information. We will select the latest version, v1.20.11.
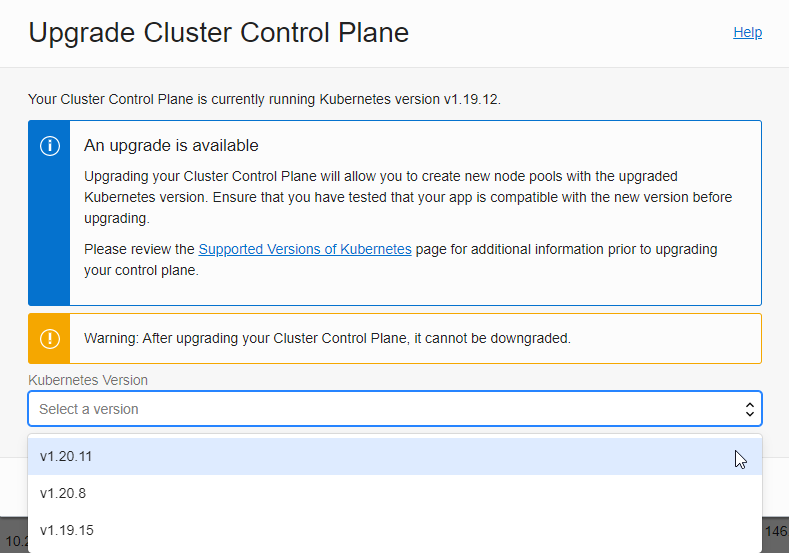
Select your version and click the Upgrade button below to start the upgrade.
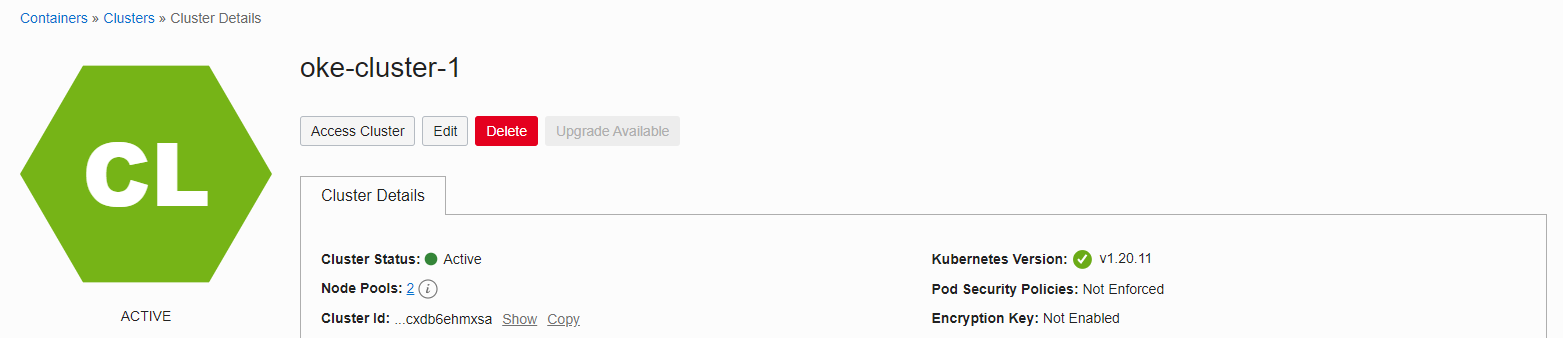
The cluster status will show as UPDATING and the upgrade will proceed. The Oracle-managed Control Plane internally upgrades sequentially. The Worker Node where the actual application runs is upgraded without stopping the service.
At the time of testing, the upgrade was completed in 10 to 15 minutes.
Worker Node upgrade - in-place upgrade
Only the control plane has been upgraded due to the upgrade of the OKE cluster, and now it is possible to upgrade in units of node pools. The in-place upgrade method upgrades in the following order: Node Pool Upgrade -> Existing Node Drain > POD Movement Confirmation -> Existing Node VM Termination.
Node Pool Upgrade
Go to the detail page of the node pool you want to upgrade.
Click Edit to edit, the edit page will appear on the right.
In the Version field, the cluster version and node pool version are displayed, and the upgradeable version is displayed.
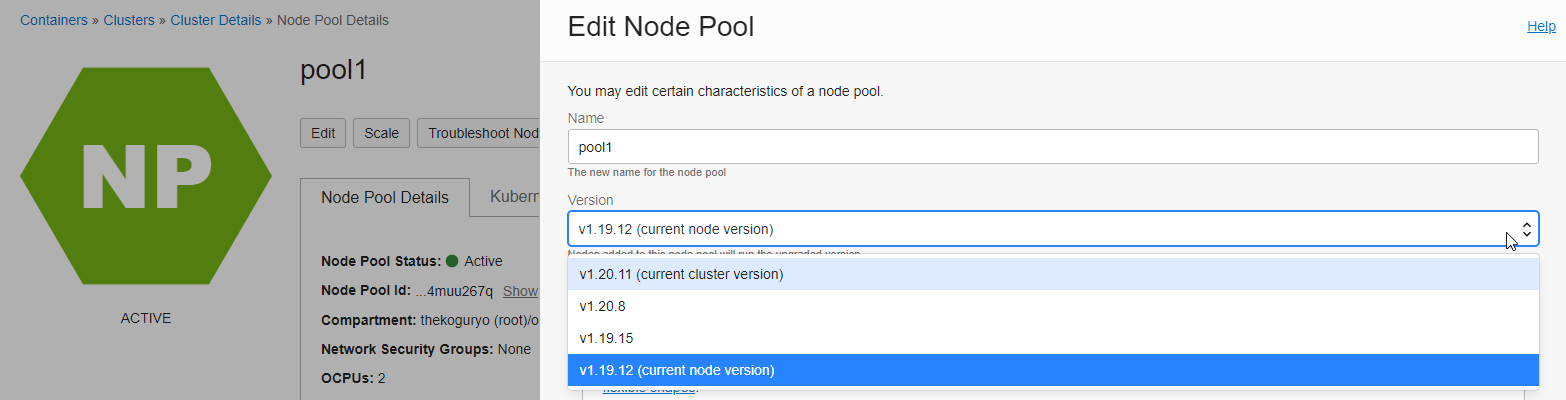
Select the same 1.20.11 as the cluster and click Save Change to save it.
If you go to Resources > Work Requests, the node pool upgrade will be completed in 2-3 seconds.

The actual Worker Node has not been upgraded yet.
If you go to Resources > Nodes, the original version is the same.

Node Drain
Check Worker Node and deployed POD with kubectl command.
oke_admin@cloudshell:~ (ap-seoul-1)$ kubectl get nodes
NAME          STATUS   ROLES   AGE   VERSION
10.0.10.185   Ready    node    24h   v1.19.12
10.0.10.226   Ready    node    24h   v1.19.12
10.0.10.44    Ready    node    24h   v1.19.12
oke_admin@cloudshell:~ (ap-seoul-1)$ kubectl get pod -o wide
NAME                             READY   STATUS    RESTARTS   AGE   IP             NODE          NOMINATED NODE   READINESS GATES
nginx-bvs-pvc-7b574c9c5c-b46nd   1/1     Running   0          72m   10.244.1.4     10.0.10.44    <none>           <none>
nginx-fss-pvc-9fb98454f-5t5bh    1/1     Running   0          39m   10.244.0.137   10.0.10.226   <none>           <none>
nginx-fss-pvc-9fb98454f-7tsjf    1/1     Running   0          39m   10.244.1.8     10.0.10.44    <none>           <none>
nginx-fss-pvc-9fb98454f-fzlxj    1/1     Running   0          40m   10.244.0.136   10.0.10.226   <none>           <none>
Remove one node from the schedule with the command
kubectl drain <node_name> --ignore-daemonsets --delete-emptydir-dataas shown below.If there is a Pod using emptydir, an error occurs when draining. Because emptydir is used for temporary data, drain it through the –delete-emptydir-data option. During testing, a related issue occurred while elasticsearch was installed.
See also: https://pet2cattle.com/2021/08/cannot-delete-pods-with-local-storage
oke_admin@cloudshell:~ (ap-seoul-1)$ kubectl drain 10.0.10.44 --ignore-daemonsets --delete-emptydir-data
node/10.0.10.44 already cordoned
WARNING: ignoring DaemonSet-managed Pods: kube-system/csi-oci-node-7hc28, kube-system/kube-flannel-ds-b4dp6, kube-system/kube-proxy-f8qmp, kube-system/proxymux-client-6qs4x
evicting pod default/nginx-fss-pvc-9fb98454f-7tsjf
evicting pod default/nginx-bvs-pvc-7b574c9c5c-b46nd
pod/nginx-bvs-pvc-7b574c9c5c-b46nd evicted
pod/nginx-fss-pvc-9fb98454f-7tsjf evicted
node/10.0.10.44 evicted
As shown below, you can see that Node 44 is excluded from container scheduling. After confirming that the POD has moved to another node, proceed to the next operation.
oke_admin@cloudshell:~ (ap-seoul-1)$ kubectl get nodes
NAME          STATUS                     ROLES   AGE   VERSION
10.0.10.185   Ready                      node    25h   v1.19.12
10.0.10.226   Ready                      node    25h   v1.19.12
10.0.10.44    Ready,SchedulingDisabled   node    25h   v1.19.12
oke_admin@cloudshell:~ (ap-seoul-1)$ kubectl get pod -o wide
NAME                             READY   STATUS    RESTARTS   AGE     IP             NODE          NOMINATED NODE   READINESS GATES
nginx-bvs-pvc-7b574c9c5c-9smhh   1/1     Running   0          3m20s   10.244.0.138   10.0.10.226   <none>           <none>
nginx-fss-pvc-9fb98454f-5t5bh    1/1     Running   0          45m     10.244.0.137   10.0.10.226   <none>           <none>
nginx-fss-pvc-9fb98454f-8zkn2    1/1     Running   0          3m20s   10.244.0.6     10.0.10.185   <none>           <none>
nginx-fss-pvc-9fb98454f-fzlxj    1/1     Running   0          46m     10.244.0.136   10.0.10.226   <none>           <none>
Check the node name of the node to be shut down.
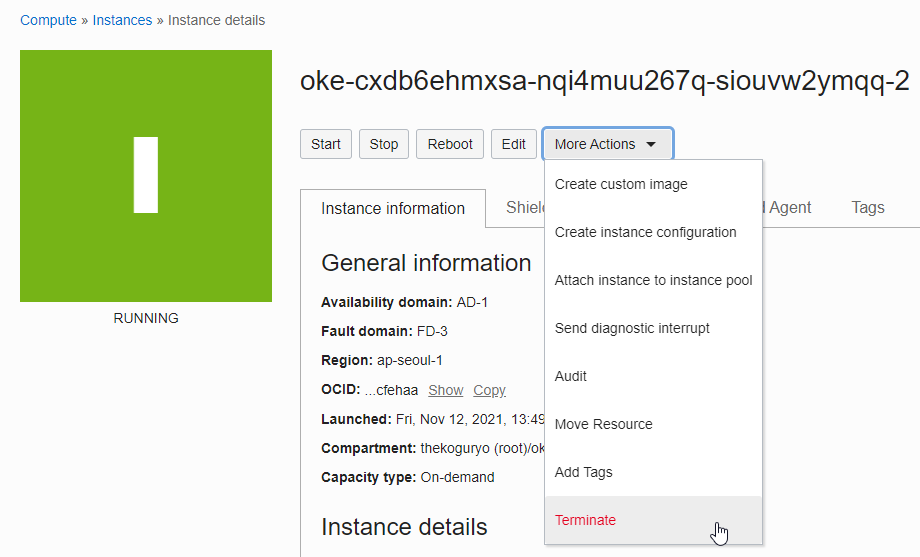
oke_admin@cloudshell:~ (ap-seoul-1)$ kubectl get nodes -L displayName
NAME          STATUS                     ROLES   AGE   VERSION    DISPLAYNAME
10.0.10.185   Ready                      node    25h   v1.19.12   oke-cxdb6ehmxsa-nqi4muu267q-siouvw2ymqq-0
10.0.10.226   Ready                      node    25h   v1.19.12   oke-cxdb6ehmxsa-nqi4muu267q-siouvw2ymqq-1
10.0.10.44    Ready,SchedulingDisabled   node    25h   v1.19.12   oke-cxdb6ehmxsa-nqi4muu267q-siouvw2ymqq-2
On the Node Pool details screen, click the name of the node to be shut down to navigate to the Compute instance.

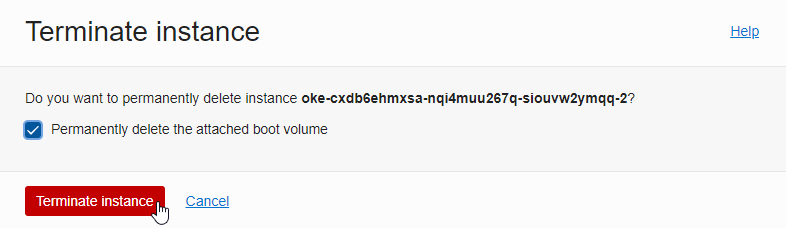
Terminate the Compute instance corresponding to the Node. The boot volume is also shut down.
New Nodes are automatically created by Node self-healing. If you look at Work Requests, a rebalance (NODEPOLL_RECONCILE) operation occurs as shown below, and nodes are re-created according to the specified number.

The newly created node is created with the upgraded version specified in the Node Pool.
If you query the node with the kubectl command, a new node is created with version 1.20.2. Due to the deprecation of the docker runtime, for reference, the container runtime has been changed to cri-o since 1.20.
oke_admin@cloudshell:~ (ap-seoul-1)$ kubectl get nodes -o wide
NAME          STATUS   ROLES   AGE     VERSION    INTERNAL-IP   EXTERNAL-IP   OS-IMAGE                  KERNEL-VERSION                    CONTAINER-RUNTIME
10.0.10.170   Ready    node    7m25s   v1.20.11   10.0.10.170   <none>        Oracle Linux Server 7.9   5.4.17-2102.206.1.el7uek.x86_64   cri-o://1.20.2
10.0.10.185   Ready    node    25h     v1.19.12   10.0.10.185   <none>        Oracle Linux Server 7.9   5.4.17-2102.206.1.el7uek.x86_64   docker://19.3.11
10.0.10.226   Ready    node    25h     v1.19.12   10.0.10.226   <none>        Oracle Linux Server 7.9   5.4.17-2102.206.1.el7uek.x86_64   docker://19.3.11
Proceed all in order for the existing node.
Completion Results
oke_admin@cloudshell:~ (ap-seoul-1)$ kubectl get nodes -o wide
NAME          STATUS   ROLES   AGE     VERSION    INTERNAL-IP   EXTERNAL-IP   OS-IMAGE                  KERNEL-VERSION                    CONTAINER-RUNTIME
10.0.10.128   Ready    node    6m10s   v1.20.11   10.0.10.128   <none>        Oracle Linux Server 7.9   5.4.17-2102.206.1.el7uek.x86_64   cri-o://1.20.2
10.0.10.146   Ready    node    35s     v1.20.11   10.0.10.146   <none>        Oracle Linux Server 7.9   5.4.17-2102.206.1.el7uek.x86_64   cri-o://1.20.2
10.0.10.170   Ready    node    23m     v1.20.11   10.0.10.170   <none>        Oracle Linux Server 7.9   5.4.17-2102.206.1.el7uek.x86_64   cri-o://1.20.2
Worker Node upgrade - out-of-place upgrade
Only the control plane has been upgraded due to the upgrade of the OKE cluster, and now it is possible to upgrade in units of node pools. The out-of-place upgrade method upgrades in the order of creating a new upgraded version of the node pool -> draining all nodes of the existing node pool -> deleting the existing node pool.
Create a new version of the Node Pool
Go to the OKE cluster detail page.
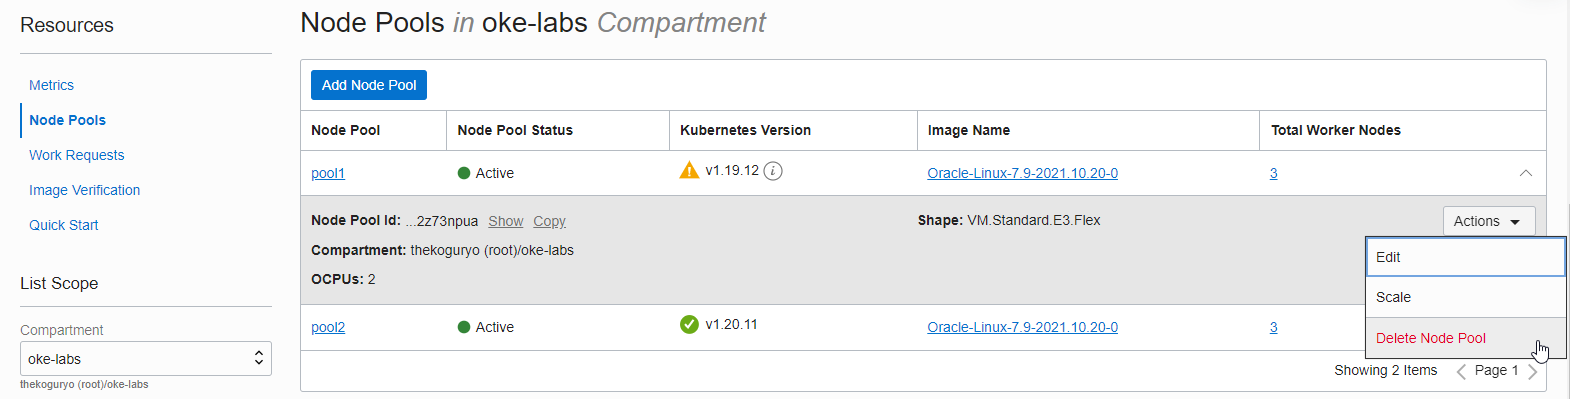
Go to Resources > Node Pools.
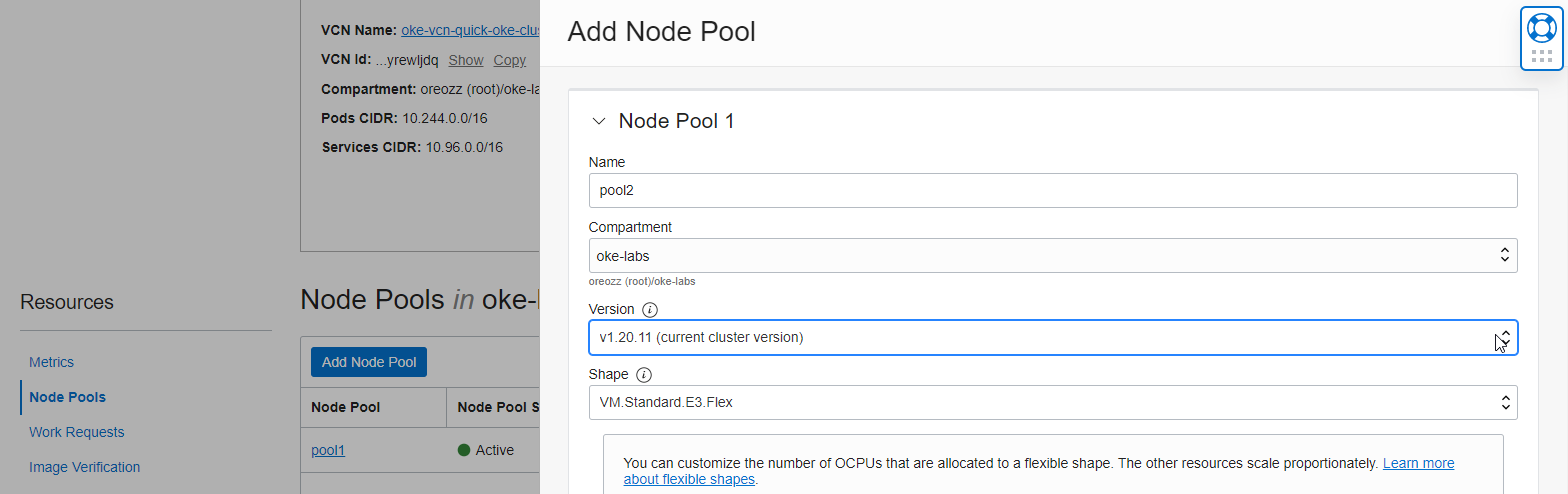
Click Add Node Pool to add a new Node Pool while there is an existing version of the Node Pool as shown in the figure.

Enter new Node Pool information to create it.
- Name
- Version: Select a new version
- Shape: Node VM type
- Number of nodes: number of nodes
- Placement Configuration
- AD, subnet where the node will be located
- Add an SSH key: The private key of the key to be used for SSH access to the Node VM
You can check the added Node Pool in the OCI service console.
Drain all nodes of the existing Node Pool
Running apps are running in the existing Node Pool.
oke_admin@cloudshell:file-storage (ap-seoul-1)$ kubectl get pod -o wide
NAME                             READY   STATUS    RESTARTS   AGE   IP             NODE          NOMINATED NODE   READINESS GATES
nginx-bvs-pvc-7b574c9c5c-8jj2d   1/1     Running   0          18m   10.244.0.134   10.0.10.29    <none>           <none>
nginx-fss-pvc-9fb98454f-2jbp8    1/1     Running   0          18m   10.244.0.5     10.0.10.242   <none>           <none>
nginx-fss-pvc-9fb98454f-nwqfd    1/1     Running   0          19m   10.244.1.5     10.0.10.61    <none>           <none>
nginx-fss-pvc-9fb98454f-twx4h    1/1     Running   0          18m   10.244.1.6     10.0.10.61    <none>           <none>
oke_admin@cloudshell:file-storage (ap-seoul-1)$ kubectl get nodes -L name --sort-by=.metadata.labels.name
NAME          STATUS   ROLES   AGE     VERSION    NAME
10.0.10.242   Ready    node    71m     v1.19.12   pool1
10.0.10.29    Ready    node    71m     v1.19.12   pool1
10.0.10.61    Ready    node    71m     v1.19.12   pool1
10.0.10.12    Ready    node    4m25s   v1.20.11   pool2
10.0.10.126   Ready    node    4m48s   v1.20.11   pool2
10.0.10.191   Ready    node    4m42s   v1.20.11   pool2
Remove one node from the schedule with the command
kubectl drain <node_name> --ignore-daemonsets --delete-emptydir-dataas shown below.oke_admin@cloudshell:file-storage (ap-seoul-1)$ kubectl drain 10.0.10.242 --ignore-daemonsets --delete-emptydir-data node/10.0.10.242 already cordoned WARNING: ignoring DaemonSet-managed Pods: kube-system/csi-oci-node-l62xw, kube-system/kube-flannel-ds-7dv8l, kube-system/kube-proxy-zv4ks, kube-system/proxymux-client-24nmv evicting pod kube-system/coredns-c5d4bf466-wv8fb evicting pod default/nginx-fss-pvc-9fb98454f-2jbp8 evicting pod kube-system/coredns-c5d4bf466-h5rrm pod/coredns-c5d4bf466-wv8fb evicted pod/nginx-fss-pvc-9fb98454f-2jbp8 evicted pod/coredns-c5d4bf466-h5rrm evicted node/10.0.10.242 evictedYou can see that node 242 is excluded from container scheduling as shown below. After confirming that the POD has moved to another node, proceed to the next operation.
oke_admin@cloudshell:file-storage (ap-seoul-1)$ kubectl get nodes -L name --sort-by=.metadata.labels.name
NAME          STATUS                     ROLES   AGE     VERSION    NAME
10.0.10.242   Ready,SchedulingDisabled   node    76m     v1.19.12   pool1
10.0.10.29    Ready                      node    76m     v1.19.12   pool1
10.0.10.61    Ready                      node    76m     v1.19.12   pool1
10.0.10.12    Ready                      node    9m15s   v1.20.11   pool2
10.0.10.126   Ready                      node    9m38s   v1.20.11   pool2
10.0.10.191   Ready                      node    9m32s   v1.20.11   pool2
oke_admin@cloudshell:file-storage (ap-seoul-1)$ kubectl get pod -o wide
NAME                             READY   STATUS    RESTARTS   AGE   IP             NODE          NOMINATED NODE   READINESS GATES
nginx-bvs-pvc-7b574c9c5c-8jj2d   1/1     Running   0          22m   10.244.0.134   10.0.10.29    <none>           <none>
nginx-fss-pvc-9fb98454f-5k8wg    1/1     Running   0          57s   10.244.3.2     10.0.10.126   <none>           <none>
nginx-fss-pvc-9fb98454f-nwqfd    1/1     Running   0          23m   10.244.1.5     10.0.10.61    <none>           <none>
nginx-fss-pvc-9fb98454f-twx4h    1/1     Running   0          22m   10.244.1.6     10.0.10.61    <none>           <none>
The remaining nodes in the existing node pool are also drained.
oke_admin@cloudshell:file-storage (ap-seoul-1)$ kubectl get nodes -L name --sort-by=.metadata.labels.name
NAME          STATUS                     ROLES   AGE   VERSION    NAME
10.0.10.242   Ready,SchedulingDisabled   node    79m   v1.19.12   pool1
10.0.10.29    Ready,SchedulingDisabled   node    79m   v1.19.12   pool1
10.0.10.61    Ready,SchedulingDisabled   node    79m   v1.19.12   pool1
10.0.10.12    Ready                      node    11m   v1.20.11   pool2
10.0.10.126   Ready                      node    12m   v1.20.11   pool2
10.0.10.191   Ready                      node    12m   v1.20.11   pool2
Delete existing node pool
All nodes in the existing node pool are drained and are no longer used.
In the OCI service console, go to the OKE cluster detail page.
Go to Resources > Node Pools and delete the existing Node Pool.
The upgrade is complete.
oke_admin@cloudshell:file-storage (ap-seoul-1)$ kubectl get nodes -L name --sort-by=.metadata.labels.name
NAME          STATUS   ROLES   AGE   VERSION    NAME
10.0.10.12    Ready    node    18m   v1.20.11   pool2
10.0.10.126   Ready    node    19m   v1.20.11   pool2
10.0.10.191   Ready    node    19m   v1.20.11   pool2
As an individual, this article was written with my personal time. There may be errors in the content of the article, and the opinions in the article are personal opinions.