Warning
This content has been generated by machine translation. The translations are automated and have not undergone human review or validation.
1.6.1 Using Block Volumes
The container’s internal storage is basically destroyed when the container is deleted or terminated. A separate Persistent Volume is used to protect data from disappearing and to store data that needs to be preserved.
Check the StorageClass for the default installed Persistent Volume
OKE provides Persistent Volume to use OCI Block Volume service as a service provided based on OCI IaaS. As of the current version, we are using two types: the FlexVolume volume plugin and the Container Storage Interface (CSI) volume plugin.
Check the default StorageClass
- oci: Use FlexVolume plugin for OCI Block Volume service
- oci-bv: Use CSI plugin for OCI Block Volume service
oke_admin@cloudshell:~ (ap-seoul-1)$ kubectl get storageclass
NAME            PROVISIONER                       RECLAIMPOLICY   VOLUMEBINDINGMODE      ALLOWVOLUMEEXPANSION   AGE
oci (default)   oracle.com/oci                    Delete          Immediate              false                  2d
oci-bv          blockvolume.csi.oraclecloud.com   Delete          WaitForFirstConsumer   false                  2d
CSI Volume Plugin
- The FlexVolume plugin method is older since the open source Kubernetes version 1.2, but it is a flow that uses the CSI plugin method in upstream Kubernetes.
- Also in OKE Release Note [August 1, 2020, Support for the Container Storage Interface (CSI) volume plug-in](https://docs.oracle.com/en-us/iaas/releasenotes/changes/99628398- As shown in 0926-4fd6-9bfa-06e448278c14/), in OKE, new features will be added to the CSI plugin, and the FlexVolume will be maintenance only. So, in the description below, we will use the oci-bv storageclass that uses the CSI plugin.
- For the oci storageclass using the Flex plugin, refer to the [official document] (https://docs.oracle.com/en-us/iaas/Content/ContEng/Tasks/contengcreatingpersistentvolumeclaim.htm).
Create and use Persistent Volume using CSI Plugin for OCI Block Volume
Persistent Volume Test
Make a request using PV request yaml as below.
apiVersion: v1
kind: PersistentVolumeClaim
metadata:
  name: csi-bvs-pvc
spec:
  storageClassName: "oci-bv"
  accessModes:
    - ReadWriteOnce
  resources:
    requests:
      storage: 50Gi
Deploy the test app
- A test app that mounts the requested Persistent Volume on the container
apiVersion: apps/v1
kind: Deployment
metadata:
  labels:
    app: nginx-bvs-pvc
  name: nginx-bvs-pvc
spec:
  replicas: 1
  selector:
    matchLabels:
      app: nginx-bvs-pvc
  template:
    metadata:
      labels:
        app: nginx-bvs-pvc
    spec:
      containers:
      - name: nginx
        image: nginx:latest
        volumeMounts:
        - name: data
          mountPath: /usr/share/nginx/html
      volumes:
      - name: data
        persistentVolumeClaim:
          claimName: csi-bvs-pvc
Generate result
- As shown below, you can see that the PV is normally created according to the PV request and operated as a test app.
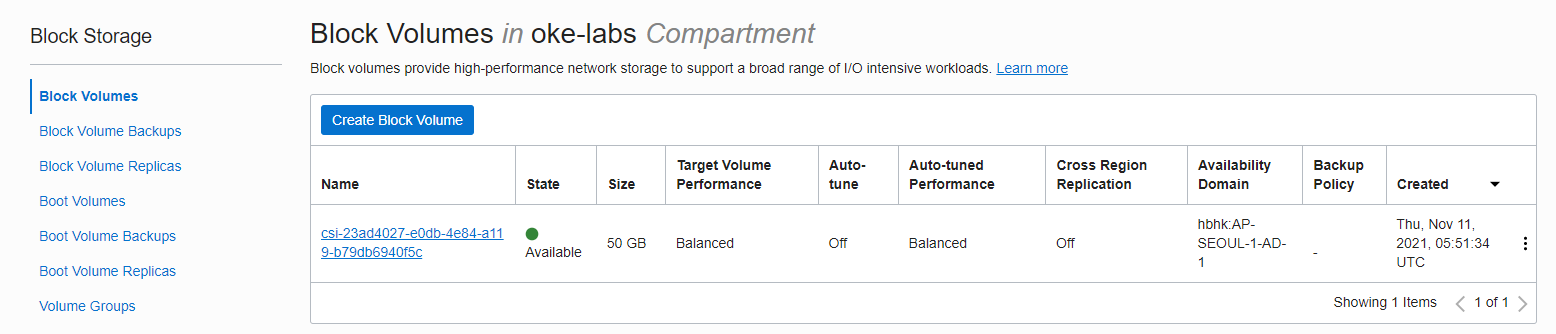
oke_admin@cloudshell:persistent-volume (ap-seoul-1)$ kubectl apply -f csi-bvs-pvc.yaml
persistentvolumeclaim/csi-bvs-pvc created
oke_admin@cloudshell:persistent-volume (ap-seoul-1)$ kubectl apply -f nginx-deployment-bvs-pvc.yaml
deployment.apps/nginx-bvs-pvc created
oke_admin@cloudshell:persistent-volume (ap-seoul-1)$ kubectl get pv
NAME                                       CAPACITY   ACCESS MODES   RECLAIM POLICY   STATUS   CLAIM                 STORAGECLASS   REASON   AGE
csi-14f32977-eaf6-4eaa-87bd-7c736ec43a52   50Gi       RWO            Delete           Bound    default/csi-bvs-pvc   oci-bv                  101s
oke_admin@cloudshell:persistent-volume (ap-seoul-1)$ kubectl get pod
NAME                             READY   STATUS    RESTARTS   AGE
nginx-bvs-pvc-7b574c9c5c-vdp7c   1/1     Running   0          118s
Block Volume If you look at the Storage > Block Volumes screen in the OCI service console, you can see that a Block Volume for PV has been created and attached to a specific Worker Node as shown below.
Test
Write to Persistent Volume
Go inside the container and write a file in the mounted PV as shown below.
oke_admin@cloudshell:persistent-volume (ap-seoul-1)$ kubectl exec -it nginx-bvs-pvc-7b574c9c5c-vdp7c -- bash
root@nginx-bvs-pvc-7b574c9c5c-vdp7c:/# echo "Hello PV" >> /usr/share/nginx/html/hello_world.txt
root@nginx-bvs-pvc-7b574c9c5c-vdp7c:/# cat /usr/share/nginx/html/hello_world.txt
Hello PV
root@nginx-bvs-pvc-7b574c9c5c-vdp7c:/#
Rebuild after deletion of POD
To ensure that the Persistent Volume is preserved, delete the existing POD and allow it to be recreated. At this time, in RWO mode, if a POD is created in another node, a multi-attach error occurs temporarily. It will take some time to realize that the old POD has been deleted, and after a while the POD will be recreated.
oke_admin@cloudshell:persistent-volume (ap-seoul-1)$ kubectl get pod
NAME                             READY   STATUS    RESTARTS   AGE
nginx-bvs-pvc-7b574c9c5c-vdp7c   1/1     Running   0          6m53s
oke_admin@cloudshell:persistent-volume (ap-seoul-1)$ kubectl delete pod nginx-bvs-pvc-7b574c9c5c-vdp7c
pod "nginx-bvs-pvc-7b574c9c5c-vdp7c" deleted
oke_admin@cloudshell:persistent-volume (ap-seoul-1)$ kubectl get pod
NAME                             READY   STATUS              RESTARTS   AGE
nginx-bvs-pvc-7b574c9c5c-vrptl   0/1     ContainerCreating   0          17s
oke_admin@cloudshell:persistent-volume (ap-seoul-1)$ kubectl get pod
NAME                             READY   STATUS    RESTARTS   AGE
nginx-bvs-pvc-7b574c9c5c-vrptl   1/1     Running   0          75s
Check Persistent Volume in new POD
If you check the previously changed file in the new POD again, you can see that the existing contents remain.
oke_admin@cloudshell:persistent-volume (ap-seoul-1)$ kubectl exec -it nginx-bvs-pvc-7b574c9c5c-vrptl -- cat /usr/share/nginx/html/hello_world.txt
Hello PV
Notes
- As in the previous test, in ReadWriteOnce access mode, only PODs in a single Kubernetes Node can be attached and used. If you try to use the same PV in a POD in another node, a Multi-Attach error occurs when starting the container, and the container does not start.
- Also, when restarting the POD with Self-Healing, a Multi-Attach error occurs because the existing POD thinks that the volume is being used, and it takes some time to recognize that there is no POD in use.
ReadWriteMany support
Based on the current version, the CSI Driver for OCI Block Volume Service only supports ReadWriteOnce. So, only multiple Pods are supported on a single Kuberenetes Node. Also, if you change the accessMode above to ReadWriteMany and do the same, the pod will not be created and an error will appear as shown below.
oke_admin@cloudshell:~ (ap-seoul-1)$ kubectl get events
LAST SEEN   TYPE      REASON                   OBJECT                               MESSAGE
...
80s         Warning   ProvisioningFailed       persistentvolumeclaim/mynginxclaim   failed to provision volume with StorageClass "oci-bv": rpc error: code = InvalidArgument desc = invalid volume capabilities requested. Only SINGLE_NODE_WRITER is supported ('accessModes.ReadWriteOnce' on Kubernetes)
As an individual, this article was written with my personal time. There may be errors in the content of the article, and the opinions in the article are personal opinions.