Warning
This content has been generated by machine translation. The translations are automated and have not undergone human review or validation.
2.2 Using Helm Chart Repository
OCIR is an Open Container Initiative (OCI) Registry, and Helm 3 currently supports OCI Registry as an experimental (experimental) feature.
Prepare the Helm CLI environment
Connect to Cloud Shell or work environment to use helm cli.
Install helm cli 3.7
To register a chart in OCIR, the OCI Registry, use the helm push command provided by helm 3.7 to facilitate it. As of the document writing date, the helm cli version currently installed by default in Cloud Shell is 3.5.4, so 3.7 is additionally installed.
wget https://get.helm.sh/helm-v3.7.1-linux-amd64.tar.gz
tar -zxvf helm-v3.7.1-linux-amd64.tar.gz linux-amd64/helm
mv linux-amd64/helm ~/.local/bin/
Register in PATH in .bashrc
PATH=$HOME/.local/bin:$HOME/bin:$PATHActivate OCI Support
OCI Registry support in the helm cli is an experimental feature, and the following environment variables need to be set for use.
export HELM_EXPERIMENTAL_OCI=1
Register Helm Chart after creation
Create a sample chart
Helm Chart Template Guide Try registering the sample chart created by following the example to OCIR.
Create a chart for testing.
oke_admin@cloudshell:helm (ap-seoul-1)$ helm create mychart
Creating mychart
Charting
The generated chart is a sample chart that deploys nginx. For actual charting, I will modify it for the app, but for now, I just use it without modification as a deployment test.
Chart Packaging
Package it with the
helm packagecommand.oke_admin@cloudshell:helm (ap-seoul-1)$ cd mychart oke_admin@cloudshell:mychart (ap-seoul-1)$ helm package . Successfully packaged chart and saved it to: /home/oke_admin/works/helm/mychart/mychart-0.1.0.tgz oke_admin@cloudshell:mychart (ap-seoul-1)$ ls charts Chart.yaml mychart-0.1.0.tgz templates values.yaml
OCIR Login and Helm Chart Push
Log in to OCIR using the same user and Auth Token as when logging in with the docker cli. See previous.
Log in with the helm cli in Cloud Shell or the connection environment through the Auth Token you created earlier.
- OCIR address:
<region-key>.ocir.io- region-key: Seoul Region is ap-seoul-1 or icn
- Full Region Information: Availability by Region
- username:
<tenancy-namespace>/<username>format- Username: The user name shown in the user profile in the OCI service console is used.
- User on Oracle Identity Cloud Service:
<tenancy-namespace>/oracleidentitycloudservice/<username> - OCI Local user:
<tenancy-namespace>/<username>
- User on Oracle Identity Cloud Service:
- tenancy-namespace: You can check the tenancy-namespace you checked when creating the Repository or
oci os ns getin Cloud Shell.
- Password: Auth Token of the user to log in created earlier
oke_admin@cloudshell:mychart (ap-seoul-1)$ oci os ns get { "data": "cnrlxxxxxxxxx" } oke_admin@cloudshell:mychart (ap-seoul-1)$ helm registry login -u ${tenancy_namespace}/oke-admin ap-seoul-1.ocir.io Password: Login Succeeded- OCIR address:
Helm Chart Push
- To push to the Repository created in OCIR, simply push the format below. This will create a repository with repo-prefix/ .
<region-key>.ocir.io/<tenancy-namespace>/<repo-prefix>
- mychart example
oke_admin@cloudshell:mychart (ap-seoul-1)$ helm push ./mychart-0.1.0.tgz oci://ap-seoul-1.ocir.io/${tenancy_namespace}/helm Pushed: ap-seoul-1.ocir.io/cnrlxx3w0wgq/helm/mychart:0.1.0 Digest: sha256:842486615ee4398001092a9b2f931320add0ecd13885e039427ce6f7926b493b- To push to the Repository created in OCIR, simply push the format below. This will create a repository with repo-prefix/ .
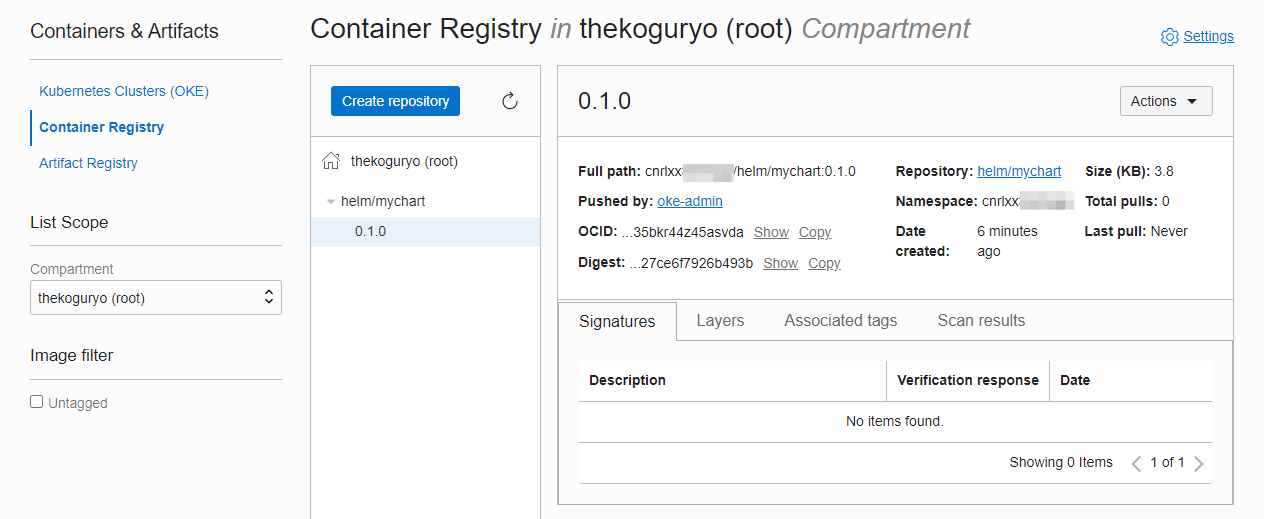
Check OCIR
If you look at OCIR in the OCI service console, you can see that the pushed chart is registered normally. The example was pushed to the root compartment for convenience.
- When pushing to a lower compartment, you must create a repository in advance. Ex) make your helm/mychart repository before push
Deploy Helm Chart to OKE Cluster
Connect to Cloud Shell or your work environment.
Deploy with the registered chart.
helm install mychart oci://ap-seoul-1.ocir.io/${tenancy_namespace}/helm/mychart --version 0.1.0Deployment example
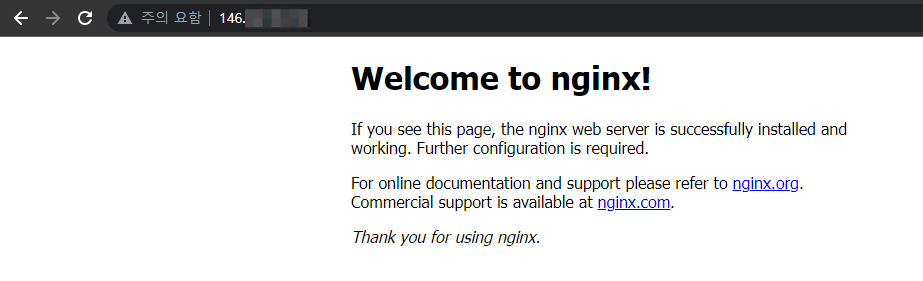
oke_admin@cloudshell:mychart (ap-seoul-1)$ helm install mychart oci://ap-seoul-1.ocir.io/${tenancy_namespace}/helm/mychart --version 0.1.0 --set service.type =LoadBalancer
NAME: mychart
LAST DEPLOYED: Fri Dec 3 15:17:51 2021
NAMESPACE: default
STATUS: deployed
REVISION: 1
NOTES:
1. Get the application URL by running these commands:
     NOTE: It may take a few minutes for the LoadBalancer IP to be available.
           You can watch the status of by running 'kubectl get --namespace default svc -w mychart'
  export SERVICE_IP=$(kubectl get svc --namespace default mychart --template "{{ range (index .status.loadBalancer.ingress 0) }}{{.}}{{ end }}")
  echo http://$SERVICE_IP:80
oke_admin@cloudshell:mychart (ap-seoul-1)$ kubectl get all
NAME READY STATUS RESTARTS AGE
pod/mychart-76677cc888-rl4v6 1/1 Running 0 55s

NAME TYPE CLUSTER-IP EXTERNAL-IP PORT(S) AGE
service/kubernetes ClusterIP 10.96.0.1 <none> 443/TCP 32m
service/mychart LoadBalancer 10.96.198.136 146.xxx.xxx.xxx 80:30926/TCP 56s

NAME READY UP-TO-DATE AVAILABLE AGE
deployment.apps/mychart 1/1 1 1 56s

NAME DESIRED CURRENT READY AGE
replicaset.apps/mychart-76677cc888 1 1 1 55s
Check the distribution app access
As an individual, this article was written with my personal time. There may be errors in the content of the article, and the opinions in the article are personal opinions.