Warning
This content has been generated by machine translation. The translations are automated and have not undergone human review or validation.
3.4 Automating Deployments with Helm Charts via DevOps Services
Automating CI/CD deployment through DevOps service
Create a DevOps project
Use the previously created project as it is, or create a new one.
Automating application deployment
Use Code Repository to Manage Application Code
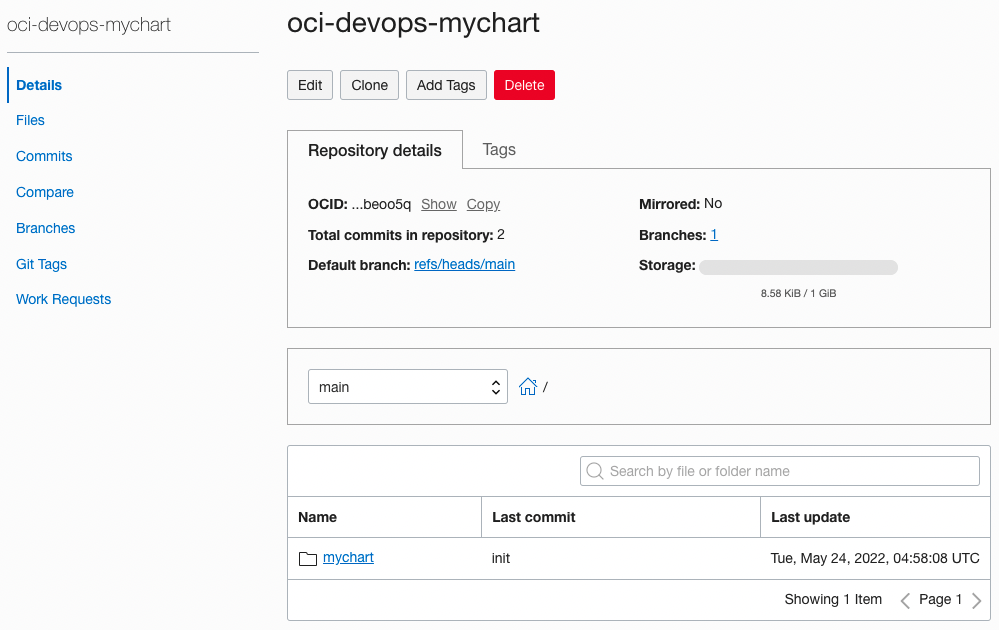
Click Code Repositories in the left menu to create a code repository.
Click Create repository to create the repository.
- Repository name: Ex) oci-devops-mychart
The actual development work can be done on the development PC through the git command. If you click the Clone button above the repository details, the Clone command will appear as shown below. We will use Clone with HTTPS here.
Using the copied address on the development PC, clone it through the git clone command.
git clone <YourClonewithHTTPS URL>User authentication is required at this time. For HTTPS-based user authentication, the following user name format and AuthToken are used.
Create a sample Helm chart
Refer to 2.2 Using Helm Chart Repository to create a chart to distribute.
Go to the copied code repository, and create a Helm chart.
winter@cloudshell:~ (ap-chuncheon-1)$ cd oci-devops-mychart/
winter@cloudshell:oci-devops-mychart (ap-chuncheon-1)$ helm create mychart
Creating mychart
Charting
The generated chart is a sample chart that deploys nginx. For actual charting, I will modify it for the app, but for now, I just use it without modification as a deployment test.
Helm Chart basic configuration file is created. The generated chart is configured to deploy nginx by default.
Push the code to the Code Repository.
git add .
git commit -m "init"
git push
Completion of code writing and reflection
Create a Build Pipeline
It is possible to configure the part corresponding to the CI process that builds code during CI/CD to create deployment artifacts through Build Pipeline.
Go to Projects page and go to Build Pipelines in the left menu.
Click Create build pipeline to create the pipeline.
- Name: Ex) mychart-build-pipeline
Click the created pipeline.
You can configure the pipeline flow by adding Stages as shown. Click Add Stage.
Create a Build Stage
First add Managed Build Stage for build.
Managed Build Stage Setup
Stage name: Ex) build-stage
Build Spec File Path: Specifies the build script path. By default, it uses the build_spec.yaml file in the source root.
Primary Code Repository: Specifies the code repository with the main source to build.
Specifies the repository where the target source code is located.
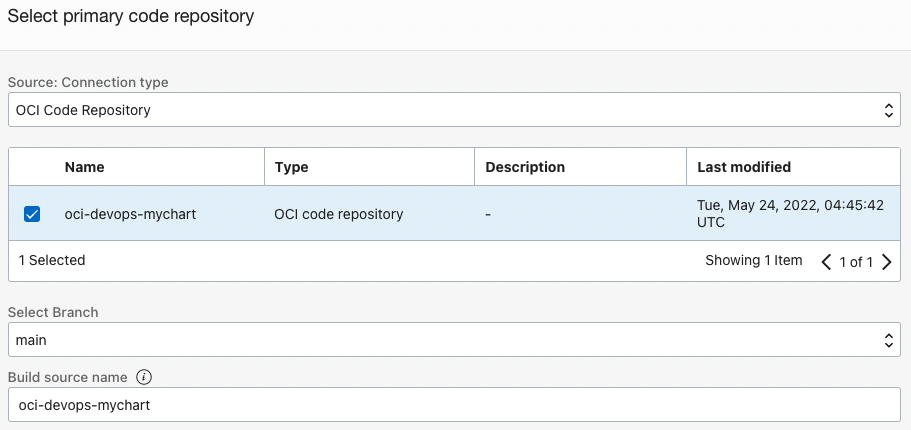
Click Add to add the set Stage.
The definition of Build Spec in the source code is necessary like a test.
Define build_spec.yaml in the root path of your source code.
build_spec.yaml
- env.variables.ocir_username: Username to use when logging in to OCIR
- env.vaultVariables.ocir_authtoken: Vault Secret that stores the AuthToken to be used when logging in to OCIR with helm cli
- env.exportedVariables
- CHART_VERSION: Get the chart’s value dynamically for use in future deployments.
- steps
- Helm Chart Step: Deploy Helm Chart to OCIR through helm cli. The user’s AuthToken to be used as the login authentication password before deployment uses Vault Secret for security.
version: 0.1
component: build
timeoutInSeconds: 6000
runAs: root
shell: bash
env:
  # these are local variables to the build config
  variables:
    ocir_username: "winter"

  # the value of a vaultVariable is the secret-id (in OCI ID format) stored in the OCI Vault service
  # you can then access the value of that secret in your build_spec.yaml commands
  vaultVariables:
    ocir_authtoken: "ocid1.vaultsecret..."

  # exportedVariables are made available to use as parameters in sucessor Build Pipeline stages
  # For this Build to run, the Build Pipeline needs to have a BUILDRUN_HASH parameter set
  exportedVariables:
    - CHART_NAME
    - CHART_VERSION
    - TENANCY_NAMESPACE
    - REPO_NAME

# Its a native way to fetch artifacts from external or artifact repo or a file path to use before a stage.
# More about buildspec formats - https://docs.oracle.com/en-us/iaas/Content/devops/using/build_specs.htm
inputArtifacts:

steps:
  - type: Command
    timeoutInSeconds: 1200
    name: "Install Tools"
    command: |
      mkdir -p ~/.local/bin
      wget https://github.com/mikefarah/yq/releases/download/v4.25.1/yq_linux_amd64 -O ~/.local/bin/yq
      chmod +x ~/.local/bin/yq
      export PATH=$HOME/.local/bin:$PATH

  - type: Command
    name: "Build Source"
    timeoutInSeconds: 4000
    command: |
      echo no action
      echo no action

  - type: Command
    timeoutInSeconds: 1200
    name: "Helm Chart"
    command: |
      TENANCY_NAMESPACE=`oci os ns get --query data --raw-output`
      cd ${OCI_PRIMARY_SOURCE_DIR}
      cd mychart
      helm package .
      helm registry login -u $TENANCY_NAMESPACE/$ocir_username ${OCI_RESOURCE_PRINCIPAL_REGION}.ocir.io -p $ocir_authtoken
      export HELM_EXPERIMENTAL_OCI=1
      helm push ./*.tgz oci://${OCI_RESOURCE_PRINCIPAL_REGION}.ocir.io/$TENANCY_NAMESPACE/helm

  - type: Command
    timeoutInSeconds: 1200
    name: "Check exportedValues"
    command: |
      cd ${OCI_PRIMARY_SOURCE_DIR}/mychart
      CHART_NAME=`yq eval '.name' Chart.yaml`
      CHART_VERSION=`yq eval '.version' Chart.yaml`
      REPO_NAME=helm/$CHART_NAME

outputArtifacts:
The build stage is complete.
Create Vault Secret to store AuthToken
Log in to the OCI console.
Go to Identity & Security > Vault from the top left hamburger menu.
Click Create Vault to create a new Vault.
- Name: Ex) myVault
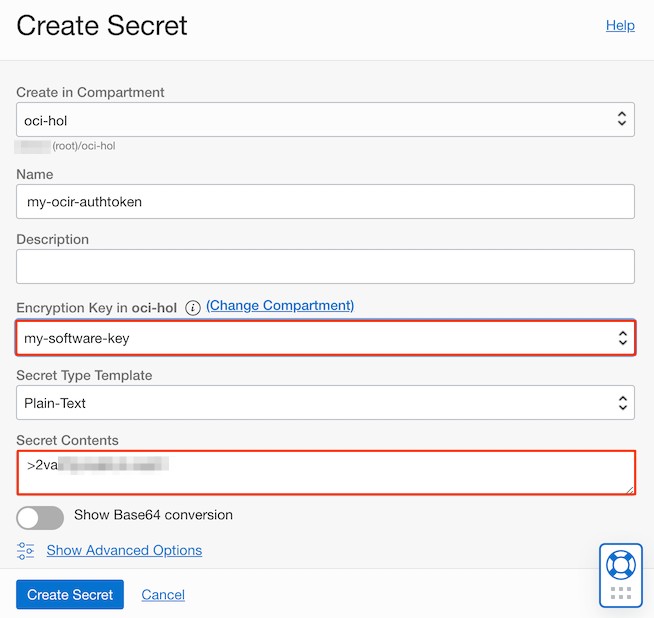
Go to the created Vault and create a Master Encryption Key. For Secret creation, select AES as the encryption method.

Create a new Secret by going to Resources > Secrets in the left menu. Select the encryption key you created earlier, and enter the AuthToken of the user to access OCIR in Secret Contents.
Copy the OCID of the created Secret.
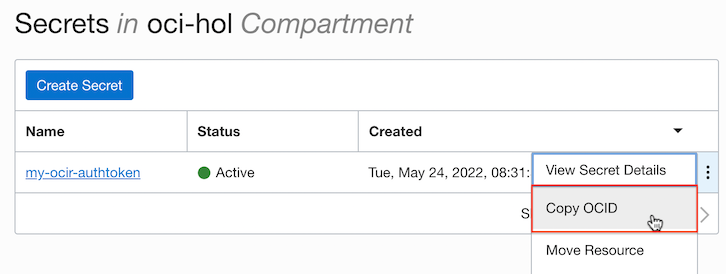
Go back to the source and add the OCID of the Secret copied to env.vaultVariables.ocir_authtoken in the build_spec.yaml you created earlier.
- build_spec.yaml
env:
  # these are local variables to the build config
  variables:
    ocir_username: "winter"

  # the value of a vaultVariable is the secret-id (in OCI ID format) stored in the OCI Vault service
  # you can then access the value of that secret in your build_spec.yaml commands
  vaultVariables:
    ocir_authtoken: "ocid1.vaultsecret..."
Commit & Push the source code to reflect the code.
git add build_spec.yaml
git commit -m "add build_spec"
git push
Create a Deployment Pipeline
It is possible to configure the part corresponding to the CD process of distributing the products built during CI/CD to the actual server through the Deployment Pipeline.
Setting Policy for DevOps Service
Add permission so that deployment pipeline can access OCIR to the policy created earlier.
Create the following Policy with Compartment level.
- Name: Ex) DevOps-compartment-policy
Allow dynamic-group DeployDynamicGroup to read repos in compartment <YourCompartmentName>Create the following Policy with the Root Compartment level.
- Name: Ex) DevOps-root-policy
If you do not create the repository before pushing the repository to OCIR, the image is pushed to the root compartment by default. At this time, an error occurs with permission, and if you want to allow it in the Root Compartment, add the following.
Allow dynamic-group BuildDynamicGroup to read repos in tenancy
Registering the Kubernetes Environment
- If there is no OKE environment registered previously, go to Project page and go to Environments in the left menu to register OKE environment to deploy.
Create a Helm Chart Artifact to deploy to Kubernetes
Go to Project Page and go to Artifacts in the left menu.
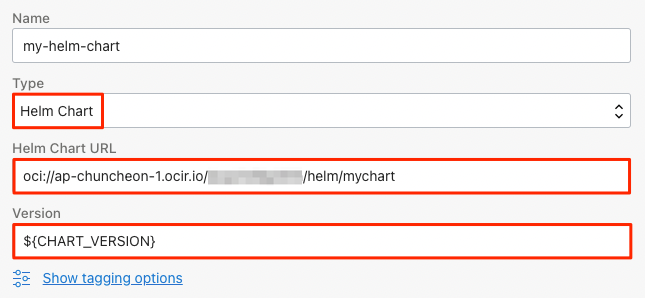
Click Add artifact to add the Helm Chart resource to deploy.
- Select Type as Helm Chart.
- For Helm Chart URL, enter the Helm Chart address located in OCIR in the form of
oci://<region-key>.ocir.io/<tenancy-namespace>/<repo-name>. - Version is the chart version to be imported from OCIR, and you can use parameters as a tag as shown in the picture. Below, I used CHART_VERSION, one of the exportedVariables in the build pipeline.
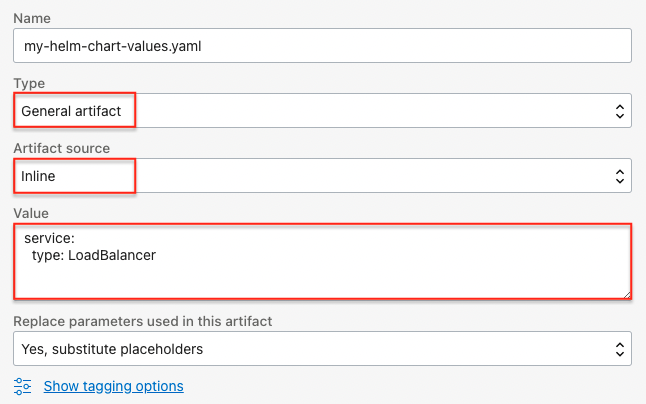
If necessary, click Add artifact to add a value resource to be used when distributing the Helm Chart to be distributed.
Type: select General artifact
Artifact source: Select Inline here.
Value: Enter the Chart Value to be used by overriding the default chart settings. For testing purposes, we will change the Service Type from ClusterIP to LoadBalancer.
service:
  type: LoadBalancer
Create a Deploy Pipeline
Go to Projects page and go to Deployment Pipelines in the left menu.
Click Create pipeline to create the pipeline.
- Name: Ex) mychart-deployment-pipeline
Click the created pipeline.
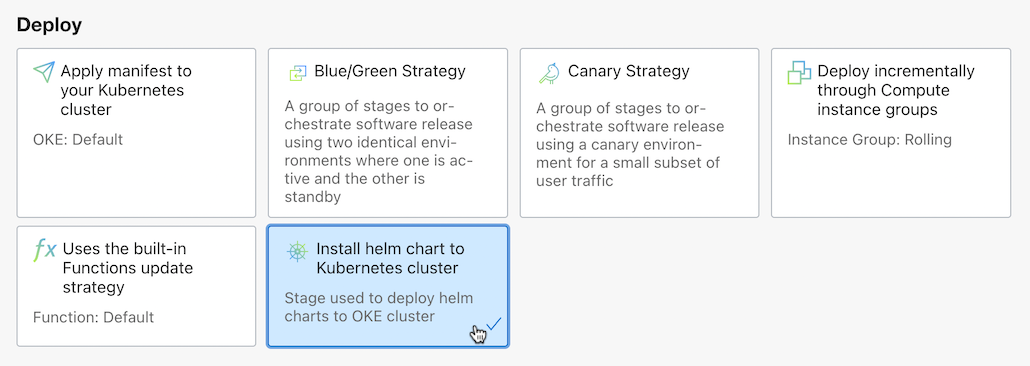
Click Add Stage and select Install helm chart to Kubernetes cluster.
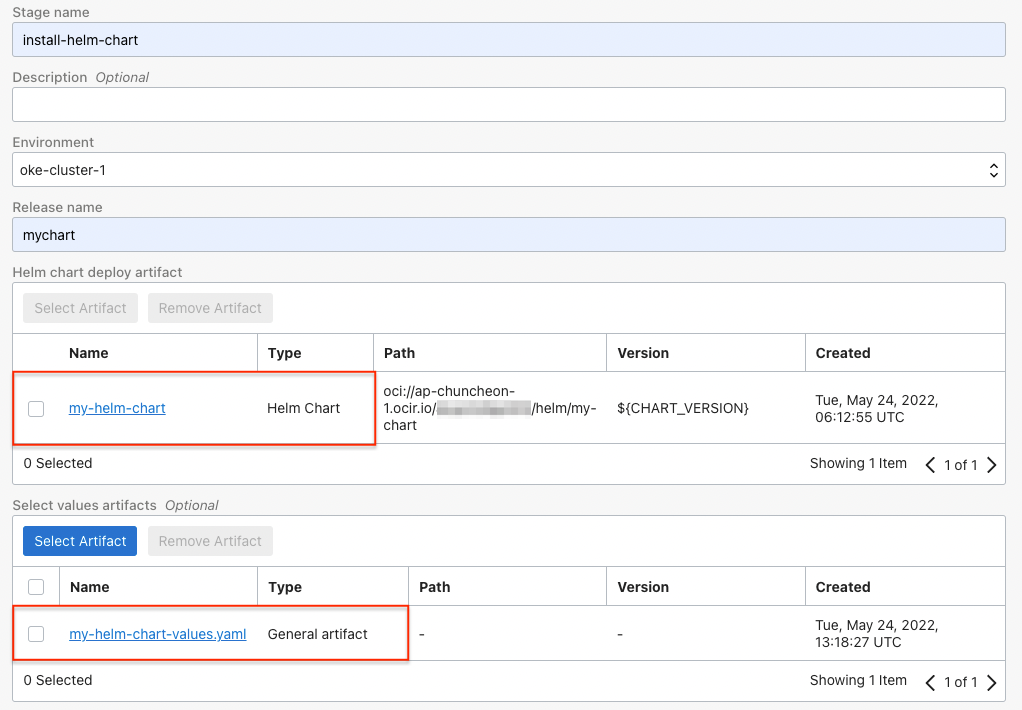
Set up Helm Chart distribution using the resources created earlier.
- Environment: Select OKE cluster to deploy
- Release name: The name to use when distributing the chart
- Helm Chart: Helm Chart Artifact for distribution registered earlier
- Value: Value Artifact to be used when distributing previously registered charts
Calling Deployment Pipeline from Build Pipeline
After the Build Pipeline we created earlier is finished, we add a call to the Deployment Pipeline so that it can be deployed.
- Go to the Build Pipelines you created earlier.
- At the end of the pipeline, right click on the three dots on the Trigger Deployment Stage > select View details.
- Choose Edit Stage to edit.
- Click Select deployment pipeline to save the changes to the newly created Deployment Pipeline for Helm Chart deployment.
- The whole flow of post-build deployment is complete.
test
You can test by setting the Trigger in the same way as before. For a quick test here, we test using Start Manual Run.
Go to the Build Pipelines you created earlier.
Click Start Manual Run in the upper right corner to run it.
When the build pipeline execution is completed, you can check the chart created by OCIR as shown below.

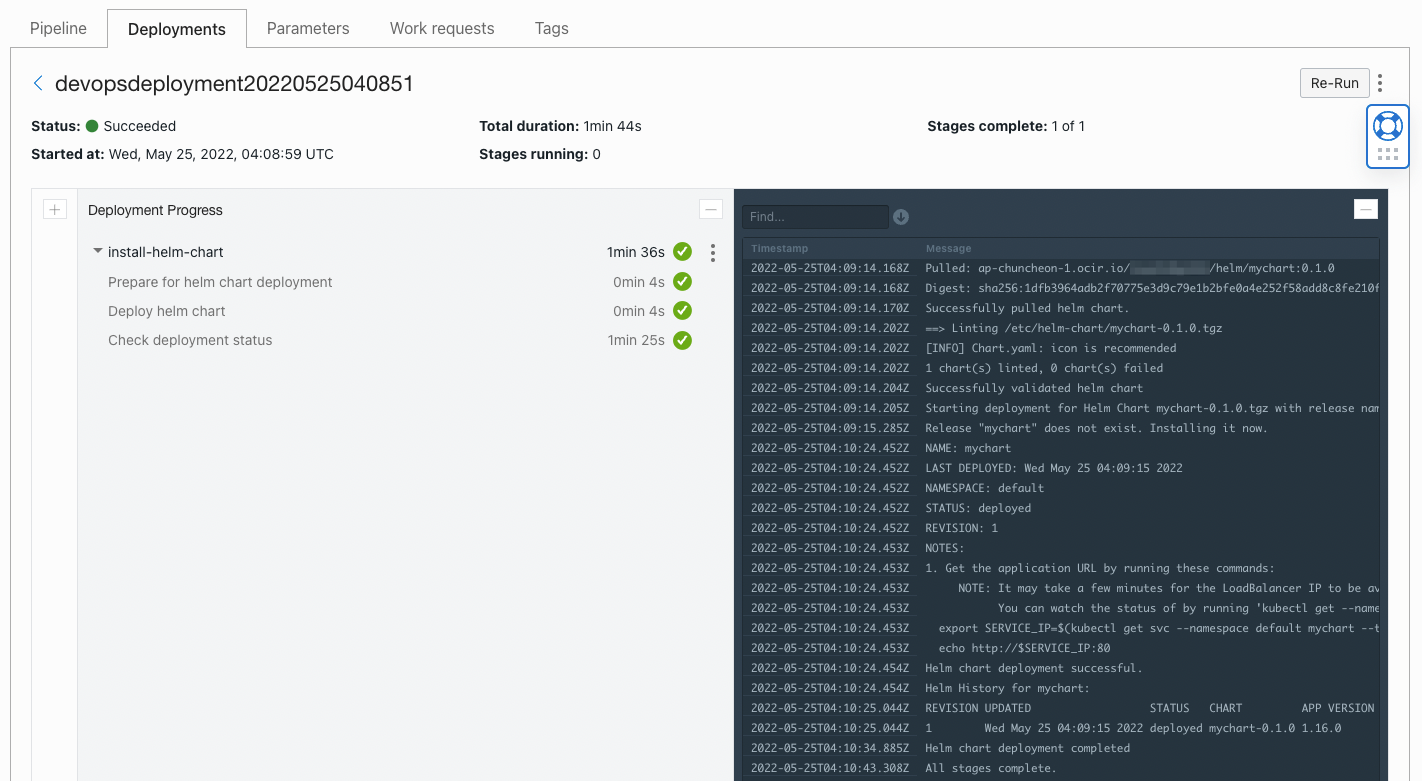
Deployment is successful as shown in the figure in Deployment Pipeline.
You can see Helm Chart deployed in OKE cluster. Or, the value.yaml file is reflected to create the LoadBalancer service type.
winter@cloudshell:~ (ap-chuncheon-1)$ helm list
NAME    NAMESPACE       REVISION        UPDATED                                 STATUS          CHART           APP VERSION
mychart default         1               2022-05-25 04:09:15.518487366 +0000 UTC deployed        mychart-0.1.0   1.16.0
winter@cloudshell:~ (ap-chuncheon-1)$ kubectl get all
NAME                           READY   STATUS    RESTARTS   AGE
pod/mychart-75c4d695c4-gqgn8   1/1     Running   0          26m

NAME                 TYPE           CLUSTER-IP      EXTERNAL-IP     PORT(S)        AGE
service/kubernetes   ClusterIP      10.96.0.1       <none>          443/TCP        13d
service/mychart      LoadBalancer   10.96.251.103   129.xxx.xxx.xxx 80:32461/TCP   26m

NAME                      READY   UP-TO-DATE   AVAILABLE   AGE
deployment.apps/mychart   1/1     1            1           26m

NAME                                 DESIRED   CURRENT   READY   AGE
replicaset.apps/mychart-75c4d695c4   1         1         1       26m
As an individual, this article was written with my personal time. There may be errors in the content of the article, and the opinions in the article are personal opinions.