Warning
This content has been generated by machine translation. The translations are automated and have not undergone human review or validation.
3.2 Deploying with a Blue/Green Deployment Strategy for DevOps Services
Automating CI/CD deployment through DevOps service
Prerequisites
- Refer to 4.1.1 Installing NGINX Ingress Controller to install Nginx Ingress Controller in advance.
Create a DevOps project
Use the previously created project as it is, or create a new one.
Automating application deployment
Use Code Repository to Manage Application Code
As a sample, we will create and test our pre-made Nginx-based web app.
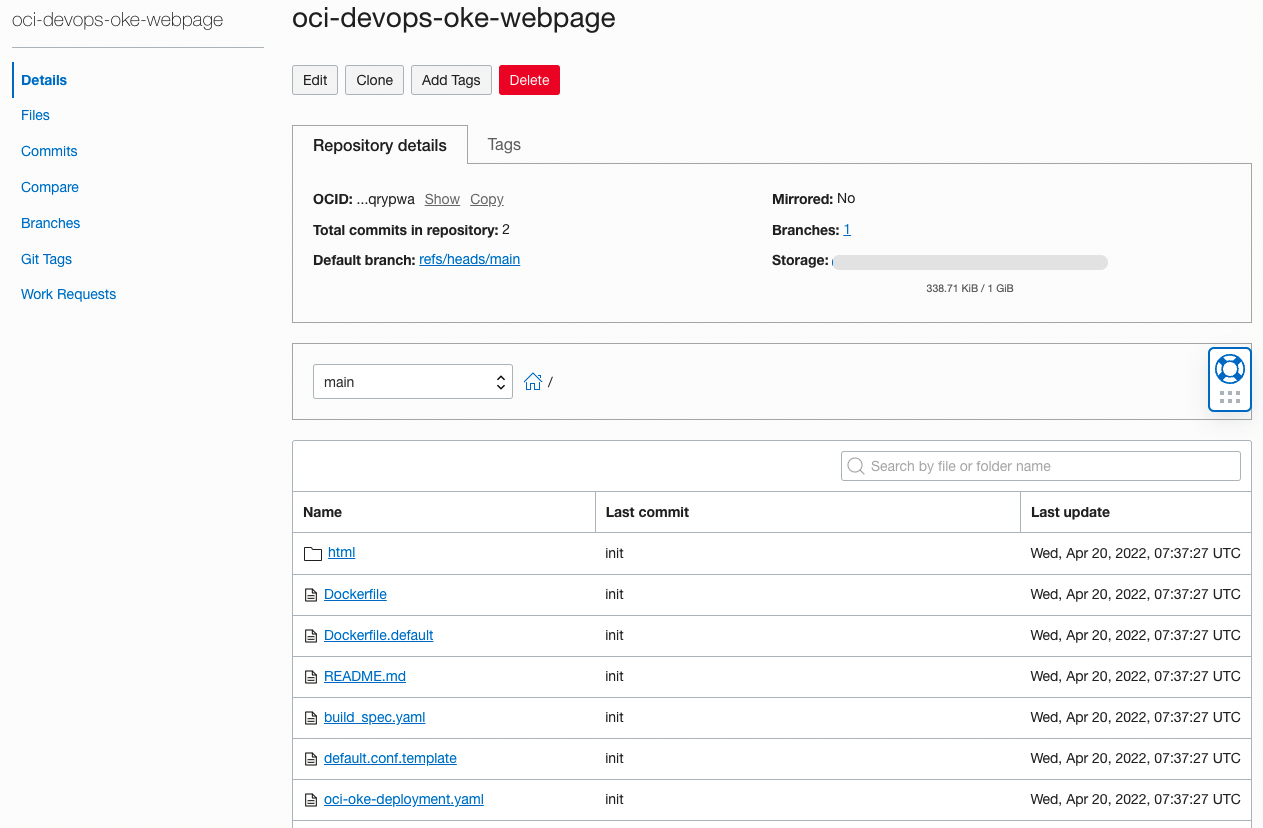
Click Code Repositories in the left menu to create a code repository.
Click Create repository to create the repository.
- Repository name: ex) oci-devops-oke-webpage
The actual development work can be done on the development PC through the git command. If you click the Clone button above the repository details, the Clone command will appear as shown below. We will use Clone with HTTPS here.
Using the copied address on the development PC, clone it through the git clone command.
git clone <YourClonewithHTTPS URL>User authentication is required at this time. For HTTPS-based user authentication, the following user name format and AuthToken are used.
Bring the already developed source and move it to the cloned repository.
wget https://github.com/TheKoguryo/oci-devops-oke-webpage/archive/refs/tags/v2022.04.tar.gz
tar -xvzf v2022.04.tar.gz --strip-components=1 -C oci-devops-oke-webpage/
Push the code to the Code Repository.
cd oci-devops-oke-webpage
git add .
git commit -m "init"
git push
Completion of code writing and reflection
- Dockerfile, default.conf.template, html folder: This is the source file to build the image of the nginx-based web app.
- build_spec.yaml: This is the build definition used in the build stage of the DevOps service.
- oci-oke-deployment.yaml: Kubernetes Manifest file defined for deployment to OKE. I will explain it again later.
Create a Build Pipeline
It is possible to configure the part corresponding to the CI process that builds code during CI/CD to create deployment artifacts through Build Pipeline.
Go to Projects page and go to Build Pipelines in the left menu.
Click Create build pipeline to create the pipeline.
- Name: Ex) webpage-build-pipeline
Click the created pipeline.
You can configure the pipeline flow by adding Stages as shown. Click Add Stage.
Create a Build Stage
First add Managed Build Stage for build.
Managed Build Stage Setup
Stage name: Ex) build-stage
Build Spec File Path: Specifies the build script path. By default, it uses the build_spec.yaml file in the source root.
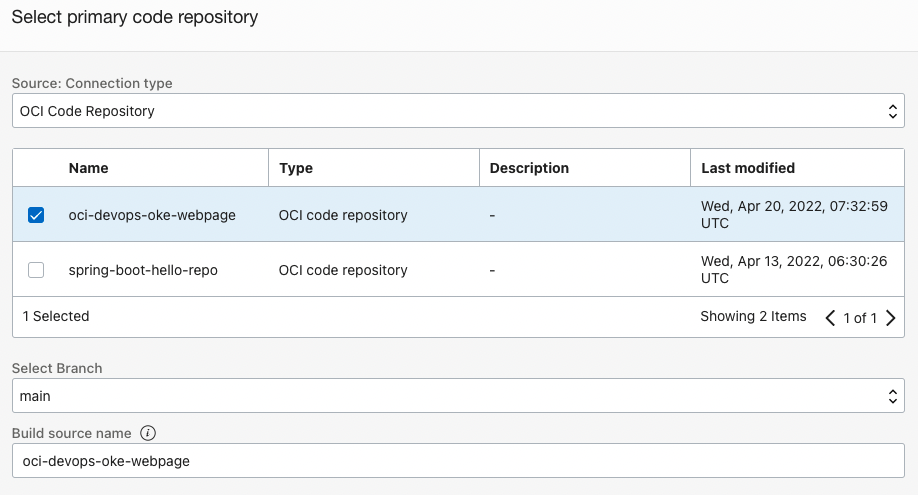
Primary Code Repository: Specifies the code repository with the main source to build.
Specifies the repository where the target source code is located.
Click Add to add the set Stage.
The definition of Build Spec in the source code is necessary like a test.
We have already defined build_spec.yaml in the root path of the developed oci-devops-oke-webpage source code. Check what you have defined.
build_spec.yaml
- outputArtifacts.output-image: refers to the container image that is the build artifact.
- outputArtifacts.output-oci-oke-deployment: Manifest file for OKE deployment in the source code as a build artifact.
- exportedVariables
- IMAGE_PATH: Calculates the OCIR repository based on the built environment information and APP_NAME.
- TAG: For convenience, it is specified as a code Commit ID or BUILD_ID hash value.
version: 0.1
component: build
timeoutInSeconds: 6000
runAs: root
shell: bash
env:
  # these are local variables to the build config
  variables:
    defaultAppName: "webpage"
    defaultContextPath: "/webpage"

  # the value of a vaultVariable is the secret-id (in OCI ID format) stored in the OCI Vault service
  # you can then access the value of that secret in your build_spec.yaml commands
  vaultVariables:

  # exportedVariables are made available to use as parameters in sucessor Build Pipeline stages
  # For this Build to run, the Build Pipeline needs to have a BUILDRUN_HASH parameter set
  exportedVariables:
    - BUILDRUN_HASH
    - APP_NAME
    - IMAGE_PATH
    - TAG
    - CONTEXT_PATH

# Its a native way to fetch artifacts from external or artifact repo or a file path to use before a stage.
# More about buildspec formats - https://docs.oracle.com/en-us/iaas/Content/devops/using/build_specs.htm

inputArtifacts:

steps:
  - type: Command
    name: "Init exportedVariables"
    timeoutInSeconds: 30
    command: |
      APP_NAME=$defaultAppName
      CONTEXT_PATH=$defaultContextPath
      echo $APP_NAME
      echo $CONTEXT_PATH

  - type: Command
    name: "Build Source"
    timeoutInSeconds: 4000
    command: |
      echo no action

  - type: Command
    name: "Define Image Tag - Commit ID"
    timeoutInSeconds: 30
    command: |
      COMMIT_ID=`echo ${OCI_TRIGGER_COMMIT_HASH} | cut -c 1-7`
      BUILDRUN_HASH=`echo ${OCI_BUILD_RUN_ID} | rev | cut -c 1-7`
      [ -z "$COMMIT_ID" ] && TAG=$BUILDRUN_HASH || TAG=$COMMIT_ID

  - type: Command
    name: "Define Image Path"
    timeoutInSeconds: 30
    command: |
      TENANCY_NAMESPACE=`oci os ns get --query data --raw-output`
      REPO_NAME=$APP_NAME
      IMAGE_PATH=$OCI_RESOURCE_PRINCIPAL_REGION.ocir.io/$TENANCY_NAMESPACE/$REPO_NAME

  - type: Command
    timeoutInSeconds: 1200
    name: "Build Container Image"
    command: |
      cd ${OCI_PRIMARY_SOURCE_DIR}
      docker build --pull --rm -t new-generated-image . --build-arg CONTEXT_PATH=$CONTEXT_PATH

  - type: Command
    name: "Check exportedVariables"
    timeoutInSeconds: 30
    command: |
      [ -z "$APP_NAME" ] && APP_NAME=unknown
      [ -z "$IMAGE_PATH" ] && IMAGE_PATH=unknown
      [ -z "$TAG" ] && TAG=unknown
      echo "APP_NAME: " $APP_NAME
      echo "IMAGE_PATH: " $IMAGE_PATH
      echo "TAG: " $TAG

outputArtifacts:
  - name: output-image
    type: DOCKER_IMAGE
    # this location tag doesn't effect the tag used to deliver the container image
    # to the Container Registry
    location: new-generated-image

  - name: output-oci-oke-deployment
    type: BINARY
    location: ${OCI_PRIMARY_SOURCE_DIR}/oci-oke-deployment.yaml
Configuration of Build Stage is completed
Create an Artifact repository to store build artifacts
- Go to Developer Services > Containers & Artifacts > Artifact Registry from the top left hamburger menu.
- Click Create repository to add a repository.
- Name: Ex) oci-hol-artifact-repository
- Immutable artifacts: unchecked for testing
Saving build artifacts to OCIR and Artifact repositories
Go to the Build Pipeline tab.
Click the plus button to add a stage after build-stage.
Select Delivery Artifact Stage.
Enter a stage name and choose Create Artifact.
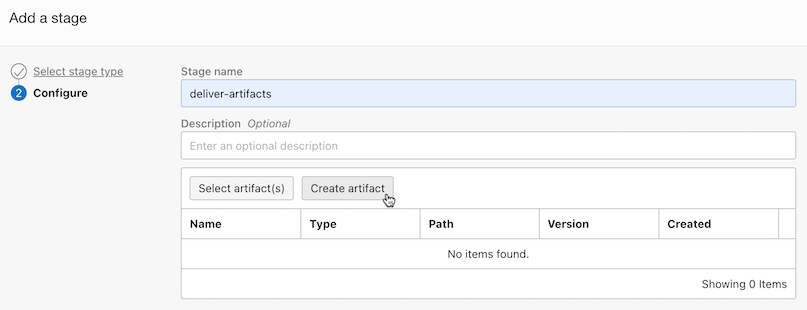
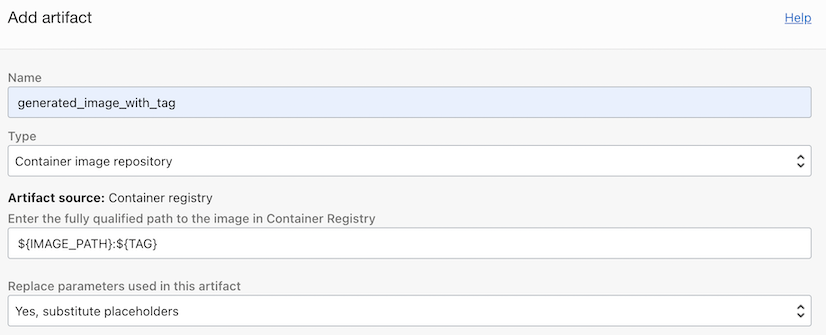
Add Artifact as Container image type.
Image path: Image path used when attaching docker tag. You can enter it directly, but here, use the exportedVariable passed from the build-stage and enter it as follows.
- Name: generated_image_with_tag
- Image Path: ${IMAGE_PATH}:${TAG}
Add one more in the same way.
- Name: generated_image_with_latest
- Image Path: ${IMAGE_PATH}:latest
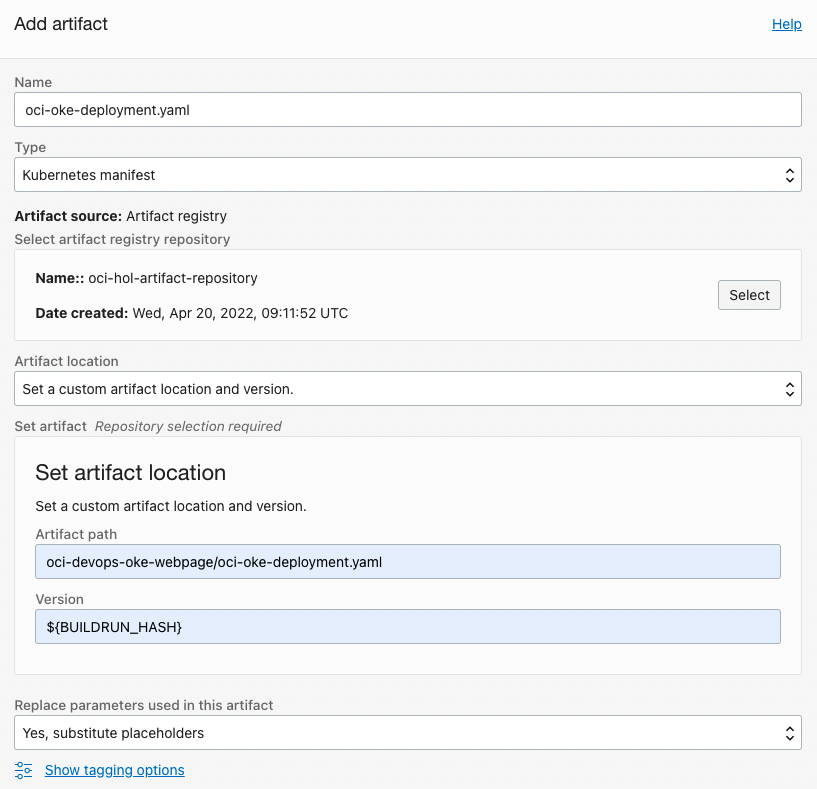
Add the Kubernetes Manifest file to the Artifact Repository you created earlier.
Name: Ex) oci-oke-deployment.yaml
Artifact path: oci-devops-oke-webpage/oci-oke-deployment.yaml
Version: ${BUILDRUN_HASH}
Artifact Mapping
Associate Artifact maps the actual container image files to the 3 Artifacts you just added. Enter the name of the outputArtifacts defined in build_spec.yaml earlier in build-stage.
outputArtifacts:
  - name: output-image
    type: DOCKER_IMAGE
    # this location tag doesn't effect the tag used to deliver the container image
    # to the Container Registry
    location: new-generated-image

  - name: output-oci-oke-deployment
    type: BINARY
    location: ${OCI_PRIMARY_SOURCE_DIR}/oci-oke-deployment.yaml
Now we have added the delivery stage.
Create Blue/Green Deployment Pipeline
It is possible to configure the part corresponding to the CD process of distributing the products built during CI/CD to the actual server through the Deployment Pipeline.
Deploying to Kubernetes with the Blue/Green strategy requires two things: a deployment environment, a Kubernetes Manifest file to deploy, and a Kubernetes Namespace to be used for deployment.
Registering the Kubernetes Environment
- If there is no OKE environment registered previously, go to Project page and go to Environments in the left menu to register OKE environment to deploy.
Prepare the manifest file for deployment to Kubernetes
To use the stage type to deploy to Kubernetes, you need to prepare the manifest yaml file for deployment in advance.
As in the previous exercise, there is a way to do it in inline format, or you can manage and use the Kubernetes Manifest file in the source project file imported earlier in this time.
Sample Manifest file to use
- Deployment, Service: Deployment and cluster IP-based service to deploy the built container app
- Ingress: Required for Blue/Green or Canary deployments. Both provide this function by adjusting routing rules based on the Nginx Ingress Controller.
apiVersion: apps/v1
kind: Deployment
metadata:
  name: ${APP_NAME}-deployment
spec:
  selector:
    matchLabels:
      app: ${APP_NAME}
  replicas: 3
  template:
    metadata:
      labels:
        app: ${APP_NAME}
    spec:
      containers:
        - name: ${APP_NAME}
          # enter the path to your image, be sure to include the correct region prefix
          image: ${IMAGE_PATH}:${TAG}
          imagePullPolicy: Always
          ports:
            - containerPort: 80
              protocol: TCP
          readinessProbe:
            exec:
              command:
              - cat
            # For demo, see the start status easily about rolling updates.
            initialDelaySeconds: 5
            periodSeconds: 5
          livenessProbe:
            exec:
              command:
              - cat
            initialDelaySeconds: 5
            periodSeconds: 5
          env:
            - name: POD_NAMESPACE
              valueFrom:
                fieldRef:
                  fieldPath: metadata.namespace

---
apiVersion: v1
kind: Service
metadata:
  name: ${APP_NAME}-service
spec:
  type: ClusterIP
  ports:
    - port: 8080
      protocol: TCP
      targetPort: 80
  selector:
    app: ${APP_NAME}
---
apiVersion: networking.k8s.io/v1
kind: Ingress
metadata:
  name: ${APP_NAME}-ingress
  annotations:
    kubernetes.io/ingress.class: "nginx"
    nginx.ingress.kubernetes.io/rewrite-target: /$2
spec:
  rules:
  - http:
      paths:
        - path: ${CONTEXT_PATH}(/|$)(.*)
          pathType: Prefix
          backend:
            service:
              name: ${APP_NAME}-service
              port:
                number: 8080
Create a namespace to deploy to Kubernetes
We need the namespace where the blue app will be deployed and the namespace where the green app will be deployed. The current version and new version of the same app will be deployed in each namespace, and traffic is controlled through routing settings.
Connect to the environment where the kubectl command can be executed through Cloud Shell.
Create two namespaces.
Ex) ns-blue, ns-green
kubectl create ns ns-blue
kubectl create ns ns-green
Import images from OCIR
If OCIR repository land (eg, webpage) does not exist in advance, it is created in a private form in the Root Compartment. To import from OKE, either create an imagepullsecret in each namespace in advance, or create a public repository in advance.
Creating a Kubernetes Deployment Stage with Blue/Green Strategy
Go to Projects page and go to Deployment Pipelines in the left menu.
Click Create pipeline to create the pipeline.
- Name: Ex) webpage-bluegreen-deployment-pipeline
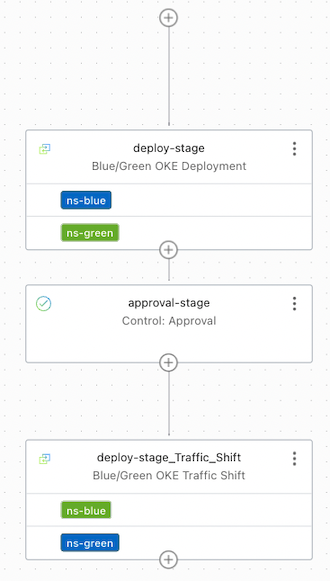
Click the created pipeline to add the Blue/Green Strategy Stage.
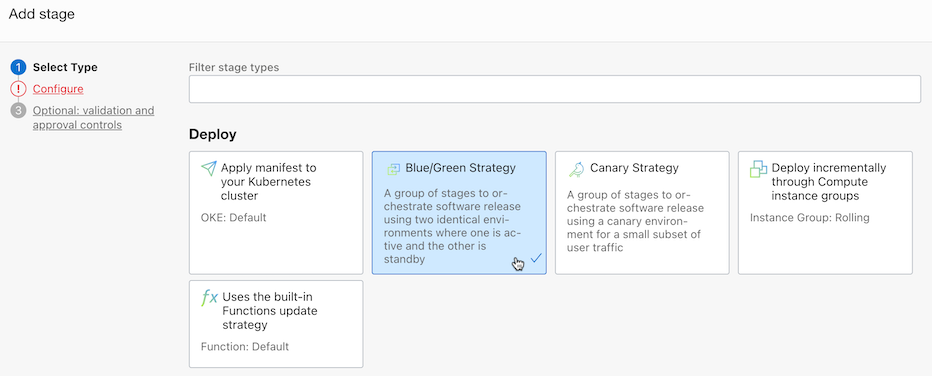
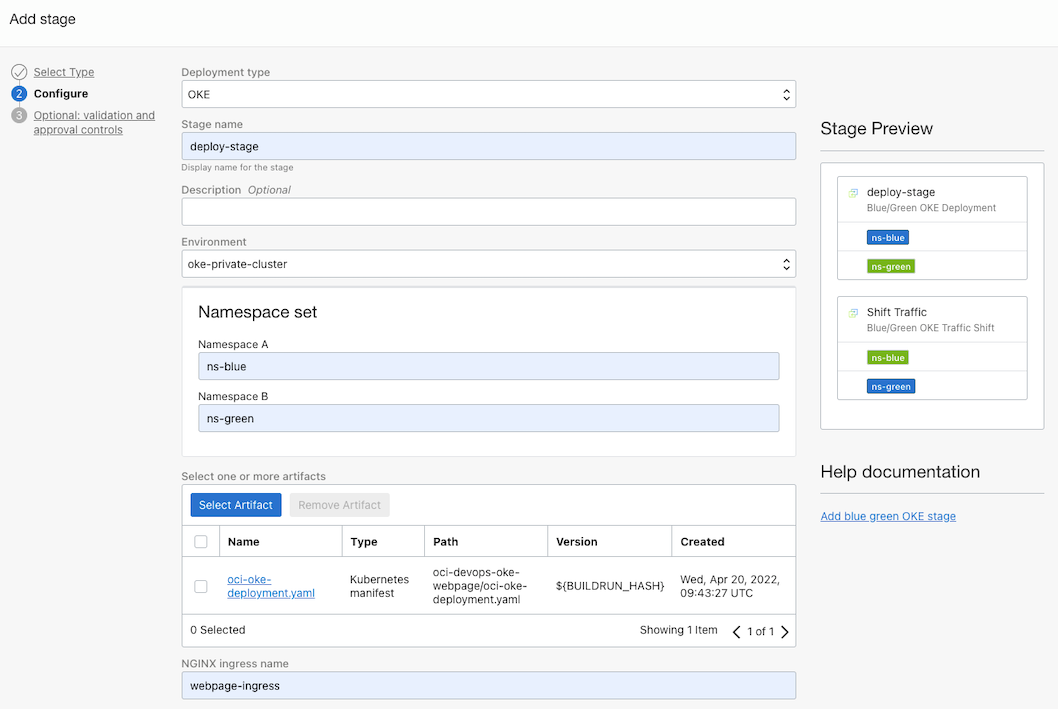
Select the deployment type as OKE, and select the deployment environment and manifest file.
Make additional settings for Blue/Green deployment.
Namespace set: Enter the two namespaces for the deployment you will create earlier. The order of the two doesn’t really matter, just deploy where the old version is, and redirect traffic to the current version to where the new version is.
- Ex) ns-blue, ns-green
NGINX ingress namespace: Enter the ingress resource name of the deployment app defined in the deployment manifest file.
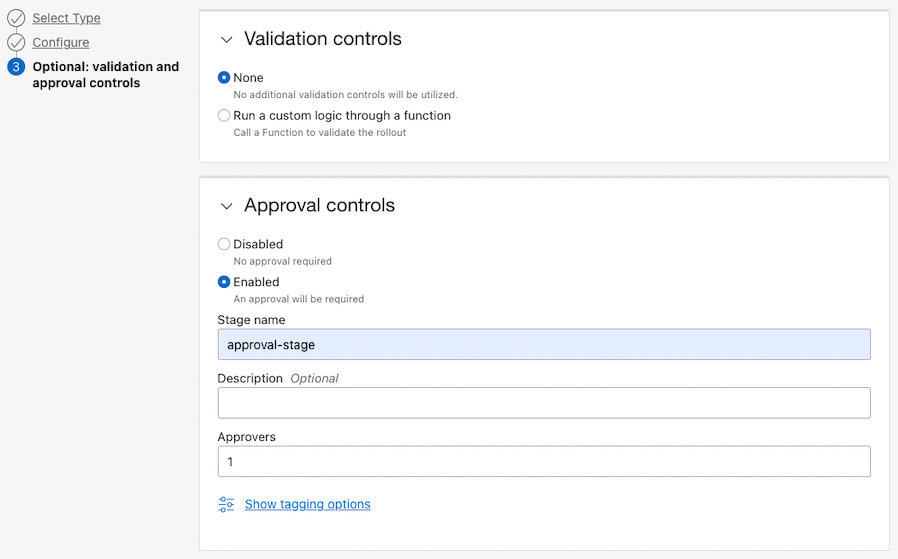
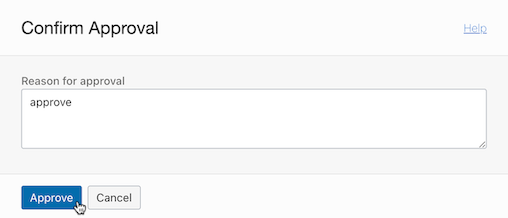
Set Options: Enable Approval controls. It automatically proceeds only to deployment, and after approval, add it to divert traffic. You can think of it as a traffic changeover switch.
Approval controls:
- Name: Ex) approval-stage
Pipeline Completion
Calling Deployment Pipeline from Build Pipeline
After the Build Pipeline we created earlier is finished, we add a call to the Deployment Pipeline so that it can be deployed.
Go to the Build Pipelines you created earlier.
Add a Stage to the end of the pipeline.
Select the Trigger Deployment type.
Specify the Deployment Pipeline for the Blue/Green deployment we created earlier.
The whole flow of post-build deployment is complete.
Setting Trigger
The build and deployment pipeline needs to work automatically when the developer applies the code to the code repository. Triggers are responsible for starting the build pipeline through events that occur in the code repository.
Go to Project Page and go to Trigger in the left menu.
Click Create trigger.
Set the trigger.
- Name: Ex) webpage-build-pipeline-trigger
- Source Code Repository: Select oci-devops-oke-webpage on the OCI Code Repository created earlier.
- Actions: Select webpage-pipeline, which is a build pipeline created with actions that are called when triggered.
Setup is complete.
Test - Blue Deployment
Random changes are made to the oci-devops-oke-webpage source code specified in Trigger and reflected in the Code Repository.
Go to Cloud Shell with the code you are working on.
You can change html/index.html, but for convenience, change the Dockerfile set as an environment variable.
Changes are made based on the current setting, and the code is committed and then pushed.
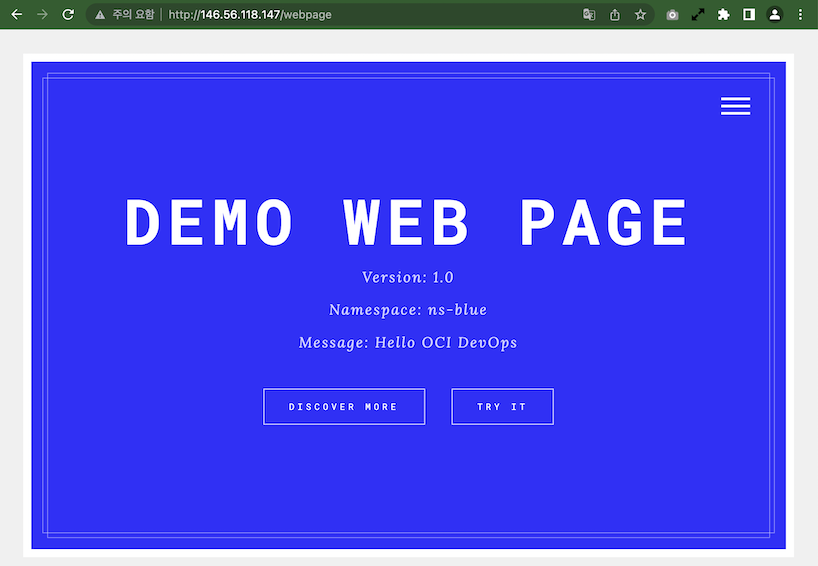
FROM nginx:alpine

COPY default.conf.template /etc/nginx/templates/
COPY html/ /usr/share/nginx/html/

ENV POD_NAMESPACE="default"

ENV VERSION="1.0"
ENV MESSAGE="Hello OCI DevOps"
ENV BACKGROUND="blue"

ARG CONTEXT_PATH="/webpage"
ENV CONTEXT_PATH=$CONTEXT_PATH
It becomes a Trigger and the build starts.
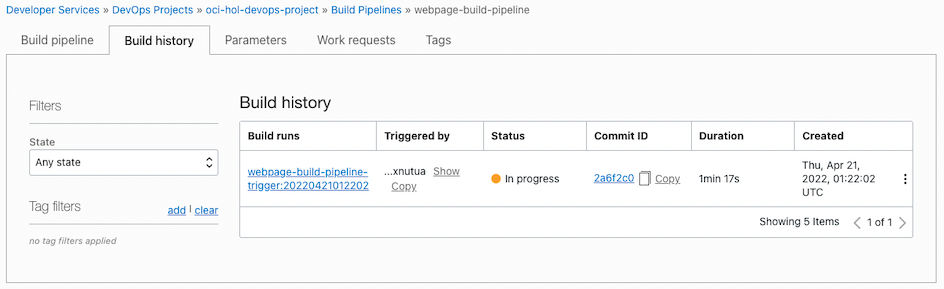
The build succeeds, the deployment pipeline runs, and waits in approval-stage.
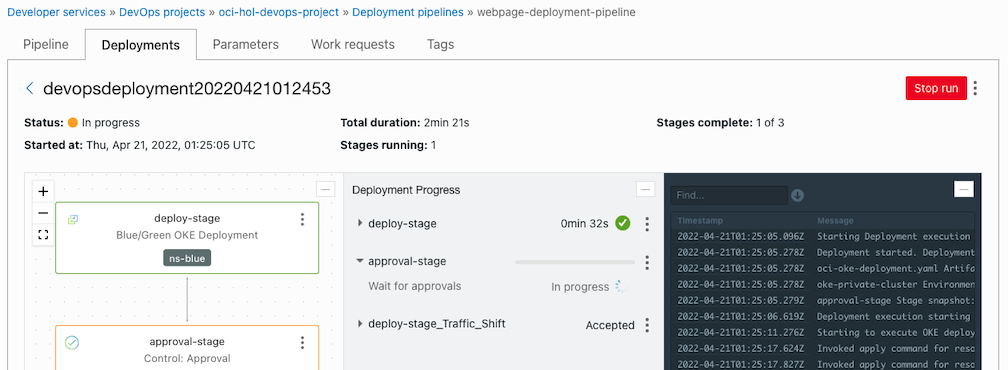
Check the Kubernetes deployment status. You can see that it is deployed only to ns-blue.
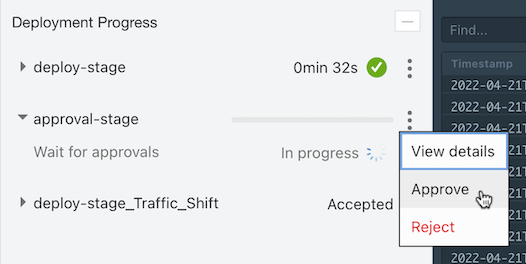
[opc@jumpbox-945115 ~]$ kubectl get all,ingress -n ns-blue
NAME                                      READY   STATUS    RESTARTS   AGE
pod/webpage-deployment-6fbfd769c7-gqprs   1/1     Running   0          9m28s
pod/webpage-deployment-6fbfd769c7-m4lk4   1/1     Running   0          9m28s
pod/webpage-deployment-6fbfd769c7-z924h   1/1     Running   0          9m28s

NAME                      TYPE        CLUSTER-IP      EXTERNAL-IP   PORT(S)    AGE
service/webpage-service   ClusterIP   10.96.166.161   <none>        8080/TCP   9m28s

NAME                                 READY   UP-TO-DATE   AVAILABLE   AGE
deployment.apps/webpage-deployment   3/3     3            3           9m28s

NAME                                            DESIRED   CURRENT   READY   AGE
replicaset.apps/webpage-deployment-6fbfd769c7   3         3         3       9m28s

NAME                                        CLASS    HOSTS   ADDRESS          PORTS   AGE
ingress.networking.k8s.io/webpage-ingress   <none>   *       146.56.118.147   80      9m28s
[opc@jumpbox-945115 ~]$ kubectl get all,ingress -n ns-green
No resources found in ns-green namespace.
Return to the running deployment pipeline and approve in approval-stage.
If approved, Traffic Shift is also performed, and you can see that the ingress is also distributed in ns-green. However, now that ns-blue is Active, if you look at the annotations of webpage-ingress in ns-green, it becomes canary-weight: “0”. In fact, the request does not go to ns-green. .
[opc@jumpbox-945115 ~]$ kubectl get all,ingress -n ns-green
NAME                                        CLASS    HOSTS   ADDRESS          PORTS   AGE
ingress.networking.k8s.io/webpage-ingress   <none>   *       146.56.118.147   80      4m
[opc@jumpbox-945115 ~]$ kubectl get ingress webpage-ingress -n ns-green -o yaml
apiVersion: networking.k8s.io/v1
kind: Ingress
metadata:
  annotations:
    kubernetes.io/ingress.class: nginx
    nginx.ingress.kubernetes.io/canary: "true"
    nginx.ingress.kubernetes.io/canary-by-header: redirect-to-namespaceB
    nginx.ingress.kubernetes.io/canary-weight: "0"
    nginx.ingress.kubernetes.io/rewrite-target: /$2
...
If you access the webpage through the Ingress address, you can see that the Blue app is currently working well.
- Address example) http://146.56.118.147/webpage
Test - Green Deployment
Go back to the source and change the code (e.g., change the environment variable of Dockerfile) and apply the code by Commit & Push
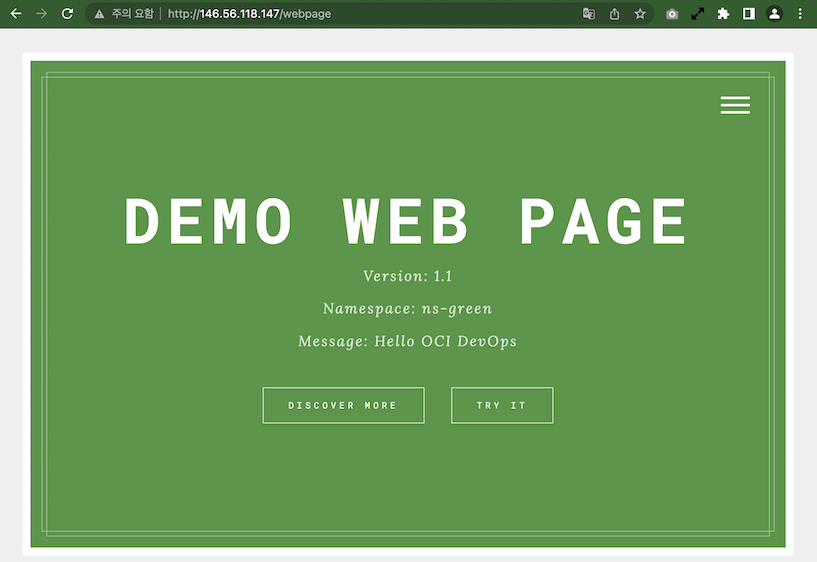
FROM nginx:alpine

COPY default.conf.template /etc/nginx/templates/
COPY html/ /usr/share/nginx/html/

ENV POD_NAMESPACE="default"

ENV VERSION="1.1"
ENV MESSAGE="Hello OCI DevOps"
ENV BACKGROUND="green"

ARG CONTEXT_PATH="/webpage"
ENV CONTEXT_PATH=$CONTEXT_PATH
Rebuild, wait for the deployment pipeline to run and stop at approval-stage.
Check the Kubernetes deployment status. You can see the app deployed to ns-green.
[opc@jumpbox-945115 ~]$ kubectl get all,ingress -n ns-blue
NAME                                      READY   STATUS    RESTARTS   AGE
pod/webpage-deployment-6fbfd769c7-gqprs   1/1     Running   0          34m
pod/webpage-deployment-6fbfd769c7-m4lk4   1/1     Running   0          34m
pod/webpage-deployment-6fbfd769c7-z924h   1/1     Running   0          34m

NAME                      TYPE        CLUSTER-IP      EXTERNAL-IP   PORT(S)    AGE
service/webpage-service   ClusterIP   10.96.166.161   <none>        8080/TCP   34m

NAME                                 READY   UP-TO-DATE   AVAILABLE   AGE
deployment.apps/webpage-deployment   3/3     3            3           34m

NAME                                            DESIRED   CURRENT   READY   AGE
replicaset.apps/webpage-deployment-6fbfd769c7   3         3         3       34m

NAME                                        CLASS    HOSTS   ADDRESS          PORTS   AGE
ingress.networking.k8s.io/webpage-ingress   <none>   *       146.56.118.147   80      34m
[opc@jumpbox-945115 ~]$ kubectl get all,ingress -n ns-green
NAME                                      READY   STATUS    RESTARTS   AGE
pod/webpage-deployment-75c8bb6ffc-5b497   1/1     Running   0          98s
pod/webpage-deployment-75c8bb6ffc-m8dl4   1/1     Running   0          98s
pod/webpage-deployment-75c8bb6ffc-xctr4   1/1     Running   0          98s

NAME                      TYPE        CLUSTER-IP     EXTERNAL-IP   PORT(S)    AGE
service/webpage-service   ClusterIP   10.96.153.34   <none>        8080/TCP   98s

NAME                                 READY   UP-TO-DATE   AVAILABLE   AGE
deployment.apps/webpage-deployment   3/3     3            3           98s

NAME                                            DESIRED   CURRENT   READY   AGE
replicaset.apps/webpage-deployment-75c8bb6ffc   3         3         3       98s

NAME                                        CLASS    HOSTS   ADDRESS          PORTS   AGE
ingress.networking.k8s.io/webpage-ingress   <none>   *       146.56.118.147   80      18m
If you access the webpage, you will still be connected to the Blue app.
Go back to the running deployment pipeline and approve in approval-stage.
If approved, it becomes Traffic Shift. Now that ns-green is Active, you can see that it has been changed to canary-weight: “100” in the annotations of webpage-ingress in ns-green. Now all requests are only forwarded to ns-green.
[opc@jumpbox-945115 ~]$ kubectl get ingress webpage-ingress -n ns-green -o yaml
apiVersion: networking.k8s.io/v1
kind: Ingress
metadata:
  annotations:
    kubernetes.io/ingress.class: nginx
    nginx.ingress.kubernetes.io/canary: "true"
    nginx.ingress.kubernetes.io/canary-by-header: redirect-to-namespaceB
    nginx.ingress.kubernetes.io/canary-weight: "100"
    nginx.ingress.kubernetes.io/rewrite-target: /$2
...
When you access the web page, you will be connected to the Green app. Even if you request repeatedly several times, you will be connected to the Green app.
Test - Deploy Additional Changes - Red Deploy
Go back to the source and change the code (e.g., change the environment variable of Dockerfile) and apply the code by Commit & Push
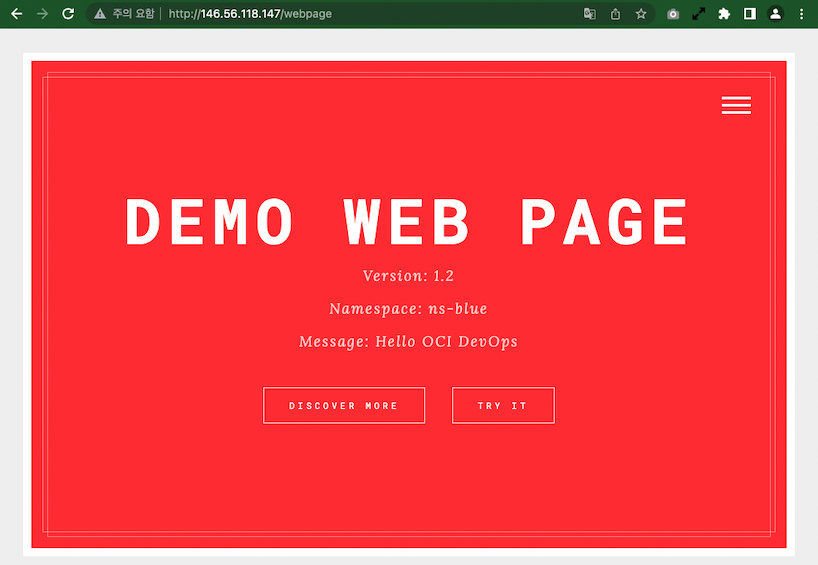
...
ENV VERSION="1.2"
ENV MESSAGE="Hello OCI DevOps"
ENV BACKGROUND="red"
...
Rebuild, wait for the deployment pipeline to run and stop at approval-stage.
Check the Kubernetes deployment status. If you look at the AGE of the POD, you can see that the new distribution is ns-blue.
[opc@jumpbox-945115 ~]$ kubectl get all,ingress -n ns-blue
NAME                                      READY   STATUS    RESTARTS   AGE
pod/webpage-deployment-7958d6b7b7-pkzmm   1/1     Running   0          115s
pod/webpage-deployment-7958d6b7b7-vwx22   1/1     Running   0          2m4s
pod/webpage-deployment-7958d6b7b7-wkbjd   1/1     Running   0          107s

NAME                      TYPE        CLUSTER-IP      EXTERNAL-IP   PORT(S)    AGE
service/webpage-service   ClusterIP   10.96.166.161   <none>        8080/TCP   53m

NAME                                 READY   UP-TO-DATE   AVAILABLE   AGE
deployment.apps/webpage-deployment   3/3     3            3           53m

NAME                                            DESIRED   CURRENT   READY   AGE
replicaset.apps/webpage-deployment-6fbfd769c7   0         0         0       53m
replicaset.apps/webpage-deployment-7958d6b7b7   3         3         3       2m4s

NAME                                        CLASS    HOSTS   ADDRESS          PORTS   AGE
ingress.networking.k8s.io/webpage-ingress   <none>   *       146.56.118.147   80      53m
[opc@jumpbox-945115 ~]$ kubectl get all,ingress -n ns-green
NAME                                      READY   STATUS    RESTARTS   AGE
pod/webpage-deployment-75c8bb6ffc-5b497   1/1     Running   0          20m
pod/webpage-deployment-75c8bb6ffc-m8dl4   1/1     Running   0          20m
pod/webpage-deployment-75c8bb6ffc-xctr4   1/1     Running   0          20m

NAME                      TYPE        CLUSTER-IP     EXTERNAL-IP   PORT(S)    AGE
service/webpage-service   ClusterIP   10.96.153.34   <none>        8080/TCP   20m

NAME                                 READY   UP-TO-DATE   AVAILABLE   AGE
deployment.apps/webpage-deployment   3/3     3            3           21m

NAME                                            DESIRED   CURRENT   READY   AGE
replicaset.apps/webpage-deployment-75c8bb6ffc   3         3         3       21m

NAME                                        CLASS    HOSTS   ADDRESS          PORTS   AGE
ingress.networking.k8s.io/webpage-ingress   <none>   *       146.56.118.147   80      37m
If you access the webpage, you will still be connected to the Green app.
Go back to the running deployment pipeline and approve in approval-stage.
If approved, it becomes Traffic Shift. ns-blue is now Active. If you look at the annotations of webpage-ingress in ns-green, you can see that it has been changed back to canary-weight: “0”. Now all requests are forwarded only to ns-blue.
[opc@jumpbox-945115 ~]$ kubectl get ingress webpage-ingress -n ns-green -o yaml
apiVersion: networking.k8s.io/v1
kind: Ingress
metadata:
  annotations:
    kubernetes.io/ingress.class: nginx
    nginx.ingress.kubernetes.io/canary: "true"
    nginx.ingress.kubernetes.io/canary-by-header: redirect-to-namespaceB
    nginx.ingress.kubernetes.io/canary-weight: "0"
...
When you access the web page, you will be connected to the Red app newly deployed in the ns-blue namespace. Even if you request repeatedly several times, you will be connected to the Red app.
If the app is distributed with this Blue/Green strategy, the new version is distributed to the currently unserviced namespace using the two specified namespaces, and when approved, the traffic is changed to the new version. Support distribution for versions.
test - rollback
If a problem occurs while servicing the new version, rollback to the previous version is available.
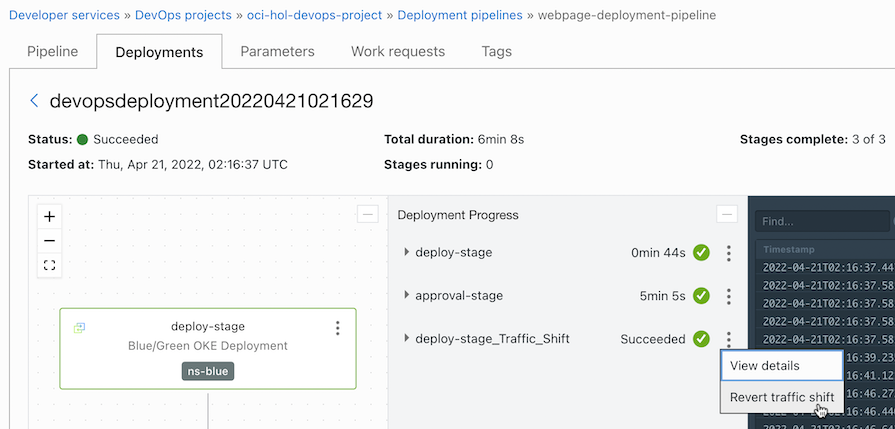
Navigate to the deployment pipeline that deployed the current version in the deployment history.
From the Traffic Shift menu, click Revert traffic shift.
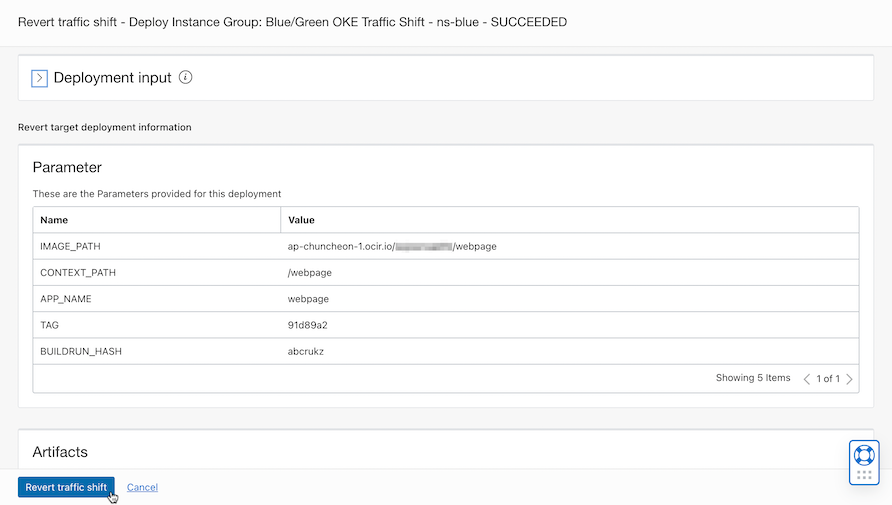
After confirming the changes, click Revert traffic shift again.
Manual rollback operation is complete.
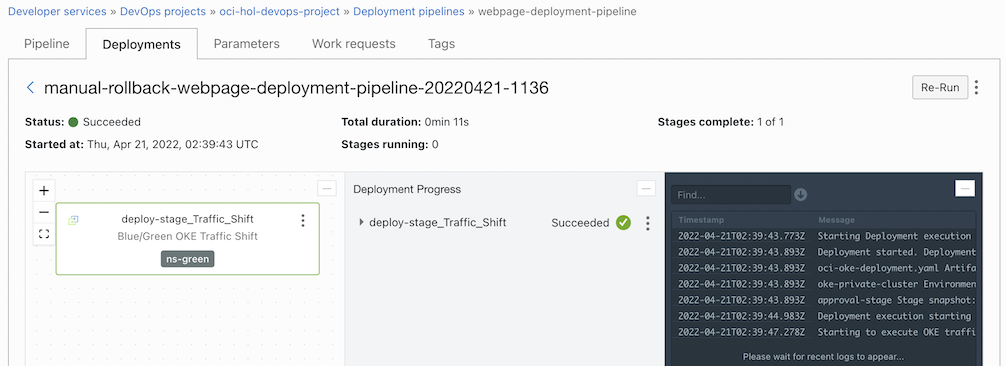
There is no distribution change, only Traffic Shift has changed. If you check the Kubernetes distribution status, in the annotations of webpage-ingress in ns-green, it is changed back to canary-weight: “100” you can see
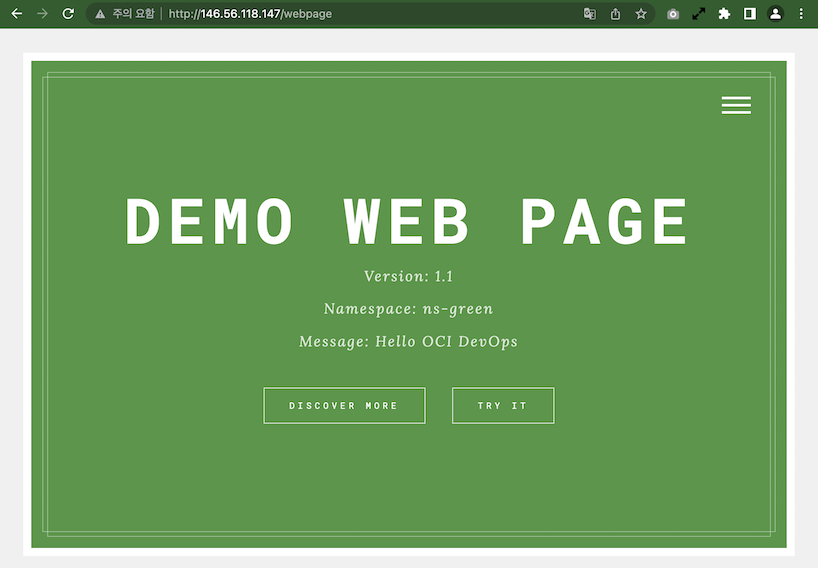
[opc@jumpbox-945115 ~]$ kubectl get ingress webpage-ingress -n ns-green -o yaml
apiVersion: networking.k8s.io/v1
kind: Ingress
metadata:
  annotations:
    kubernetes.io/ingress.class: nginx
    nginx.ingress.kubernetes.io/canary: "true"
    nginx.ingress.kubernetes.io/canary-by-header: redirect-to-namespaceB
    nginx.ingress.kubernetes.io/canary-weight: "100"
    nginx.ingress.kubernetes.io/rewrite-target: /$2
When accessing the web page, you can see that the last deployed app, Red, has been restored to the existing app, Green app, in the ns-blue namespace.
If you deploy the app with the Blue/Green strategy provided by the DevOps service in this way, you can deploy Blue/Green by changing the routing rules of two namespaces and Ingress Controller.
As an individual, this article was written with my personal time. There may be errors in the content of the article, and the opinions in the article are personal opinions.