Warning
This content has been generated by machine translation. The translations are automated and have not undergone human review or validation.
3.1 Automating deployment of Spring Boot app to OKE via DevOps service
Set up IAM policy to use DevOps service
To use DevOps services, you need to set permissions on DevOps resources. Refer to the official documentation to set the policy for Dynamic Group and Group for permission setting.
The Dynamic Group and Policy below are based on the examples in the above document and may be subject to some changes depending on requirements.
Create Dynamic Group
First create a Dynamic Group for the Compartment so that DevOps services can be used within the given Compartment.
Log in to the OCI console.
Go to Identity & Security > Identity > Compartments from the top left hamburger menu.
Go to the Compartment you want to use DevOps for and make a copy of the OCID.
Go to Identity > Dynamic Groups.
Click Create Dynamic Group.
Create the required Dynamic Group using the copied Compartment OCID.
CoderepoDynamicGroup
ALL {resource.type = 'devopsrepository', resource.compartment.id = '<YourCompartmentOCID>'}ConnectionDynamicGroup
ALL {resource.type = 'devopsconnection', resource.compartment.id = '<YourCompartmentOCID>'}BuildDynamicGroup
ALL {resource.type = 'devopsbuildpipeline', resource.compartment.id = '<YourCompartmentOCID>'}DeployDynamicGroup
All {resource.type = 'devopsdeploypipeline', resource.compartment.id = '<YourCompartmentOCID>'}
Setting Policy for DevOps Service
Go to Identity > Policies.
Click Create Policy to create a new Policy.
Create the following Policy with Compartment level.
- Name: Ex) DevOps-compartment-policy
Allow dynamic-group CoderepoDynamicGroup to manage devops-family in compartment <YourCompartmentName>
Allow dynamic-group BuildDynamicGroup to manage repos in compartment <YourCompartmentName>
Allow dynamic-group BuildDynamicGroup to read secret-family in compartment <YourCompartmentName>
Allow dynamic-group BuildDynamicGroup to manage devops-family in compartment <YourCompartmentName>
Allow dynamic-group BuildDynamicGroup to manage generic-artifacts in compartment <YourCompartmentName>
Allow dynamic-group BuildDynamicGroup to use ons-topics in compartment <YourCompartmentName>
Allow dynamic-group CoderepoDynamicGroup to read secret-family in compartment <YourCompartmentName>
Allow dynamic-group DeployDynamicGroup to manage all-resources in compartment <YourCompartmentName>
Allow dynamic-group ConnectionDynamicGroup to read secret-family in compartment <YourCompartmentName>
Create the following Policy with the Root Compartment level.
- Name: Ex) DevOps-root-policy
If you do not create the repository before pushing the repository to OCIR, the image is pushed to the root compartment by default. At this time, an error occurs with permission, and if you want to allow it in the Root Compartment, add the following.
Allow dynamic-group BuildDynamicGroup to manage repos in tenancy
Automating CI/CD deployment through DevOps service
Create a DevOps project
Create Notification Topic
A Notification Topic setting is required to notify you of key events that occur when your DevOps pipeline runs. It is a required requirement when creating a DevOps project, so make it in advance
Log in to the OCI console.
From the top left hamburger menu, go to Developer Services > Application Integration > Notifications.
Click Create Topic to create a Topic.
- Name: Ex) oke-labs-devops-topic
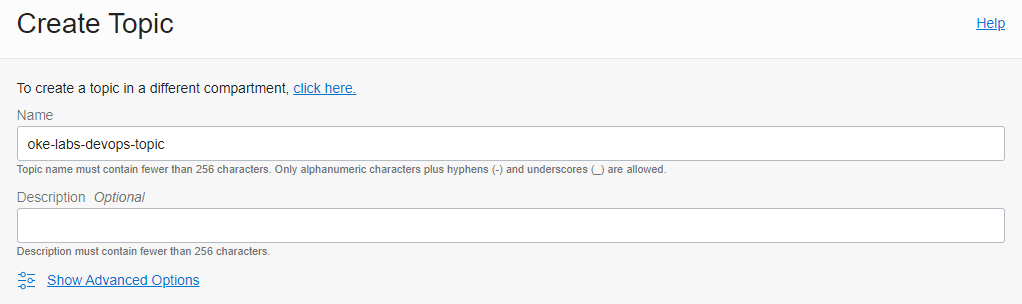
Skip the Subscript to take the Topic event created for Notification. You can configure it if necessary.
Create a DevOps Project
Log in to the OCI console.
From the top left hamburger menu, go to Developer Services > DevOps.
To create a project, go to Projects and click on Create DevOps project.
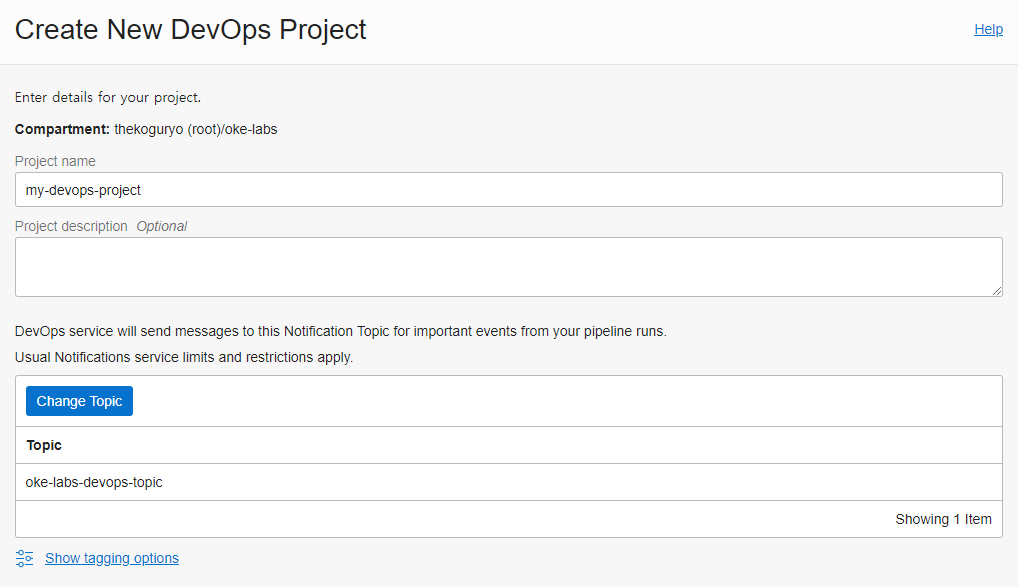
Enter the creation information to create the project.
- Project name: Ex) my-devops-project
- Notification Topic: Select the topic you created earlier
Complete project creation
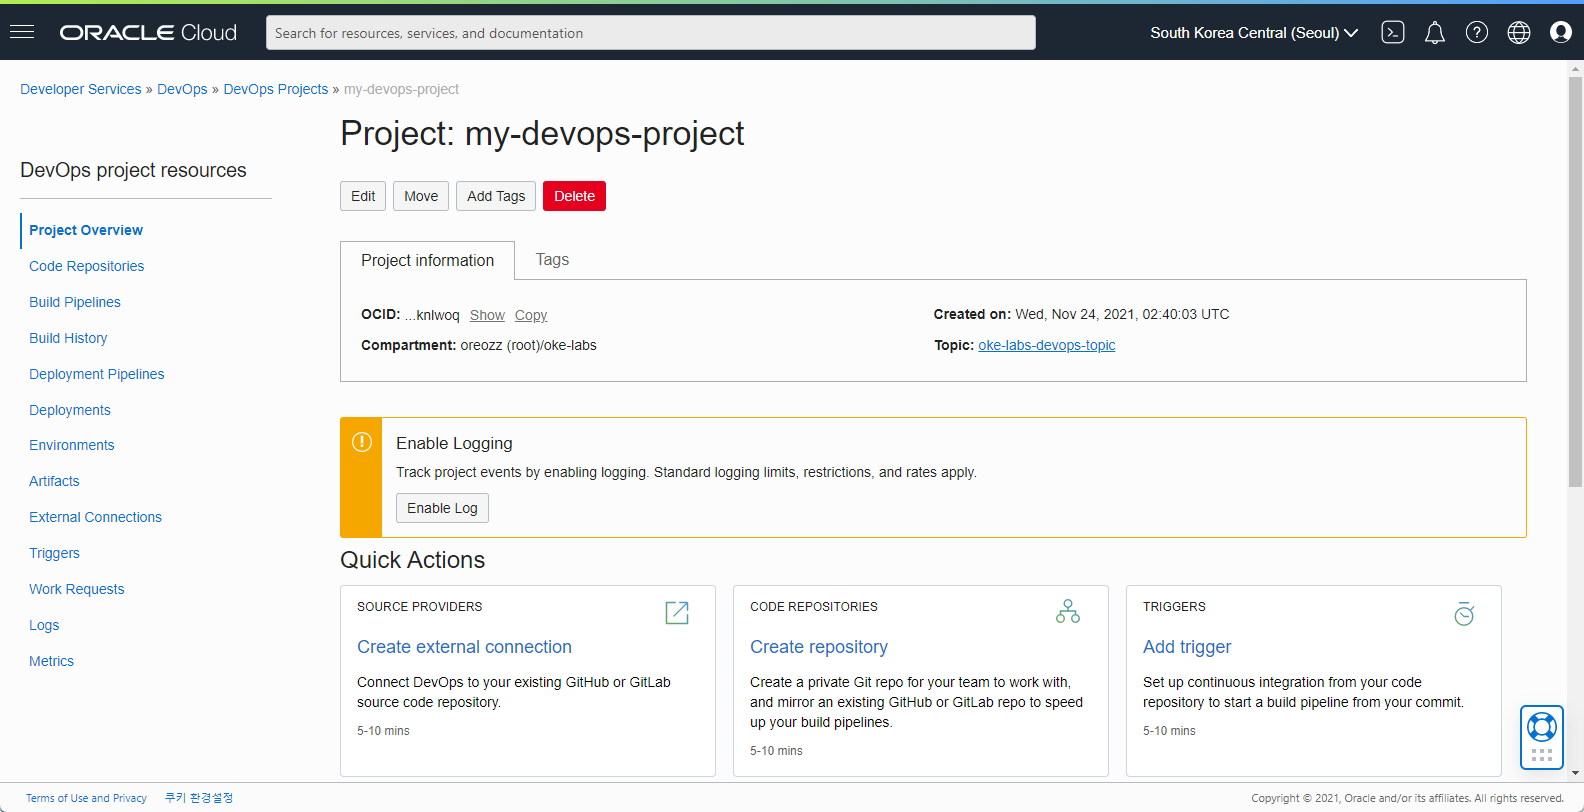
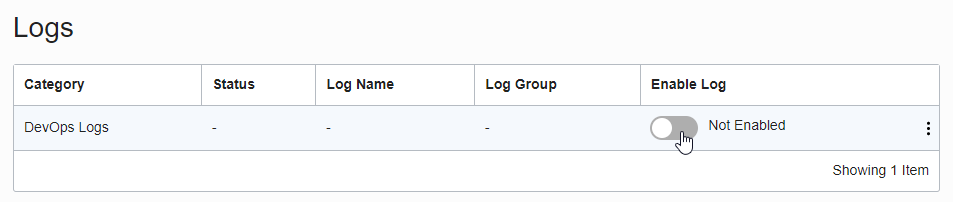
Enable Logging
You can see the Enable Logging related information immediately after project creation. As seen in the description, if logging is not enabled, the execution log shown on the right in the pipeline execution screen is not visible. So Enable Logging is essential.
In the Project Overview, click Enable Log or click Logs in the left menu.

Toggle the Enable Log button.
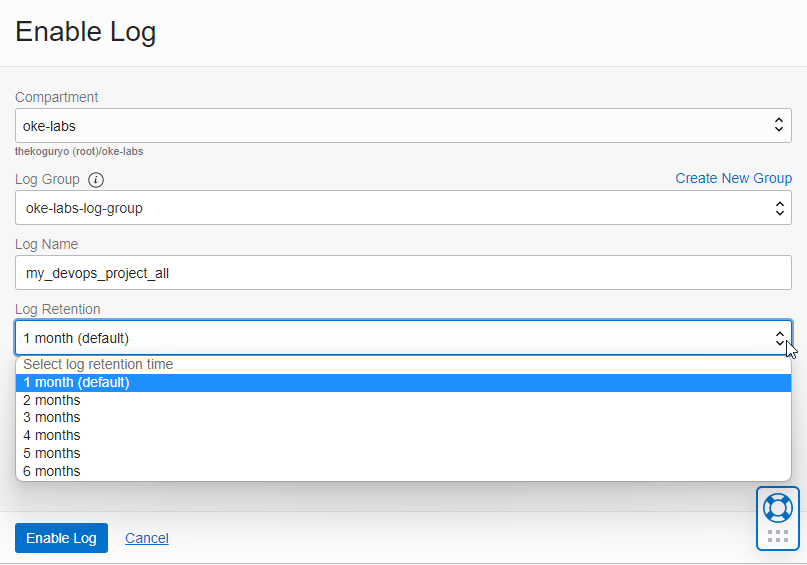
If the target compartment already has a Log Group, you can choose from the ones listed. If there is no pre-created Log Group, a new Log Group and Log will be created when you click the Enable Log button based on the automatically entered information as shown below. Modify the settings if necessary, otherwise click the Enable Log button.
Automating application deployment
Use Code Repository to Manage Application Code
As a sample, we will create and test a Spring Boot Helloworld app.
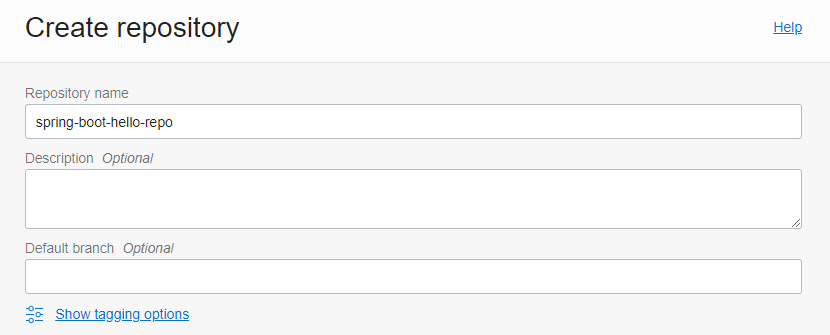
Click Code Repositories in the left menu to create a code repository.
Click Create repository to create the repository.
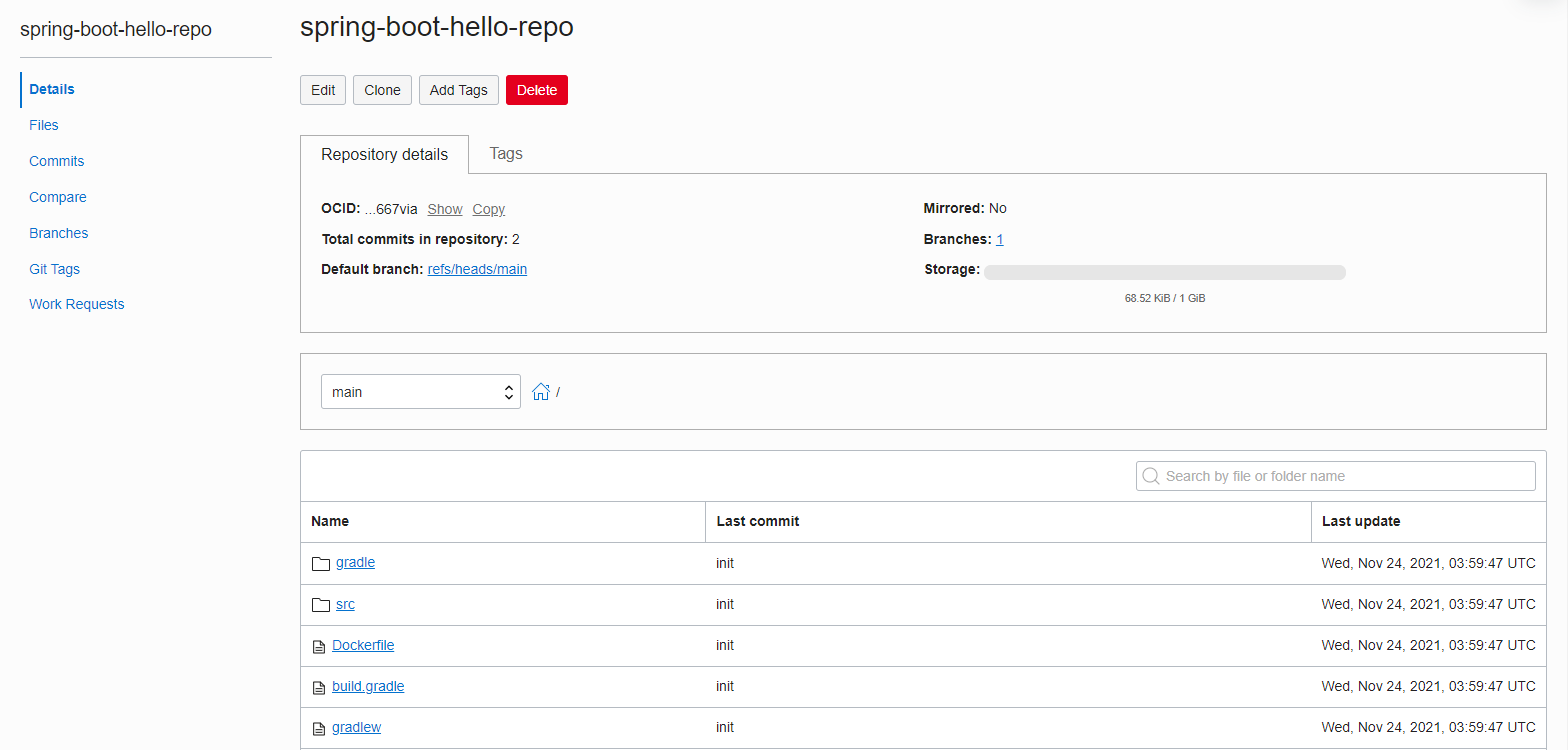
- Repository name: Ex) spring-boot-hello-repo
This is the generated code repository. This is a generic Git Repository.
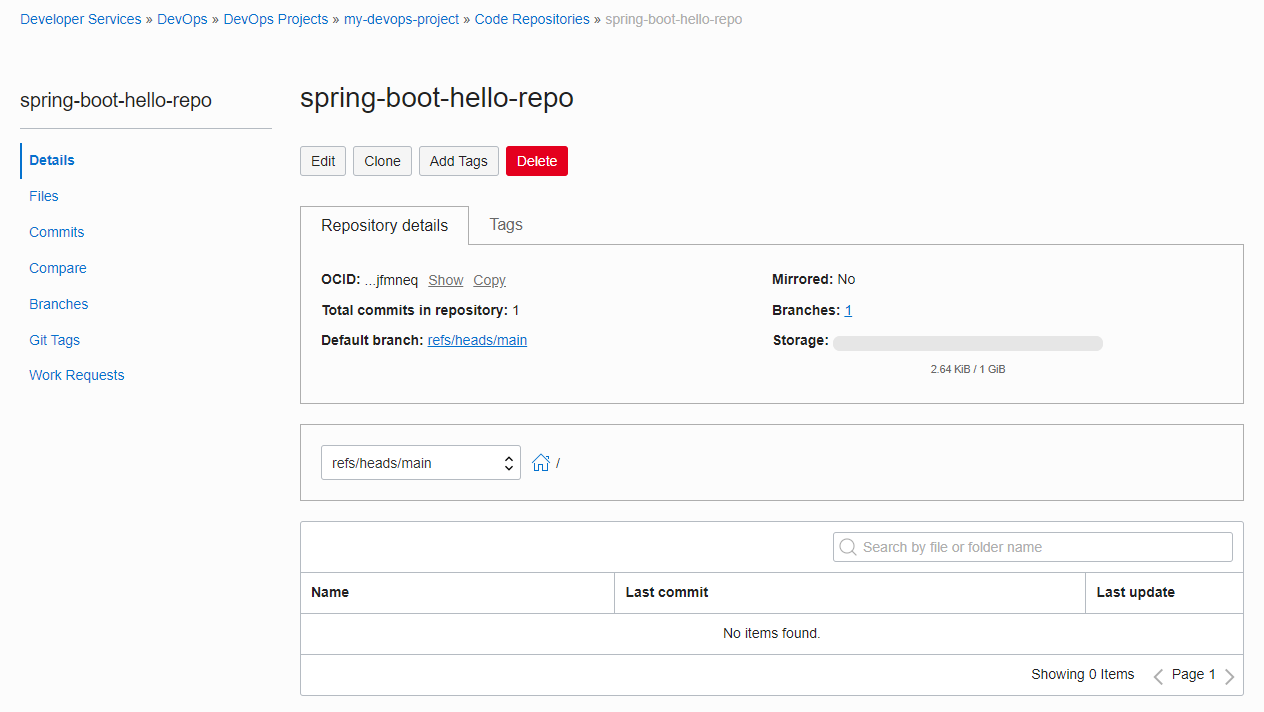
The actual development work can be done on the development PC through the git command. If you click the Clone button above the repository details, the Clone command will appear as shown below. We will use Clone with HTTPS here.
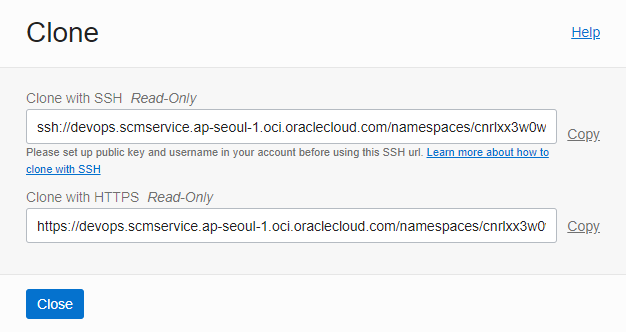
Using the copied address on the development PC, clone it through the git clone command.
git clone <YourClonewithHTTPS URL>User authentication is required at this time. For HTTPS-based user authentication, the following user name format and AuthToken are used.
Authentication user name
- User on Oracle Identity Cloud Service:
<tenancy-name>/oracleidentitycloudservice/<username> - OCI Local user:
<tenancy-name>/<username> - Unlike previous guides, note that this is a tenacy-name, not a tenancy-namespace.
- User on Oracle Identity Cloud Service:
AuthToken: For information on creation, refer to previous guides.
Documents related to HTTPS authentication in Code Repository
example
$ git clone https://devops.scmservice.ap-seoul-1.oci.oraclecloud.com/namespaces/cnrlxx3w0wgq/projects/my-devops-project/repositories/spring-boot-hello-repo
Cloning into 'spring-boot-hello-repo'...
Username for 'https://devops.scmservice.ap-seoul-1.oci.oraclecloud.com': thekoguryo/oke-developer
Password for 'https://oreozz/oke-admin@devops.scmservice.ap-seoul-1.oci.oraclecloud.com':
remote: Counting objects: 2, done
remote: Finding sources: 100% (2/2)
remote: Getting sizes: 100% (1/1)
Unpacking objects: 100% (2/2), done.
remote: Total 2 (delta 0), reused 2 (delta 0)
Currently the cloned repository is empty. Follow the guide below to write the spring-boot-hello sample code.
Save the written code in the Code Repository through the git command.
example
git add .
git commit -m "init"
git push
Completion of code writing and reflection
Create a Build Pipeline
It is possible to configure the part corresponding to the CI process that builds code during CI/CD to create deployment artifacts through Build Pipeline.
Go to the my-devops-project project page and go to Build Pipelines in the left menu.
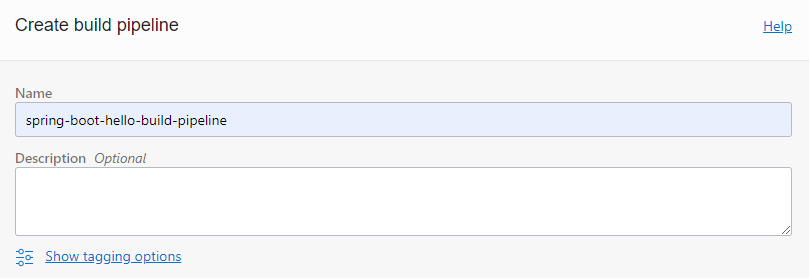
Click Create build pipeline to create the pipeline.
Name: Ex) spring-boot-hello-build-pipeline
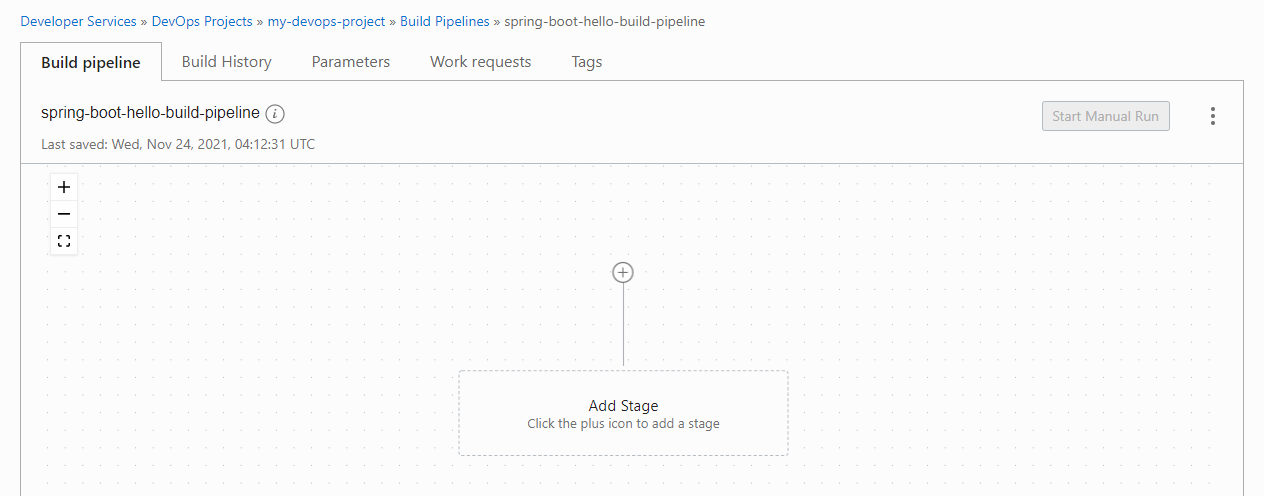
Click the created pipeline.
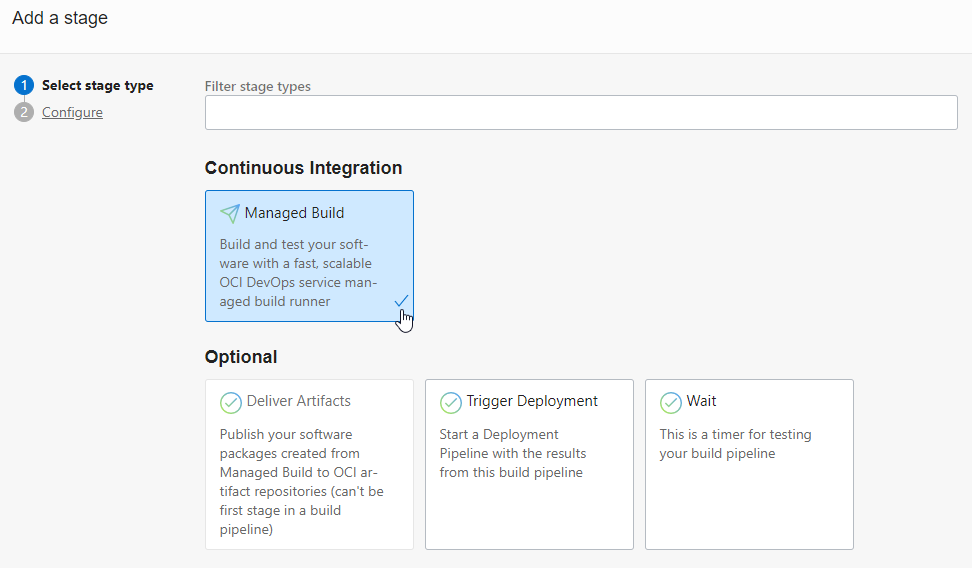
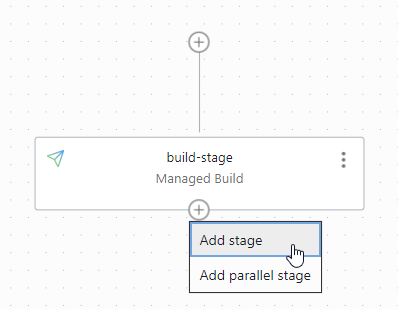
You can configure the pipeline flow by adding Stages as shown. Click Add Stage.
Provision Stage
- Managed Build: Executes the build process according to the contents defined in the build specification.
- Delivery Artifacts: Save build artifacts (eg container images) to the Artifact Repository.
- Trigger Deployment: Calls the Deployment Pipeline at the end of the build.
- Wait: Waits for a certain amount of time.
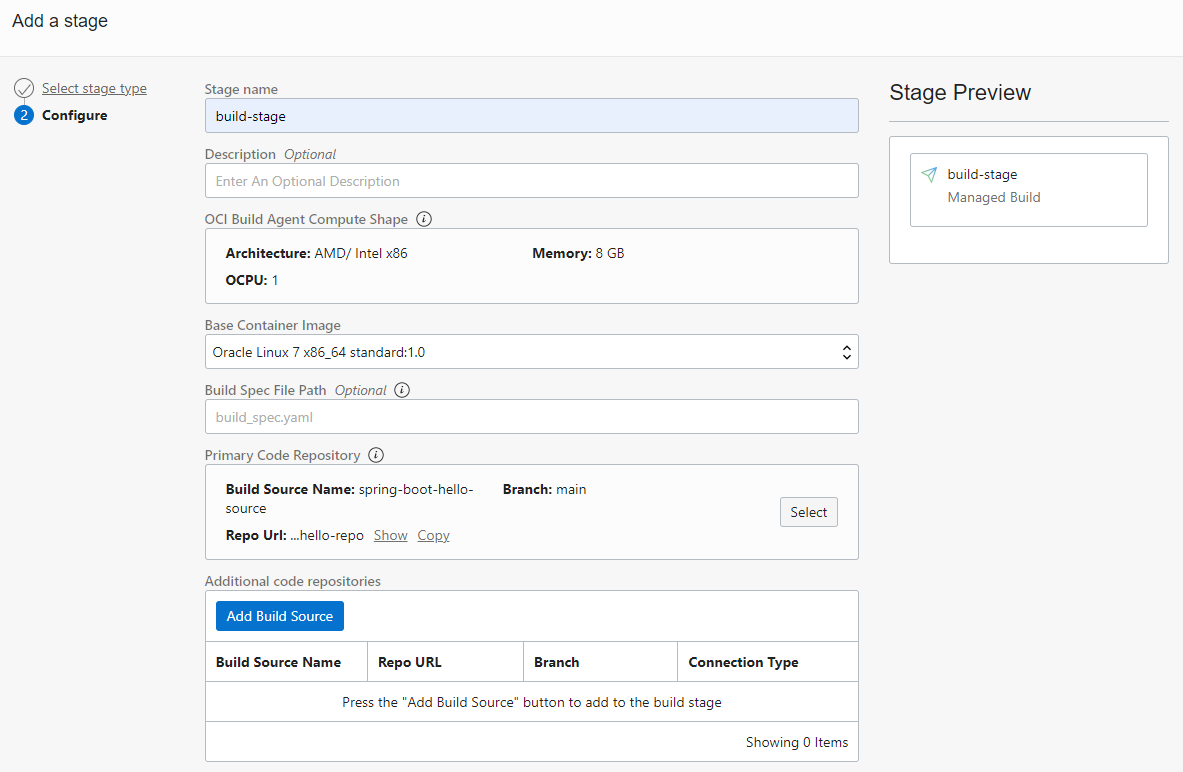
Create a Build Stage
First add Managed Build Stage for build.
Managed Build Stage Setup
- Stage name: Ex) build-stage
- Build Spec File Path: Specifies the build script path. By default, it uses the build_spec.yaml file in the source root.
- Primary Code Repository: Specifies the code repository with the main source to build.
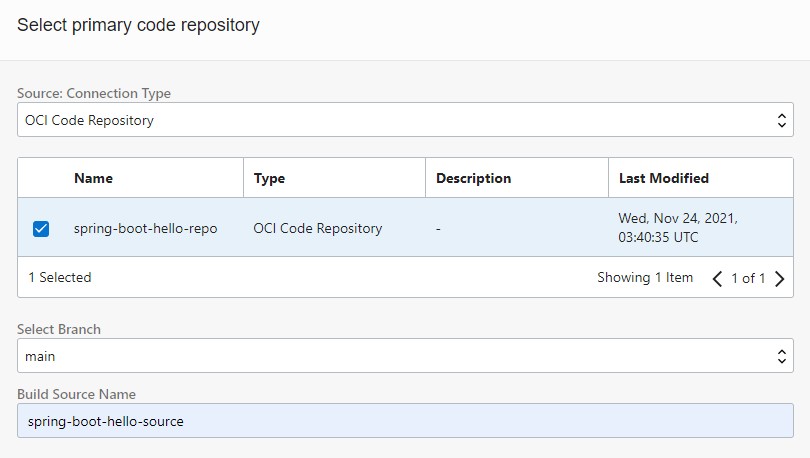
Primary Code Repository setting screen
- Specifies the repository where the target source code is located.
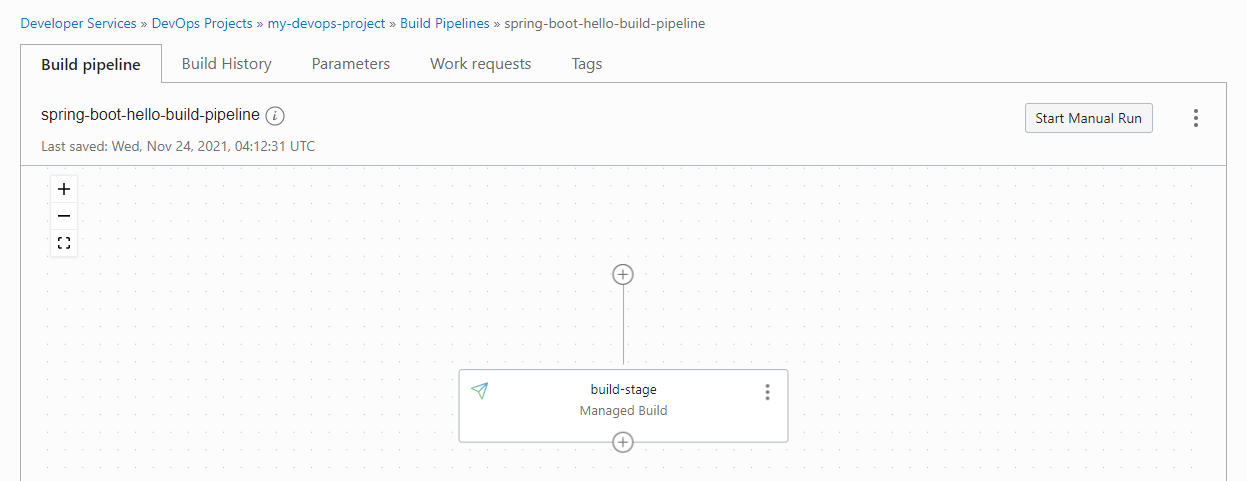
Click Add to add the set Stage.
build-stage has been added as shown below. Click Start Manual Run to test it.
The definition of Build Spec in the source code is required like a test.
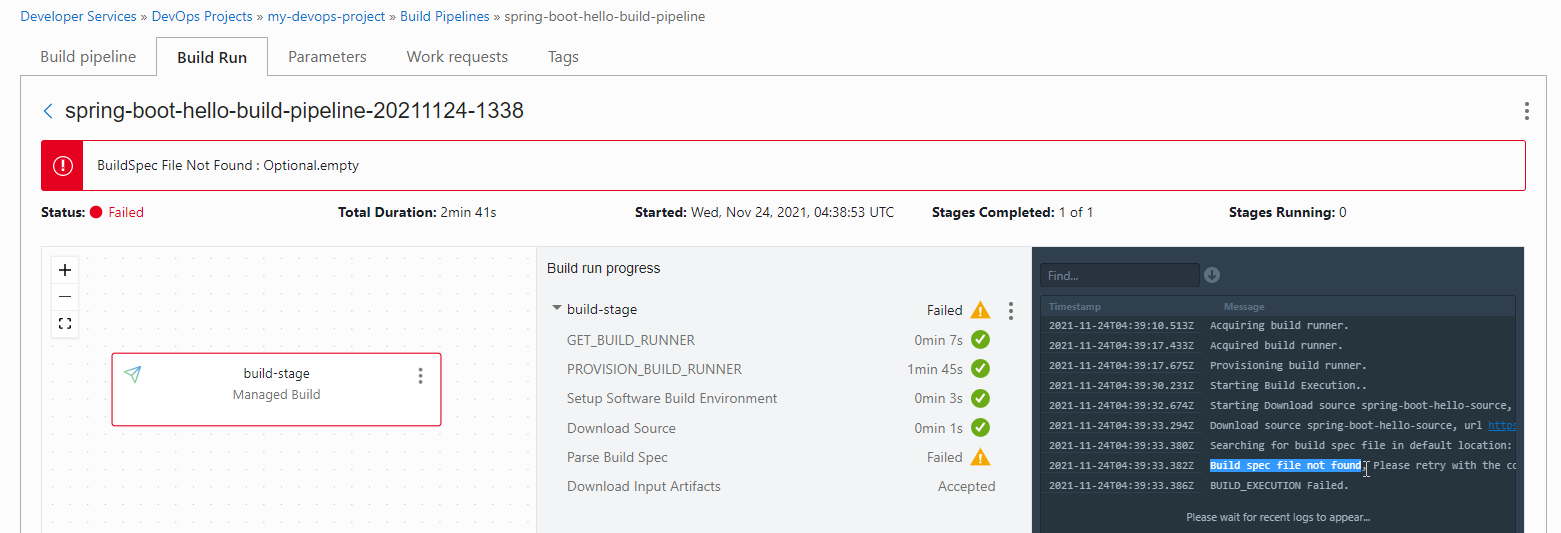
Build Spec refers to the following documents:
https://docs.oracle.com/en-us/iaas/Content/devops/using/build_specs.htm
Example based on Example 2 in the documentation
- steps: This is the part that defines the script to be executed. In this example, two steps, Build Source and Dockerizer, are defined, and each defines a script to be executed in the command. They are executed in the defined order.
- env.exportedVariables: Globally declared environment variable. If the value is changed in the previous step, it is applied to the next step. It is also dispatched when calling the Deployment Pipeline.
- outputArtifacts: This is the part that defines the build artifact, and can be specified through the name defined here when saving to Artifact Storage through the Delivery Artifact Stage.
version: 0.1
component: build
timeoutInSeconds: 6000
shell: bash
env:
  exportedVariables:
    - BuildServiceDemoVersion

steps:
  - type: Command
    name: "Build Source"
    timeoutInSeconds: 4000
    command: |
      echo $PATH
      mvn clean install
  - type: Command
    timeoutInSeconds: 400
    name: "Dockerizer"
    command: |
      BuildServiceDemoVersion=`echo ${OCI_BUILD_RUN_ID} | rev | cut -c 1-7`
      echo $BuildServiceDemoVersion
      docker build -t build-service-demo .

outputArtifacts:
  - name: build-service-demo
    type: DOCKER_IMAGE
    location: build-service-demo
  - name: build-service-demo-kube-manifest
    type: BINARY
    location: deployment/app.yml
Build Spec Definition
Define build_spec.yaml in the root path of the developed spring-boot-hello source code as follows and save it in the code repository.
build_spec.yaml
version: 0.1
component: build
timeoutInSeconds: 6000
shell: bash
env:
  variables:
    appName: "spring-boot-hello"

  exportedVariables:
    - APP_NAME
    - OCIR_PATH
    - TAG

steps:
  - type: Command
    name: "Init exportedVariables"
    timeoutInSeconds: 4000
    command: |
      APP_NAME=$appName
      echo $APP_NAME

  - type: Command
    name: "Build Source"
    timeoutInSeconds: 4000
    command: |
      echo "build"
      mvn clean install

  - type: Command
    timeoutInSeconds: 400
    name: "Build Source - Post"
    command: |
      echo "add dependency"
      mkdir -p target/dependency && (cd target/dependency; jar -xf ../*.jar)

  - type: Command
    name: "Define Image Tag - Commit ID"
    timeoutInSeconds: 30
    command: |
      COMMIT_ID=`echo ${OCI_TRIGGER_COMMIT_HASH} | cut -c 1-7`
      BUILDRUN_HASH=`echo ${OCI_BUILD_RUN_ID} | rev | cut -c 1-7`
      [ -z "$COMMIT_ID" ] && TAG=$BUILDRUN_HASH || TAG=$COMMIT_ID

  - type: Command
    name: "Define OCIR Path"
    timeoutInSeconds: 30
    command: |
      TENANCY_NAMESPACE=`oci os ns get --query data --raw-output`
      REPO_NAME=$appName
      OCIR_PATH=$OCI_RESOURCE_PRINCIPAL_REGION.ocir.io/$TENANCY_NAMESPACE/$REPO_NAME

  - type: Command
    timeoutInSeconds: 400
    name: "Containerize"
    command: |
      docker build -t new-generated-image .
      docker images

  - type: Command
    name: "Check exportedVariables"
    timeoutInSeconds: 30
    command: |
      [ -z "$APP_NAME" ] && APP_NAME=unknown
      [ -z "$OCIR_PATH" ] && OCIR_PATH=unknown
      [ -z "$TAG" ] && TAG=unknown
      echo "APP_NAME: " $APP_NAME
      echo "OCIR_PATH: " $OCIR_PATH
      echo "TAG: " $TAG

outputArtifacts:
  - name: output-image
    type: DOCKER_IMAGE
    location: new-generated-image
If you run it again through Start Manual Run, you can see the script being executed as shown below.

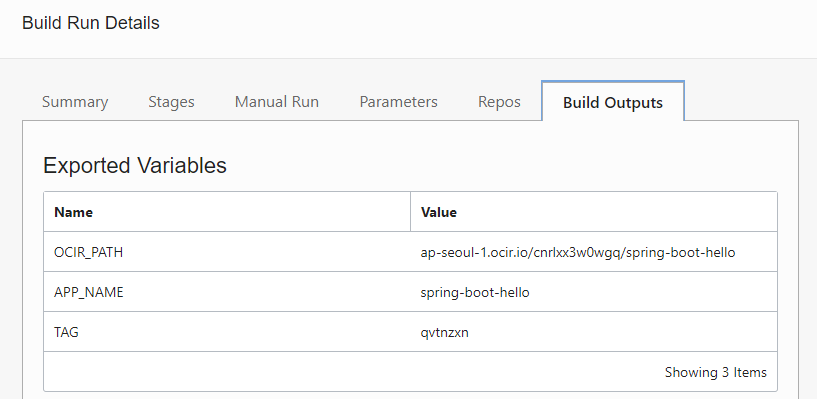
Check ExportVariables
If you click the three dots in the upper right corner on the execution result screen to move to the detail screen, you can see the variable value as the execution result in Build Output. These variables are then passed on to the Stage or connected and called Deployment Pipeline for use.
Create the container image OCIR registration stage
Go to the Build Pipeline tab.
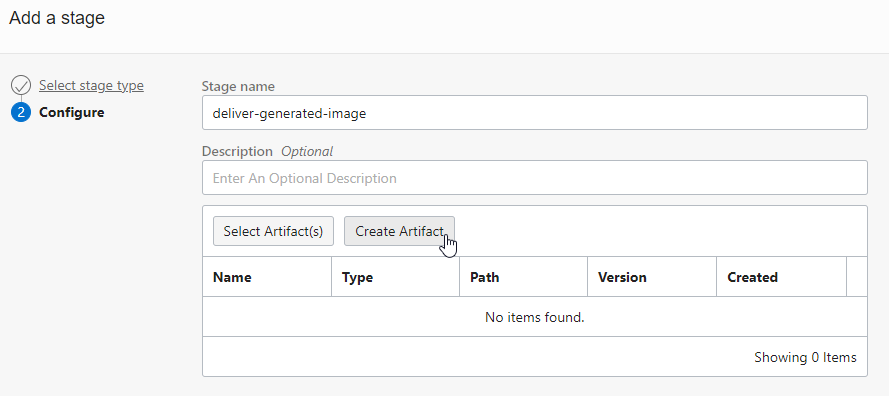
Click the plus button to add a stage after build-stage.
Select Delivery Artifact Stage.
Enter a stage name and choose Create Artifact.
Add Artifact as Container image type.
- Image path: Image path used when attaching docker tag. You can enter it directly, but here it is entered as
${OCIR_PATH}:${TAG}using exportedVariable passed from build-stage.

- Image path: Image path used when attaching docker tag. You can enter it directly, but here it is entered as
Add one more in the same way.
- Name: generated_image_with_latest
- Image Path: ${OCIR_PATH}:latest
Artifact Mapping
Associate Artifact maps the actual container image files to the 2 Artifacts you just added. Enter the name of the outputArtifacts defined in build_spec.yaml earlier in build-stage.
outputArtifacts:
  - name: output-image
    type: DOCKER_IMAGE
    location: new-generated-image
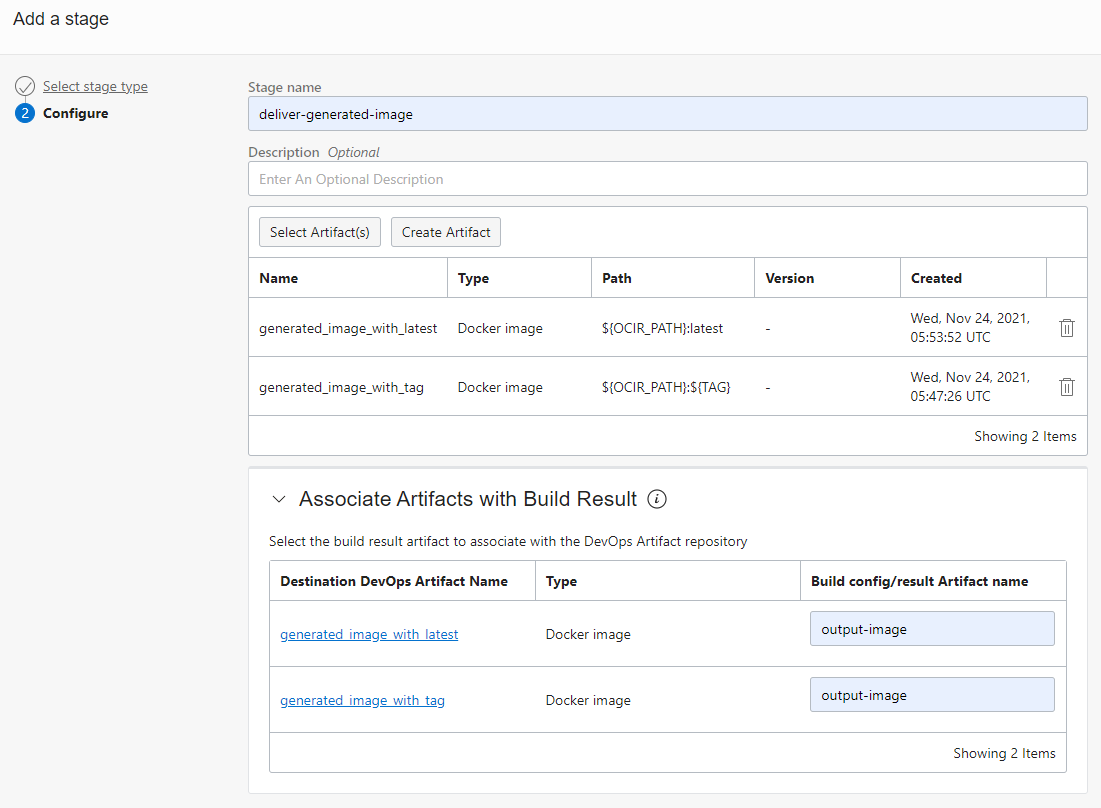
Now we have added the delivery stage.
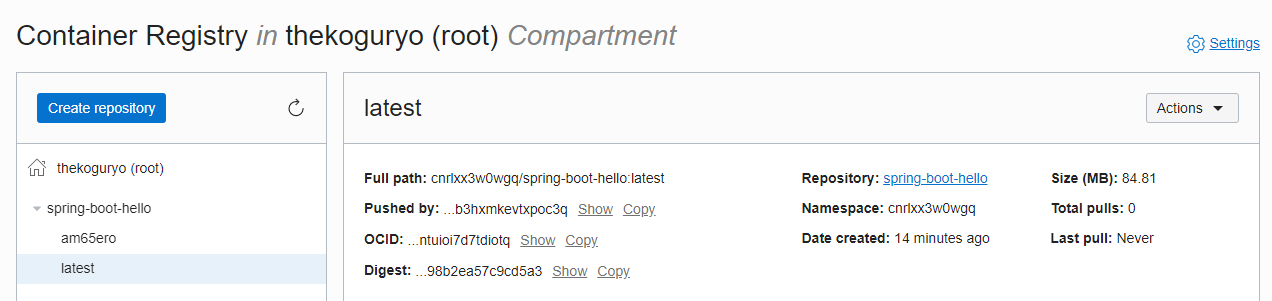
Try running the pipeline again. Container images built with actual source code are automatically registered with OCIR.
If the OCIR repository (eg, spring-boot-hello) does not exist in advance, it is created in a private form in the Root Compartment. To import from OKE, create an imagepullsecret in advance, or create a repository as Public in advance.
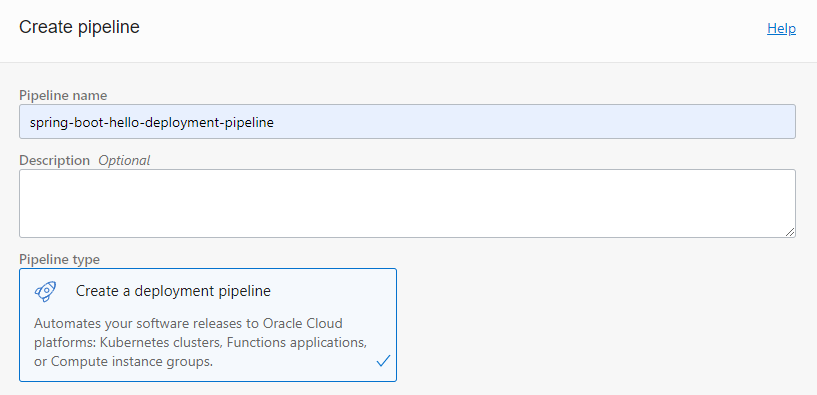
Create a Deploy Pipeline
It is possible to configure the part corresponding to the CD process of distributing the products built during CI/CD to the actual server through the Deployment Pipeline.
Go to the my-devops-project project page and go to Deployment Pipelines in the left menu.
Click Create pipeline to create the pipeline.
Name: Ex) spring-boot-hello-deployment-pipeline
Click the created pipeline.
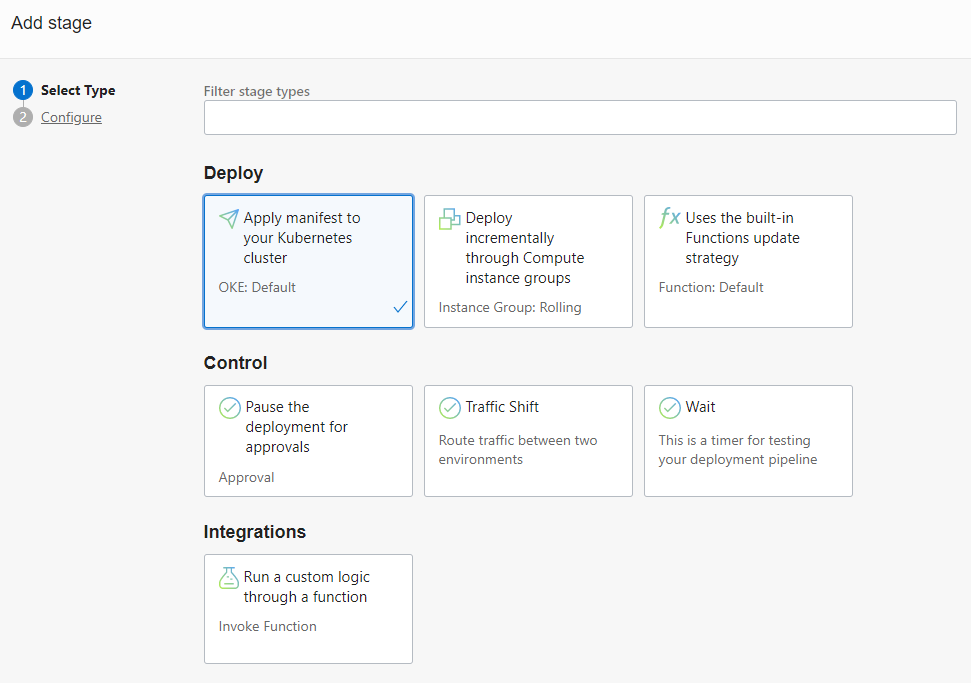
Click Add Stage to add a Stage.
Provision Stage
Deploy: Provides deployment capabilities to OKE, Compute instance deployment, and Oracle Function.
Control: support acknowledgment waiting, traffic change, waiting, etc.
Integration: Supports Oracle Function execution for custom logic execution.
Prepare the manifest file for deployment to Kubernetes
To use the stage type to deploy to Kubernetes, you need to prepare a manifest yaml file for deployment in advance.
Go to the my-devops-project project page and go to Artifacts in the left menu.
You can see that there are two registered when creating the build pipeline with Artifacts earlier. Artifacts registered here can be reused.
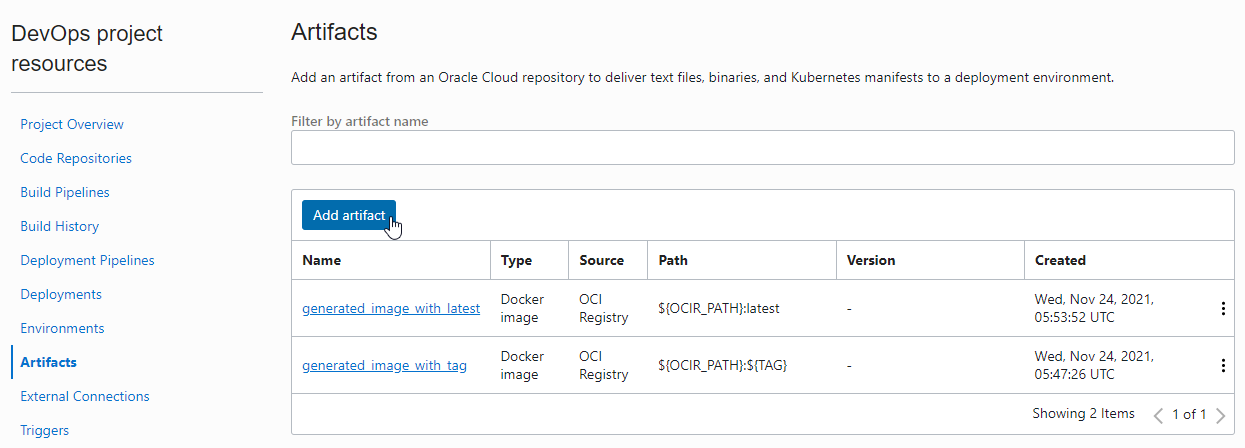
Click Add artifact to register the manifest file.
We offer 4 types of registration. Among them, select Kubernetes manifest.

For Kubernetes manifest types, we provide 2 types as Artifact Source.
- Artifact Registry Repository: Just as OCIR is provided as a container registry, Artifact Registry is provided as a service. Select to refer to the resource there.
- Inline: Inline refers to input directly into Artifact here in the current DevOps project.
Register as Inline type as Artifact Source as follows.
- Name: Ex) k8s_spring_boot_deploy_template
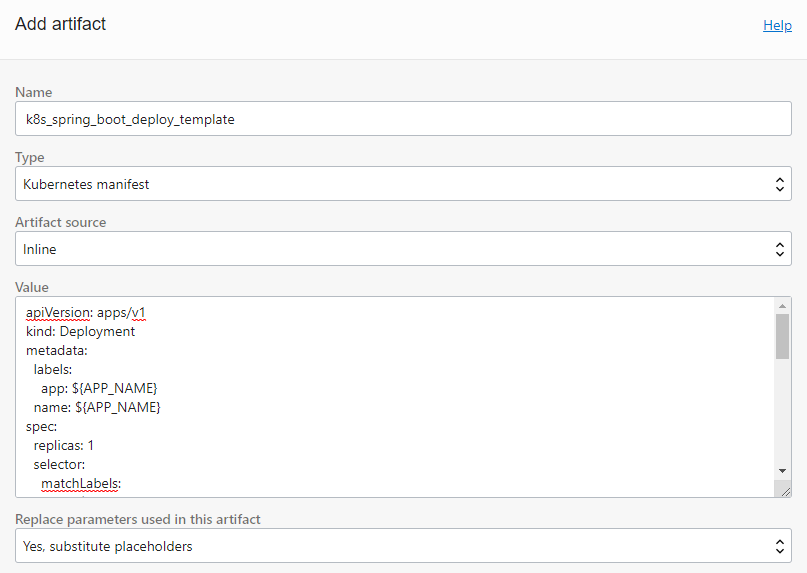
Value
As before, you can use variable values exported from build-stage.
apiVersion: apps/v1
kind: Deployment
metadata:
  labels:
    app: ${APP_NAME}
  name: ${APP_NAME}
spec:
  replicas: 1
  selector:
    matchLabels:
      app: ${APP_NAME}
  template:
    metadata:
      labels:
        app: ${APP_NAME}
    spec:
      containers:
      - name: ${APP_NAME}
        image: ${OCIR_PATH}:${TAG}
---
apiVersion: v1
kind: Service
metadata:
  name: ${APP_NAME}-service
  annotations:
    service.beta.kubernetes.io/oci-load-balancer-shape: "10Mbps"
spec:
  type: LoadBalancer
  ports:
    - port: 80
      protocol: TCP
      targetPort: 8080
  selector:
    app: ${APP_NAME}
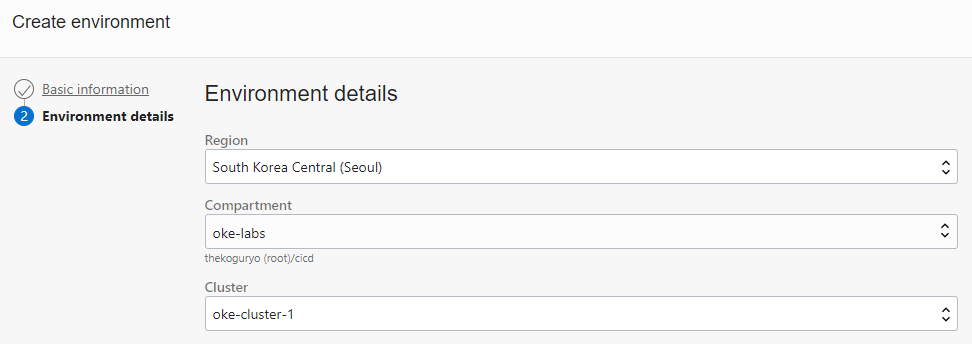
Registering the Kubernetes Environment
Go to the my-devops-project project page and go to Environments in the left menu to register the OKE environment to deploy.
Select the OKE type.
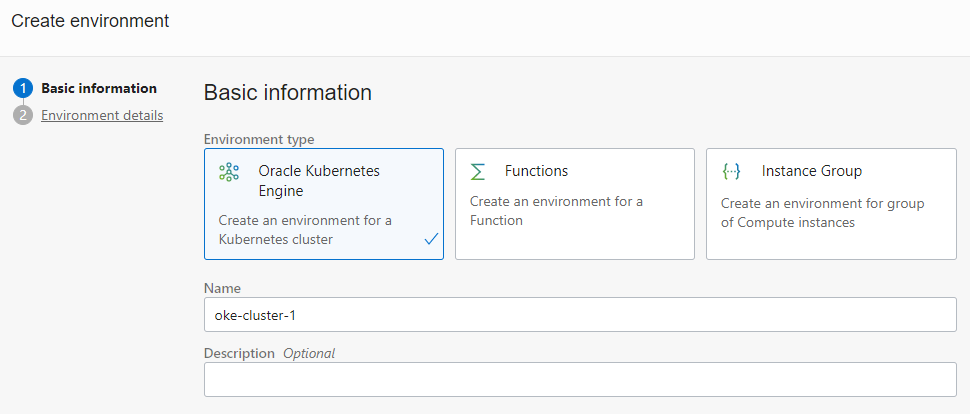
Select the cluster to deploy.
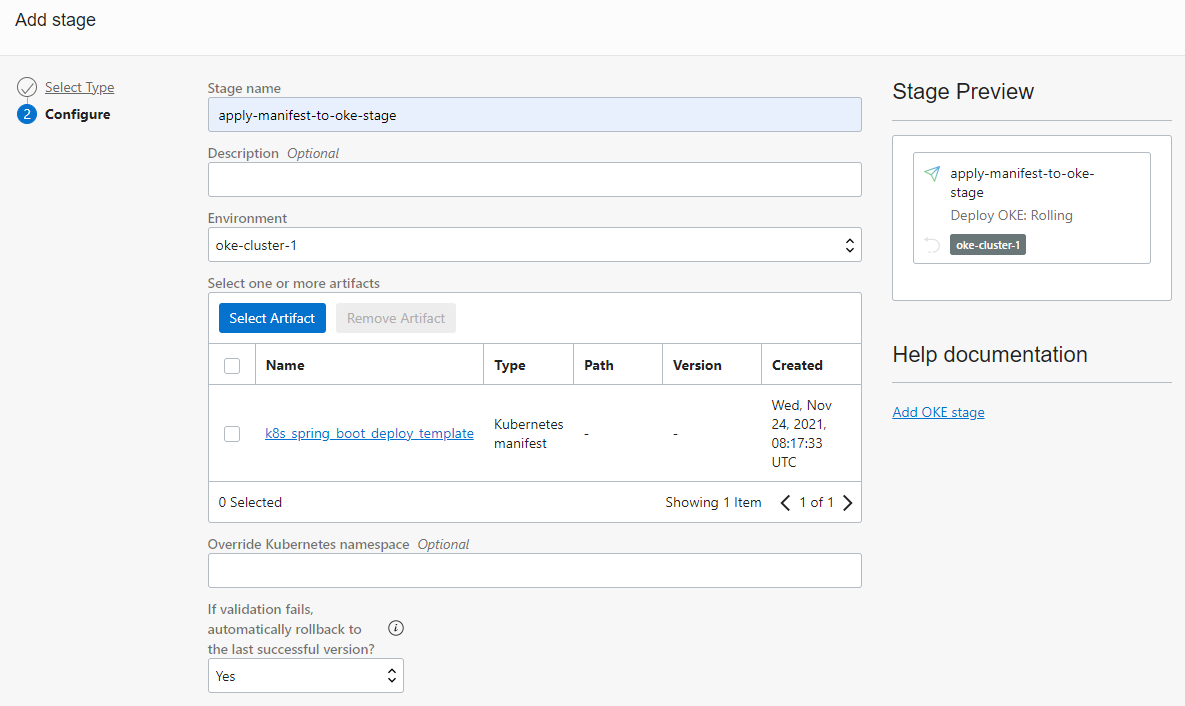
Create a Kubernetes manifest deployment stage
Go to the registered Deployment Pipeline (spring-boot-hello-deployment-pipeline) setting page.
Click Add Stage to add the Apply manifest to your Kubernetes cluster Stage.
Select the environment and manifest file to deploy
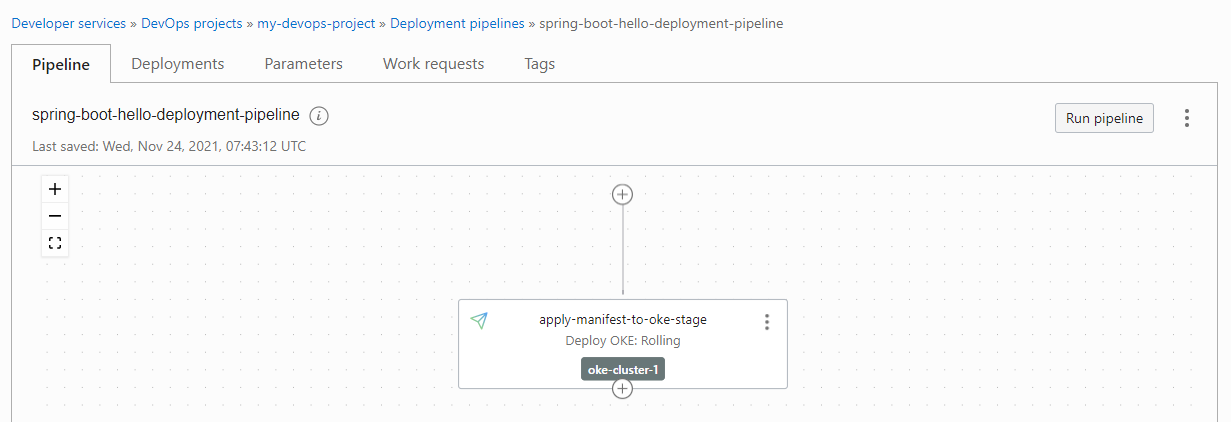
Pipeline completion
Calling Deployment Pipeline from Build Pipeline
After registering in OCIR from the Build Pipeline created earlier to the container image, the Deployment Pipeline to be deployed to OKE must be started to complete the entire build and deployment. Now that we have registered the Deployment Pipeline, we can call it from the Build Pipeline.
Go to the Build Pipelines you created earlier (spring-boot-hello-build-pipeline).
Add a Stage to the end of the pipeline.
Select the Trigger Deployment type.
Specify the Deployment Pipeline you have set up.
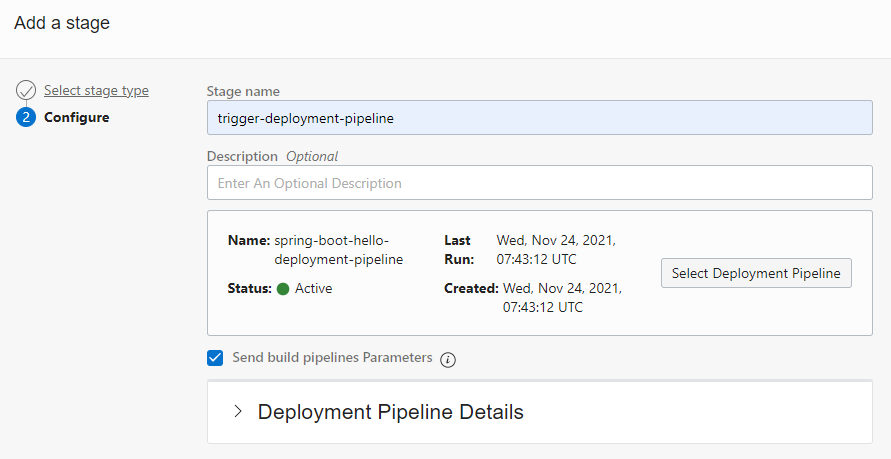
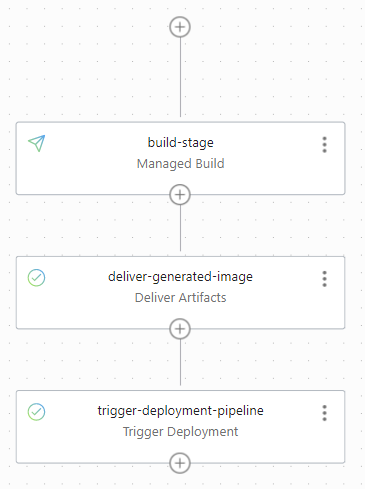
The whole flow is complete.
Setting Trigger
So far, to test it, I started it through the Start Manual Run in the Build Pipeline. In reality, the build and deployment pipelines need to operate automatically when the developer applies the code to the code repository. Triggers are responsible for starting the build pipeline through events that occur in the code repository.
Go to the my-devops-project project page and go to Trigger in the left menu.
Click Create trigger.
Set the trigger.
- Name: Ex) spring-boot-hello-trigger
- Source Code Repository: Supports OCI Code Repository, GitHub, and GitLab integration. In the example, select spring-boot-hello-repo on the OCI Code Repository created earlier.
- Actions: Select spring-boot-hello-build-pipeline, which is a build pipeline created with actions that are called when triggered.
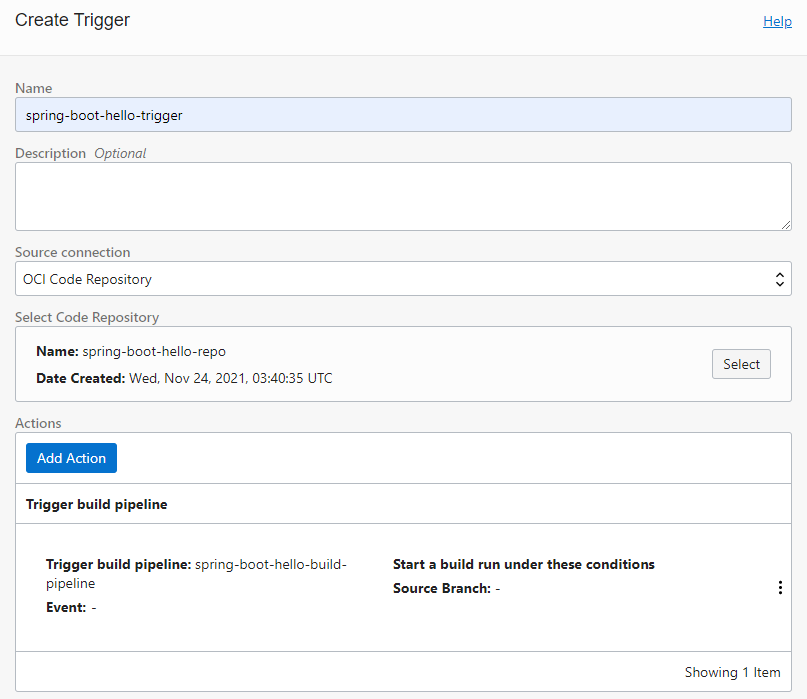
Setup is complete.
test
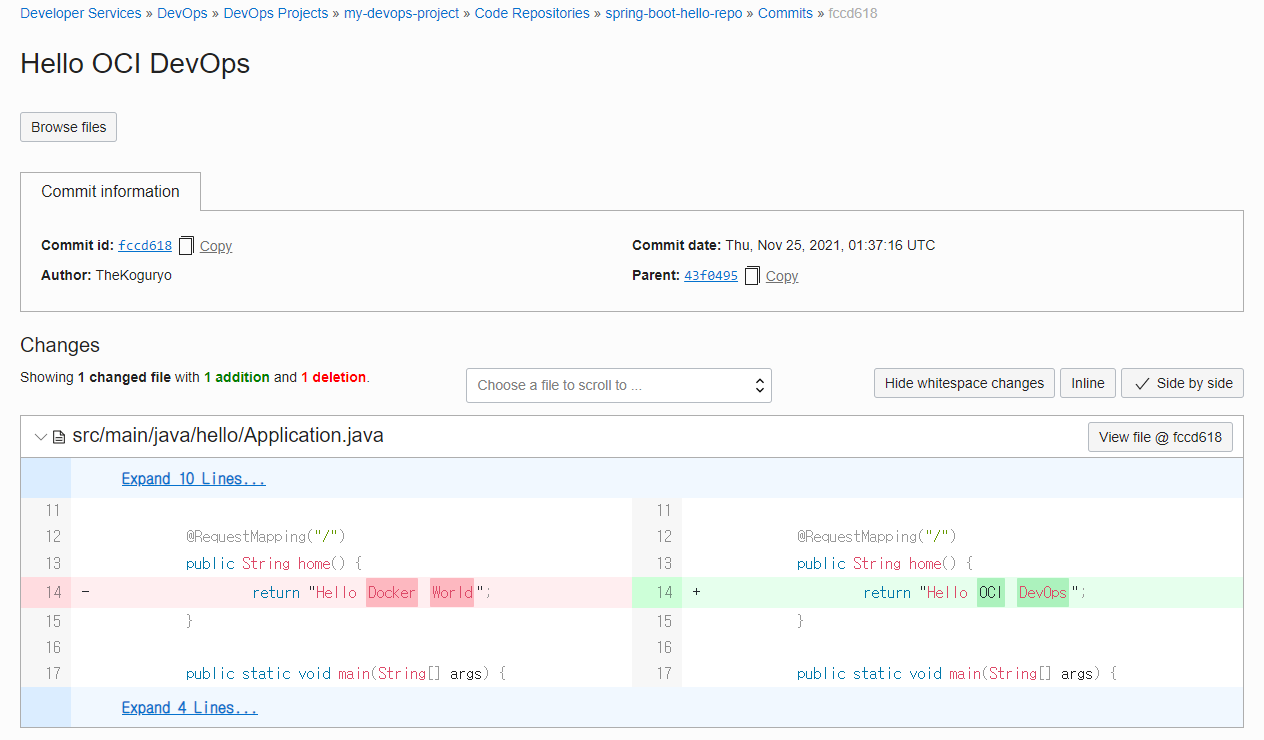
Random changes are made to the spring-boot-hello source code specified in Trigger and reflected in the Code Repository.
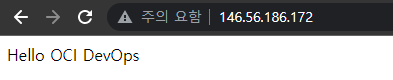
I changed the response message in Application.java to “Hello OCI DevOps” and reflected it.
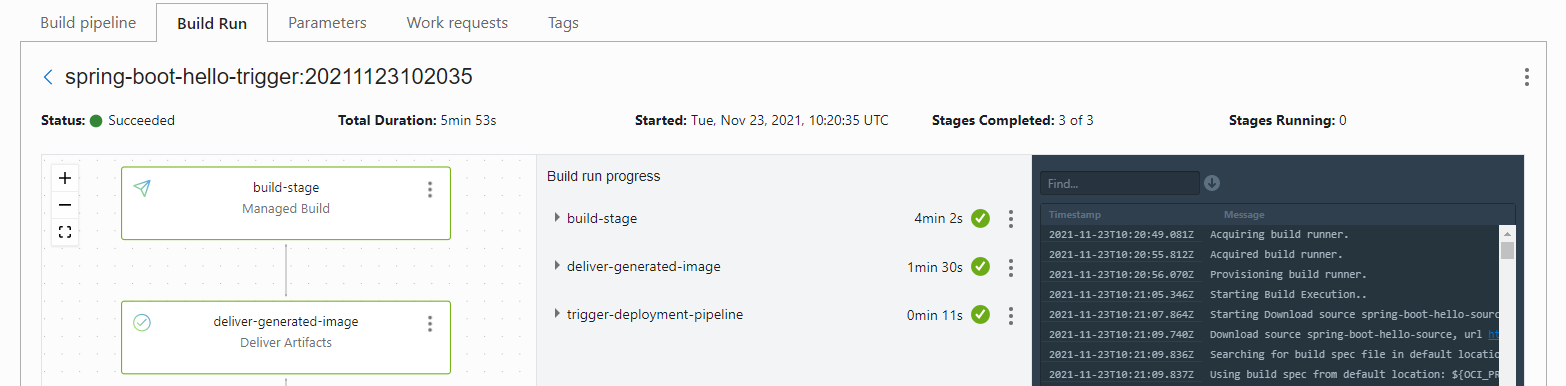
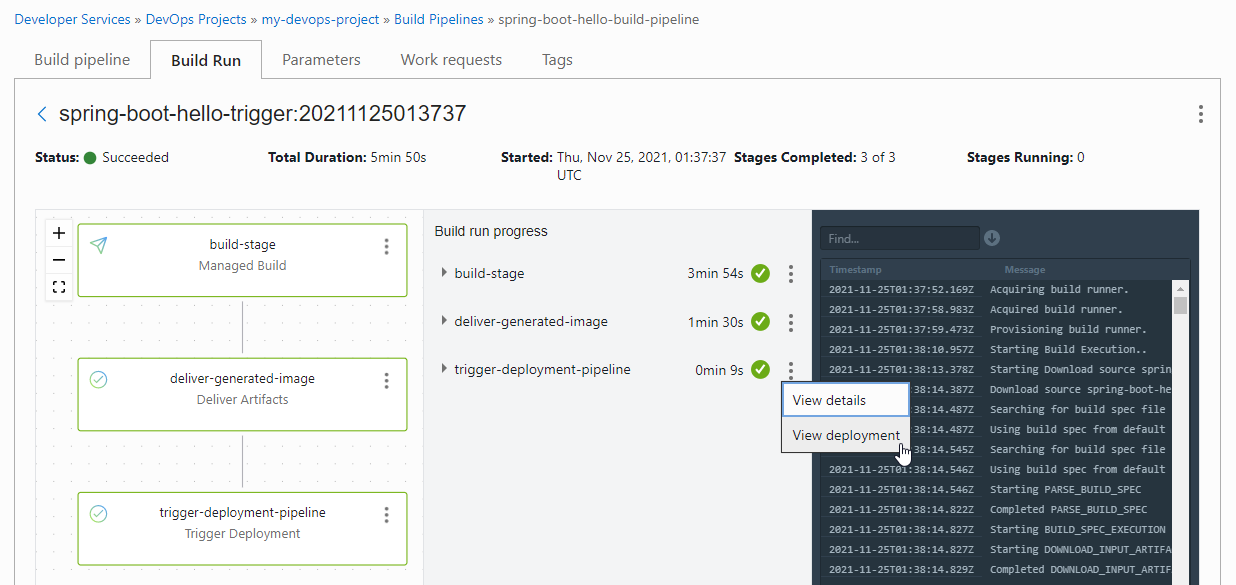
If you look at the build execution history, the Commit ID is shown together with the trigger as shown in the figure, and it is linked to the Code Repository.

If you click Commit ID, you can check the number of code changes in the Code Repository.
The build pipeline ran normally, from code build to container image creation to deployment pipeline invocation.
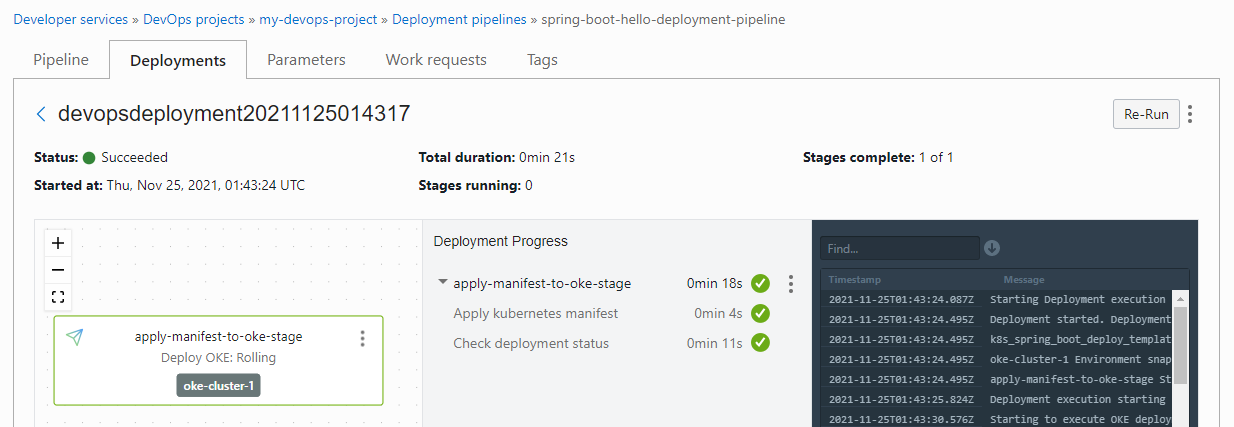
The deployment pipeline also ran normally.
If you look up the OKE cluster, it was deployed normally.
oke_admin@cloudshell:~ (ap-seoul-1)$ kubectl get all
NAME                                     READY   STATUS    RESTARTS   AGE
pod/spring-boot-hello-54848fcfd5-5jpxh   1/1     Running   0          5m39s

NAME                                TYPE           CLUSTER-IP      EXTERNAL-IP      PORT(S)        AGE
service/kubernetes                  ClusterIP      10.96.0.1       <none>           443/TCP        16h
service/spring-boot-hello-service   LoadBalancer   10.96.186.158   146.56.186.172   80:32224/TCP   41m

NAME                                READY   UP-TO-DATE   AVAILABLE   AGE
deployment.apps/spring-boot-hello   1/1     1            1           15h

NAME                                           DESIRED   CURRENT   READY   AGE
replicaset.apps/spring-boot-hello-54557d9c47   0         0         0       41m
replicaset.apps/spring-boot-hello-54848fcfd5   1         1         1       5m39s
You can check the normal operation when connecting to the service address.
As an individual, this article was written with my personal time. There may be errors in the content of the article, and the opinions in the article are personal opinions.