Warning
This content has been generated by machine translation. The translations are automated and have not undergone human review or validation.
8.1 Deploying containers with Container Instances
OCI Container Instances
Container Orchestration is commonly used with Kubernetes to consume container applications. Alternatively, you can simply run containers by directly installing Docker Engine on a virtual machine. At this time, the user must manage Kubernetes or Docker Engine. Container Instances are managed by cloud service providers, not by users of Container Orchestration. Users can simply deploy and use containers, and have the advantage of only paying for the resources directly used by containers.
Just as one host is virtualized to provide an independent environment between VMs, a host is virtualized to provide an independent environment for Container Instance, and Container Instance provides a container runtime environment, which is managed by OCI. Users only need to manage the containers that will run on Container Instance. Please refer to the OCI First Principles video blog post for detailed inner workings.

As seen in the GA blog of OCI Container Instances, I think it would be good to distribute and use an open source package solution that can be independently distributed and used.
Reference
Deploying WordPress and MySQL containers
You can deploy container applications through the Container Instances service.
The current GA does not support persistent volumes as of the December 2022 version. When Container Instance is restarted, data is not saved, so you will proceed from the initial installation of WordPress.
Persistent Volume is scheduled to be supported in the future.
Log in to the OCI console.
From the hamburger menu on the top left, go to Developer Services > Containers & Artifacts > Container Instances.
Click the Create container instance button to create it.
Enter basic creation information.
Name: ex) wordpress
Compartment: Select the Compartment to use
Placement: You can select Availability Domain and Fault Domain where the instance will be located. Use the default on a single AD basis.
-Shape:
- Select a shape provided for Container Instance. Flex type lets you choose the OCPU and memory size you want. This is the sum of resources used by containers in Container Instance. Here, WordPress and MySQL are used by two containers.
- Select 2 OCPU, 16 GB memory.

Networking
- Select the VCN and Subnet where the container instance will be located. Here, select Public Subnet for testing and assign Public IP.

- You can configure advanced network settings in Show advanced options. You can set a private IP and private domain name to use when accessing container instances from the internal network.

- You can specify additional advanced settings by clicking Show advanced options at the bottom of the screen. You can set the Graceful shutdown timeout and Container Restart Policy to wait when the container shuts down.

Click Next
Enter container information to run within Container Instance.
Enter the MySQL container information as the first container.
Name: ex) mysql
Image: Click Select Image.

Supports OCIR and external container registries. The default server for external registries is Docker Hub. Import the MySQL image using the image name and tag as shown below.

Environmental variables: Among the environment variable values provided by the MySQL container image you are using, add the variables below required for database installation.
Key Value MYSQL_DATABASE wordpress MYSQL_ROOT_PASSWORD wordpressonmysql MYSQL_USER wordpress MYSQL_PASSWORD wordpress 
You can specify additional advanced settings by clicking Show advanced options.
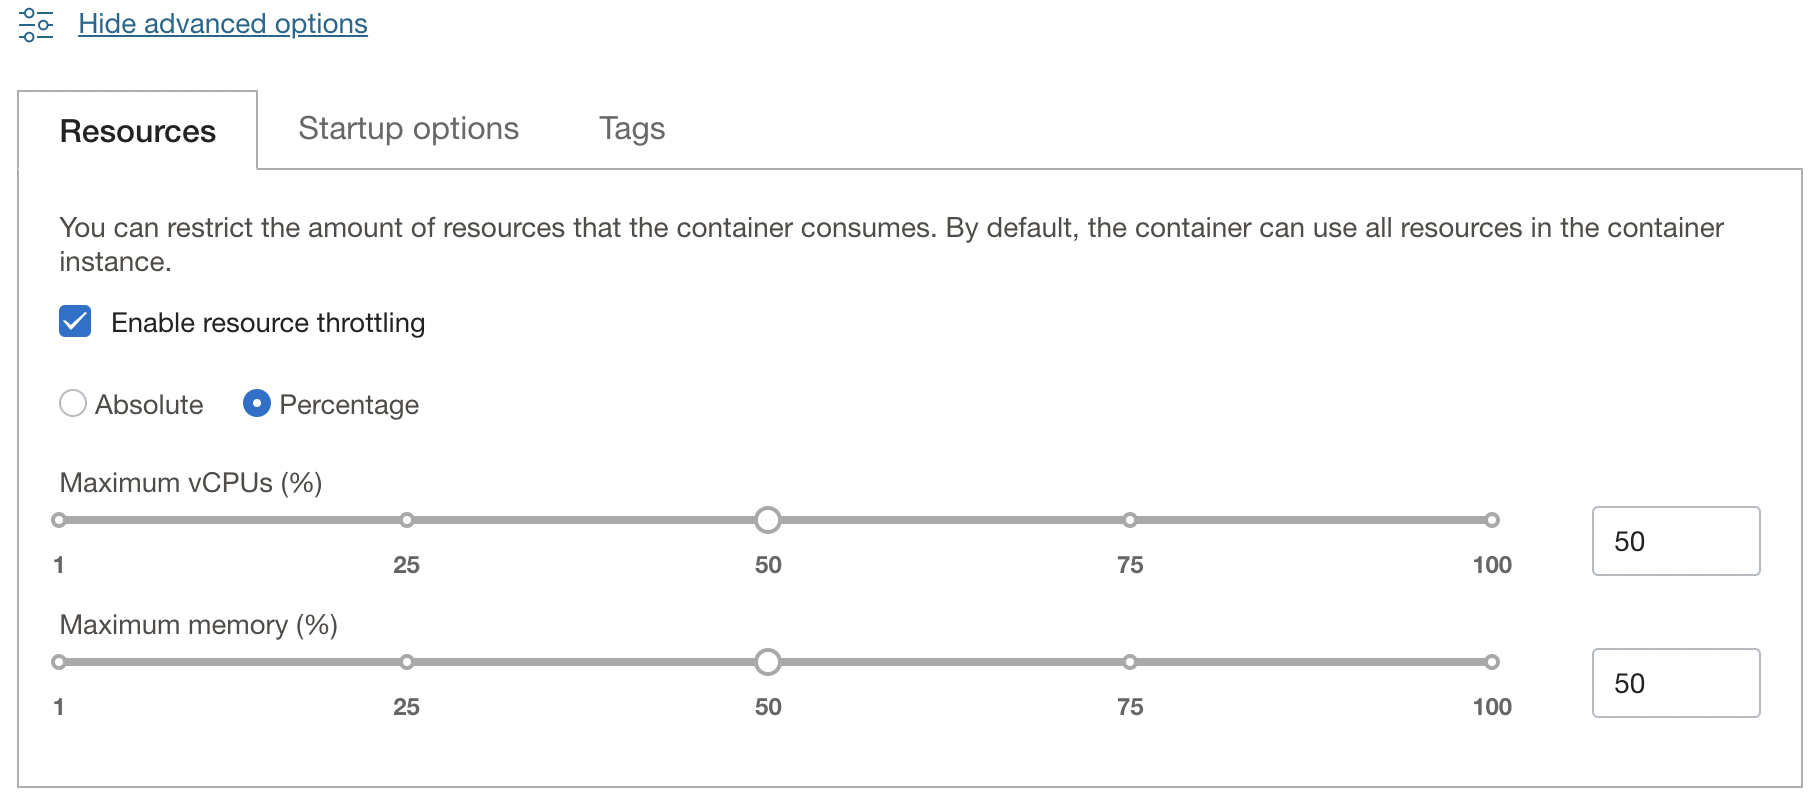
-Resources
If there are multiple containers in Container Instance, you can set throttling so that one container does not use resources unilaterally. You can directly specify OCPU, Memory, or set the percentage as shown in the figure below. Here, both are entered as 50%.

-Startup Options
You can set the values to use when starting the container. Starting from MySQL 8, the default authentication method has been changed. For convenience,
--default-authentication-plugin=mysql_native_passwordis added to the ENTRYPOINT value to use the existing password method.
Click + Add container to add a second container.
Enter the wordpress container information as the second container.
- Name: ex) wordpress
-Image:
Click Select Image to import from an external registry, Docker Hub, same as before. Enter only the image name in wordpress. If the tag is not present, the tag defaults to latest.

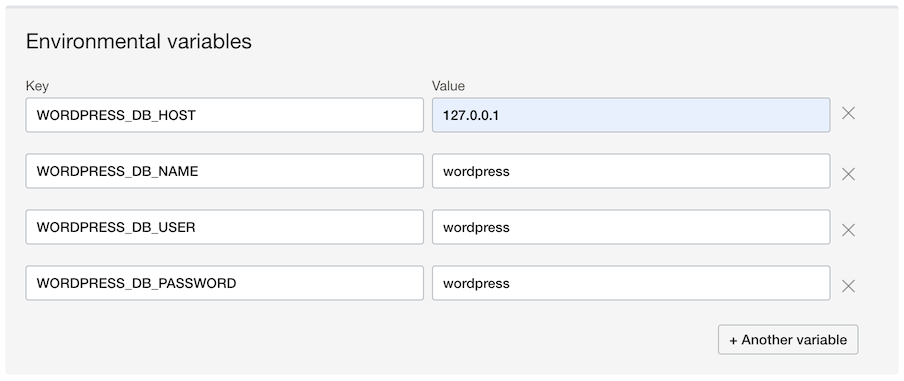
-Environmental variables:
Among the environment variable values provided by the MySQL container image you are using, add the following variables required to install the database. When there are multiple containers in Container Instances, they share CPU, memory, and share the network together. So even if WORDPRESS_DB_HOST is set to 127.0.0.1, you can access the MySQL container created earlier.
| Key | Value |
| :-------------------- | :-------- |
| WORDPRESS_DB_HOST | 127.0.0.1 |
| WORDPRESS_DB_NAME | wordpress |
| WORDPRESS_DB_USER | wordpress |
| WORDPRESS_DB_PASSWORD | wordpress |
- You can specify additional advanced settings by clicking **Show advanced options**.
- Resources
The second container also sets throttling. Specify the percentage as the remaining 50% as shown in the figure below.
Click Next
Check all the information you have entered and click the Create button to create a Container Instance. Two containers, including Wordpress and MySQL to be used by Wordpress, are created as one Container Instance.
After a few seconds, the Container Instance is created as shown below. Check the Public IP of the created Wordpress.

In order to access, you must register in advance in Ingress that can be accessed from the Internet through port 80 in the Security List used by Container Instance.
Stateless Source IP Protocol Source Port Range Destination Port Range Description No 0.0.0.0/0 TCP All 80 Wordpress You can see the initial installation screen of Wordpress by connecting to Public IP.

Monitoring & Log check
In the Container Instance detail screen, you can see the CPU, Memory, and Storage metric information in Resources > Metrics at the bottom left.

If you go to the Containers tab, you can see the deployed containers. You can also see that resources are allocated by 50% as set for the total allocated OCPU and Memory.

Click the first wordpress container to go to the detail screen. You can check container logs through More actions > View logs in the container menu.


As an individual, this article was written with my personal time. There may be errors in the content of the article, and the opinions in the article are personal opinions.