Warning
This content has been generated by machine translation. The translations are automated and have not undergone human review or validation.
7.1 Developing Spring Boot applications
Based on the Spring Boot example, check out the process of app development, container image build, and deployment to OKE.
Create a Spring Boot-based microservice
Spring Initializr is used to develop based on the basic project source file.
Create a project file through Spring Initializr.
Method 1. Create a basic project source file using Spring Initializr.
As shown in the figure below, enter project information and click Generate to generate source files.

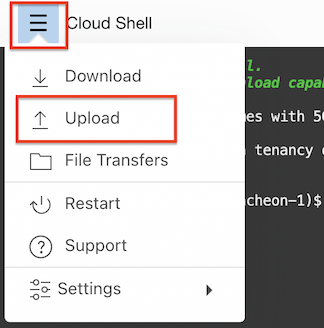
Upload the downloaded file to Cloud Shell.
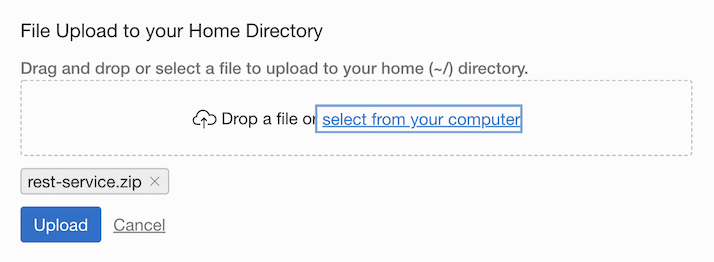
Unzip the uploaded file in Cloud Shell with unzip.
Method 2. Instead of using Spring Initializr in the browser, use the command below to create a basic project source file directly in the Cloud Shell.
curl https://start.spring.io/starter.tgz -d baseDir=rest-service -d name=rest-service -d artifactId=rest-service -d javaVersion=1.8 -d dependencies=web,actuator | tar -xzvf -
Navigate to the rest-service folder.
Implement the code that responds to the request response message as a JSON message like the one below.
{
    "id": 1,
    "content": "Hello, World!"
}
Copy the code below and create a Java class file (src/main/java/com/example/restservice/Greeting.java) in .
package com.example.restservice;

public class Greeting {

    private final long id;
    private final String content;

    public Greeting(long id, String content) {
        this.id = id;
        this.content = content;
    }

    public long getId() {
        return id;
    }

    public String getContent() {
        return content;
    }
}
Result of processing HTTP Get request with /greeting URL. Write RestController code for sending response message here at src/main/java/com/example/restservice/GreetingController.java.
package com.example.restservice;

import java.util.concurrent.atomic.AtomicLong;

import org.springframework.web.bind.annotation.GetMapping;
import org.springframework.web.bind.annotation.RequestParam;
import org.springframework.web.bind.annotation.RestController;

@RestController
public class GreetingController {

    private static final String template = "Hello, %s!";
    private final AtomicLong counter = new AtomicLong();

    @GetMapping("/greeting")
    public Greeting greeting(@RequestParam(value = "name", defaultValue = "World") String name) {
        return new Greeting(counter.incrementAndGet(), String.format(template, name));
    }
}
In Kubernetes, enable readiness and liveness after container startup in Spring Boot. Add the following settings to the src/main/resources/application.properties file.
management.health.probes.enabled=trueBuild your code for execution.
./mvnw clean packageRun the built JAR file.
java -jar target/rest-service-0.0.1-SNAPSHOT.jarAs shown below, the service runs fast, and you can see that the one running on port 8080 through the built-in Tomcat runs fast.
  .   ____          _            __ _ _
 /\\ / ___'_ __ _ _(_)_ __  __ _ \ \ \ \
( ( )\___ | '_ | '_| | '_ \/ _` | \ \ \ \
 \\/  ___)| |_)| | | | | || (_| |  ) ) ) )
  '  |____| .__|_| |_|_| |_\__, | / / / /
 =========|_|==============|___/=/_/_/_/
 :: Spring Boot ::                (v2.6.4)

2022-03-07 00:27:56.538  INFO 2806 --- [           main] c.e.restservice.RestServiceApplication   : Starting RestServiceApplication v0.0.1-SNAPSHOT using Java 1.8.0_322 on 6d0b991bde66 with PID 2806 (/home/winter/rest-service/target/rest-service-0.0.1-SNAPSHOT.jar started by winter in /home/winter/rest-service)
2022-03-07 00:27:56.544  INFO 2806 --- [           main] c.e.restservice.RestServiceApplication   : No active profile set, falling back to 1 default profile: "default"
2022-03-07 00:27:59.015  INFO 2806 --- [           main] o.s.b.w.embedded.tomcat.TomcatWebServer  : Tomcat initialized with port(s): 8080 (http)
2022-03-07 00:27:59.037  INFO 2806 --- [           main] o.apache.catalina.core.StandardService   : Starting service [Tomcat]
2022-03-07 00:27:59.038  INFO 2806 --- [           main] org.apache.catalina.core.StandardEngine  : Starting Servlet engine: [Apache Tomcat/9.0.58]
2022-03-07 00:27:59.134  INFO 2806 --- [           main] o.a.c.c.C.[Tomcat].[localhost].[/]       : Initializing Spring embedded WebApplicationContext
2022-03-07 00:27:59.134  INFO 2806 --- [           main] w.s.c.ServletWebServerApplicationContext : Root WebApplicationContext: initialization completed in 2409 ms
2022-03-07 00:28:00.235  INFO 2806 --- [           main] o.s.b.a.e.web.EndpointLinksResolver      : Exposing 1 endpoint(s) beneath base path '/actuator'
2022-03-07 00:28:00.290  INFO 2806 --- [           main] o.s.b.w.embedded.tomcat.TomcatWebServer  : Tomcat started on port(s): 8080 (http) with context path ''
2022-03-07 00:28:00.327  INFO 2806 --- [           main] c.e.restservice.RestServiceApplication   : Started RestServiceApplication in 4.615 seconds (JVM running for 5.413)
For testing, open another browser tab and connect to the same Oracle Cloud account to launch Cloud Shell.
Test the service in the second Cloud Shell.
curl http://localhost:8080/greeting; echo{"id":1,"content":"Hello, World!"}Stop the app running in the first Cloud Shell.
Create Container Image
In order to run on Kubernetes, the service application to run must be containerized. Create container images via the Docker client.
Create a Dockerfile in the project folder as below. An example of copying a JAR file built using the openjdk:8-jdk-alpine base image into the image and running it with java -jar.
FROM openjdk:8-jdk-alpine
ARG JAR_FILE=target/*.jar
COPY ${JAR_FILE} app.jar
ENTRYPOINT ["java","-jar","app.jar"]
Build the image.
docker build -t spring-boot-greeting:1.0 .Retrieve the image currently in your local (in this case Cloud Shell).
$ docker-images
REPOSITORY TAG IMAGE ID CREATED SIZE
spring-boot-greeting 1.0 a80b8a33c501 About a minute ago 124MB
openjdk 8-jdk-alpine a3562aa0b991 2 years ago 105MB
Register image to OCIR
To push a container image to OCIR, the following image tag naming rules must be followed. Check the information below.
<region-key or region-identifier>.ocir.io/<tenancy-namespace>/<repo-name>:<tag>- region-key: Since both Region Key and Region Identifier are now supported, you can use icn and ap-seoul-1 for Seoul and yny and ap-chuncheon-1 for Chuncheon. For complete address information, see OCIR Available Endpoint.
- tenancy-namespace: Check the Object Storage Namespace in OCI Console Tenancy Details or check it with oci os ns get in Cloud Shell.
- repo-name: name of image, including path if present
winter@cloudshell:rest-service (ap-chuncheon-1)$ oci os ns get
{
  "data": "axjowrxxxxxx"
}
winter@cloudshell:rest-service (ap-chuncheon-1)$ echo $OCI_REGION
ap-chuncheon-1
Additional tagging of existing images for OCIR registration.
docker tag spring-boot-greeting:1.0 ap-chuncheon-1.ocir.io/${tenancy_namespace}/spring-boot-greeting:1.0You can see that the same image has been tagged.
winter@cloudshell:rest-service (ap-chuncheon-1)$ docker images
REPOSITORY                                                 TAG                 IMAGE ID            CREATED             SIZE
ap-chuncheon-1.ocir.io/axjowrxxxxxx/spring-boot-greeting   1.0                 a80b8a33c501        6 minutes ago       124MB
spring-boot-greeting                                       1.0                 a80b8a33c501        6 minutes ago       124MB
openjdk                                                    8-jdk-alpine        a3562aa0b991        2 years ago         105MB
To push an image to OCIR, you need to log in to OCIR with Docker CLI. Username and Password are as follows.
- Username: In the form of
<tenancy-namespace>/<user-name>, user-name uses the username shown in the user profile in the OCI service console. - Password: Use the user’s Auth Token. My Profile > Auth tokens > Generate token.
Log in with the Docker CLI as shown below.
# For IDCS users
docker login ap-chuncheon-1.ocir.io -u ${tenancy_namespace}/oracleidentitycloudservice/~~~
# For OCI Native users
docker login ap-chuncheon-1.ocir.io -u ${tenancy_namespace}/~~~
winter@cloudshell:~ (ap-chuncheon-1)$ docker login ap-chuncheon-1.ocir.io -u ${tenancy_namespace}/winter Password: WARNING! Your password will be stored unencrypted in /home/winter/.docker/config.json. Configure a credential helper to remove this warning. See https://docs.docker.com/engine/reference/commandline/login/#credentials-store Login Succeeded- Username: In the form of
Push the image using only image tag for OCIR.
docker push ap-chuncheon-1.ocir.io/${tenancy_namespace}/spring-boot-greeting:1.0
Deploy microservices to OKE
In order to start a container in OKE using an image in OCIR, permission to access the OCIR image in OKE is required. Since you have registered as an OCIR Private Repository, create a secret to access OKE. Since you have already logged in to OCI with Docker CLI in Cloud Shell, use that information to create it.
kubectl create secret generic ocir-secret \
--from-file=.dockerconfigjson=$HOME/.docker/config.json \
--type=kubernetes.io/dockerconfigjson
Deploy to OKE using the following YAML file. In order to proceed with the use of Load Balancer, Service Type is also deployed.
The image address is modified according to each environment.
kubectl apply -f <<EOF -
apiVersion: apps/v1
kind: Deployment
metadata:
  labels:
    app: spring-boot-greeting
  name: spring-boot-greeting-deployment
spec:
  replicas: 1
  selector:
    matchLabels:
      app: spring-boot-greeting
  template:
    metadata:
      labels:
        app: spring-boot-greeting
    spec:
      containers:
      - name: spring-boot-greeting
        image: ap-chuncheon-1.ocir.io/${tenancy_namespace}/spring-boot-greeting:1.0
      imagePullSecrets:
      - name: ocir-secret
---
apiVersion: v1
kind: Service
metadata:
  name: spring-boot-greeting-service
spec:
  selector:
    app: spring-boot-greeting
  ports:
    - protocol: TCP
      port: 80
      targetPort: 8080
  type: LoadBalancer
EOF
Check the deployed resources with kubectl get all command.
$kubectl get all
NAME                                                   READY   STATUS    RESTARTS   AGE
pod/spring-boot-greeting-deployment-84c4865b98-7rmrp   1/1     Running   0          34s

NAME                                   TYPE           CLUSTER-IP     EXTERNAL-IP       PORT(S)        AGE
service/kubernetes                     ClusterIP      10.96.0.1      <none>            443/TCP        10h
service/spring-boot-greeting-service   LoadBalancer   10.96.75.242   150.xxx.xxx.xxx   80:32418/TCP   35s

NAME                                              READY   UP-TO-DATE   AVAILABLE   AGE
deployment.apps/spring-boot-greeting-deployment   1/1     1            1           35s

NAME                                                         DESIRED   CURRENT   READY   AGE
replicaset.apps/spring-boot-greeting-deployment-84c4865b98   1         1         1       35s
Pod started normally. Request service via LoadBalancer’s EXTERNAL-IP.
curl http://150.xxx.xxx.xxx/greeting; echo{"id":1,"content":"Hello, World!"}
As an individual, this article was written with my personal time. There may be errors in the content of the article, and the opinions in the article are personal opinions.