Warning
This content has been generated by machine translation. The translations are automated and have not undergone human review or validation.
15.3 Configuring Private Git Server for Resource Manager
Resource Manager supports GitHub and GitLab as Terraform configuration repositories. Environments that can be accessed through the public Internet can of course be connected from Resource Manager. If you want to use an internal server instead of a public server for setting storage, you can connect to a privately installed server on OCI by following the procedure below.
Create Private GitLab CE VM
Create Compute instance
-
Create a Compute instance on which to install GitLab CE.
- Image: Choose Oracle Linux 7.9 (Oracle Linux 8 is not.)
- Networking: Select Private Subnet without Public IP
- Example, Private Subnet-ExampleVCN
- Add SSH Keys: Enter the public key of the key pair to be used
-
Prepare the JumpBox Compute instance for accessing the GitLab CE instance.
- Networking:
- Set to allow access to GitLab CE instance with public IP.
- Select Public Subnet and set it to receive Public IP.
- Example, Public Subnet-ExampleVCN
- Add SSH Keys: Enter the public key of the key pair to be used
- Networking:
-
SSH into JumpBox using your private key.
-
From JumpBox, connect to GitLab CE again via SSH.
-
You can save the private key in .ssh/id_rsa in the home of the JumpBox, or you can specify it with the ssh option.
-
SSH into the GitLab CE instance using the private key.
[opc@jumpbox ~]$ ssh opc@10.0.1.149
Last login: Mon Jun 20 04:44:00 2022 from jumpbox.sub06200152300.examplevcn.oraclevcn.com
[opc@gitlab-ce ~]$
-
Install GitLab CE
-
Install GitLab CE on the connected GitLab CE Compute instance.
-
Install the required OS libraries.
sudo yum install -y curl policycoreutils-python openssh-server perl # Enable OpenSSH server daemon if not enabled: sudo systemctl status sshd sudo systemctl enable sshd sudo systemctl start sshd # Check if opening the firewall is needed with: sudo systemctl status firewalld sudo firewall-cmd --permanent --add-service=http sudo firewall-cmd --permanent --add-service=https sudo systemctl reload firewalld -
For email notifications via Postfix, install:
sudo yum install postfix sudo systemctl enable postfix sudo systemctl start postfix -
Set up the GitLab CE repository.
curl https://packages.gitlab.com/install/repositories/gitlab/gitlab-ce/script.rpm.sh | sudo bash -
Install the GitLab CE package.
EXTERNAL_URL is an address accessed through DNS and is used when registering an HTTPS certificate. Enter the desired address.
sudo EXTERNAL_URL="https://gitlab.example.com" yum install -y gitlab-ce -
Add Ingress Rule to the Security List to which the server belongs.
- Security List Name: Ex) Security List for Private Subnet-ExampleVCN
- Target: Ex) if the source within VCN (10.0.0.0/16) is allowed
Stateless Source IP Protocol Source Port Range Destination Port Range Description No 10.0.0.0/16 TCP All 443 GitLab CE
Create Certificate Authority in OCI Certificate Service
- HTTPS-based Private Git Server is supported in Resource Manager.
- The certificate to be used when connecting the Private Git Server with HTTPS must be registered as an OCI Certificate.
- In case of a certificate from a separate accredited institution, import it in advance.
- Since OCI Certificate service does not support import of Self-Signed Certificate, if you do not have a separate public certificate, create it and use it in OCI Certificate service. Here we create CA and Certificate through OCI Certificate service.
-
In the OCI console, click Identity & Security » Dynamic Group in the navigation menu.
-
Create a Dynamic Group for the CA.
- Name: example, ca-dynamic-group
resource.type='certificateauthority' -
Create a Policy.
- Name: example, ca-policy
Allow dynamic-group <YourDynamicGroupName> to use keys in compartment <YourCompartmentName> Allow dynamic-group <YourDynamicGroupName> to manage objects in compartment <YourCompartmentName> -
In the OCI console, click Identity & Security » Vault in the navigation menu.
-
Create a new vault.
- Name: example, my-vault
-
Go to the created Vault.
-
Create a new Master Encryption Key.
- Create an asymmetric key (here an RSA based key) in HSM mode for use in an OCI certificate.
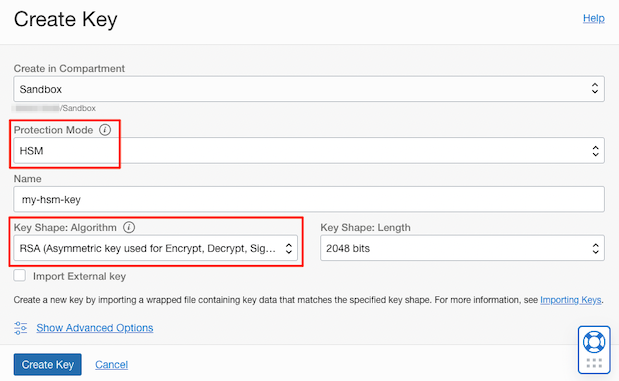
-
In the OCI console, click Identity & Security » Certificate » Certificate Authorities in the navigation menu.
-
Click Create Certificate Authority.
-
Enter the Certificate Authority creation information.
-
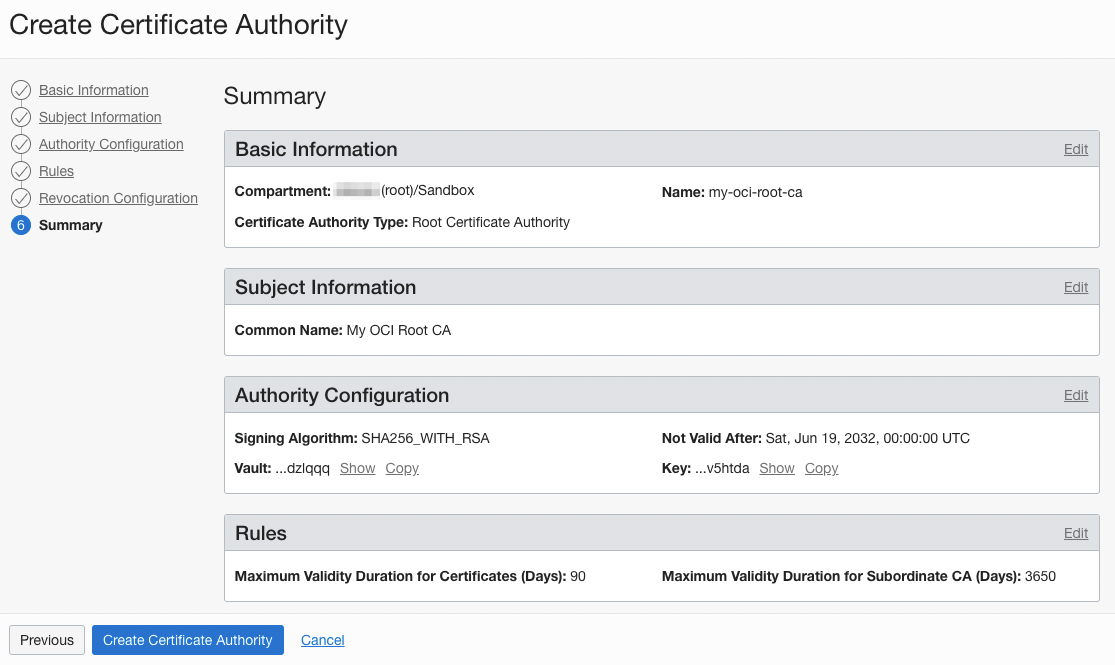
Basic Information
- CA Type: Root Certificate Authority
- Name: example, my-oci-root-ca
-
Subject Information
- Common Name: Example, My OCI Root CA
-
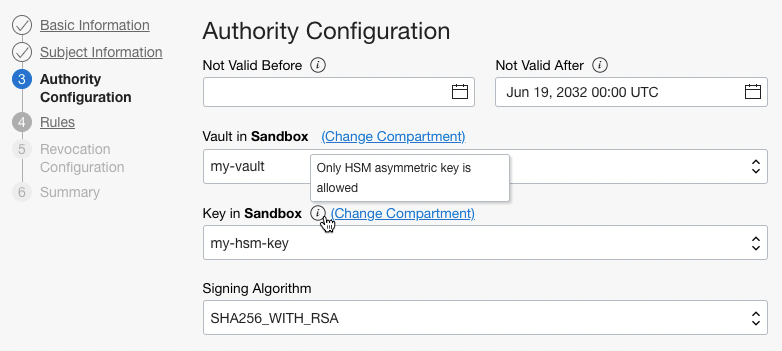
Authority Configuration
- Select the Master Encryption Key of the vault you created earlier.
-
Expire Rule
- Maximum Validity Duration for Certificates (Days): Default 90 days as the maximum validity period of sub-certificates
-
Revocation Configuration
- Check Skip Revocation.
-
Summary
- After confirming the settings, create a CA.
Create OCI Certificate
-
Go to the CA screen you created earlier.
-
Under Resources > Certificates, click Issue Certificate.
-
Enter the certificate generation information.
-
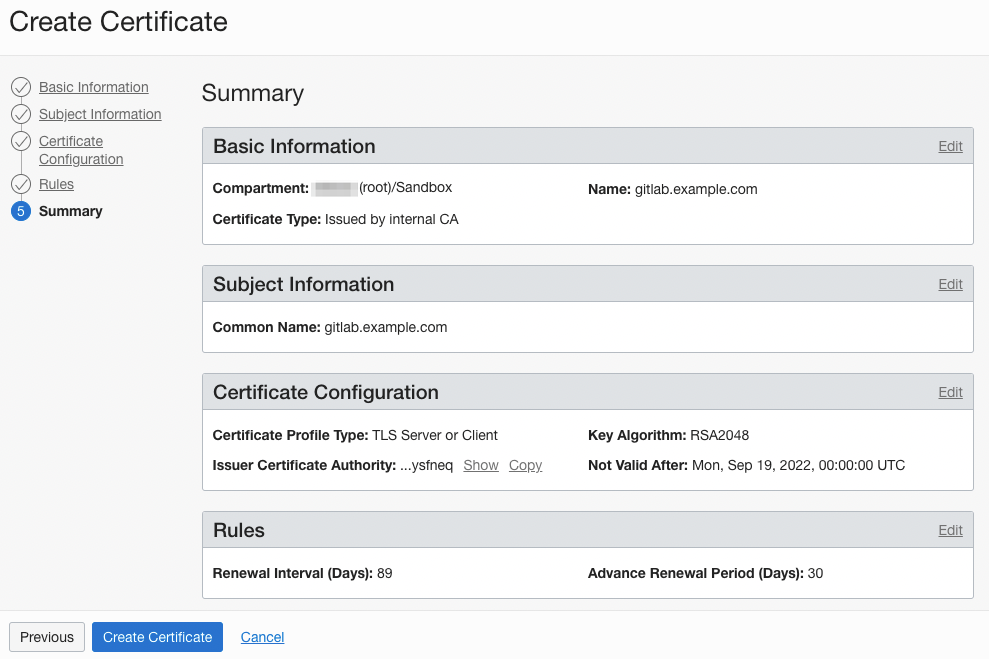
Basic Information
- CA Type: Issued by internal CA
- Name: Example, gitlab.example.com
-
Subject Information
- Common Name: Enter the address name to be used when connecting via HTTPS. The GitLab CE setting must be the same as the EXTERNAL_URL value.
- Example, gitlab.example.com
- Common Name: Enter the address name to be used when connecting via HTTPS. The GitLab CE setting must be the same as the EXTERNAL_URL value.
-
Certificate Configuration
- Designate the expiration date (Not Valid After) as the day before the set date.
- Otherwise, an error such as “The validity period 7838778727 exceeds the maximum validity period allowed 7776000000.”
- Use the default settings for the rest.
- Designate the expiration date (Not Valid After) as the day before the set date.
-
Rules
- use as is
-
Summary
- After confirming the settings, create a certificate.
-
Setting up HTTPS with OCI Certificate in GitLab CE
-
When setting HTTPS, Certificate PEM and Private Key PEM files are required.
-
Download Certificate PEM
-
Click the icon on the right side of the generated certificate screen and click View Content

-
Copy the value of the upper Certificate PEM area and save it as gitlab.example.com.crt file name.
-
-
Download Private Key
-
You can’t download it directly from the Oracle Cloud Console, so you can download it with the OCI CLI.
-
For convenience, the OCI CLI connects to Cloud Shell, which can be used immediately.
-
Execute the following command with OCI CLI to save the private key PEM value. Save as gitlab.example.com.key file name.
- –certificate-id uses the OCID value of the previously generated certificate
oci certificates certificate-bundle get --certificate-id=ocid1.certificate.oc1.... --bundle-type=CERTIFICATE_CONTENT_WITH_PRIVATE_KEY --query 'data."private-key-pem"' --raw-output
-
-
SSH to the GitLab CE Compute instance through JumpBox in the same way as before where OCI CLI is installed.
-
Check the external_url value in the /etc/gitlab/gitlab.rb file
## GitLab URL ... external_url 'https://gitlab.example.com' -
Disable Let’s Encrypt in /etc/gitlab/gitlab.rb.
################################################################################ # Let's Encrypt integration ################################################################################ letsencrypt['enable'] = false -
Create the /etc/gitlab/ssl folder and copy the Certificate PEM and Private Key PEM files that you downloaded and received through OCI CLI.
sudo mkdir -p /etc/gitlab/ssl/bak sudo chmod 755 /etc/gitlab/ssl sudo mv /etc/gitlab/ssl/*.* /etc/gitlab/ssl/bak/ sudo cp gitlab.example.com.key gitlab.example.com.crt /etc/gitlab/ssl/ -
Reconfigure and Restart GitLab
If you run gitlab-ctl reconfigure 24 hours after the initial installation, the password file of the initial root may be deleted. Pre-check before running.
sudo gitlab-ctl reconfigure
sudo gitlab-ctl restart
GitLab Connection Test
-
SSH tunnel to GitLab server through JumpBox to access GitLab as web.
- If the private IP of the GitLab CE instance is 10.0.1.149
ssh opc@jumpbox -L 8443:10.0.1.149:443 -
Connect locally with a web browser.
- Access address: https://localhost:8443
- This is an example of Chrome browser on Mac.
- After connecting, check the certificate.
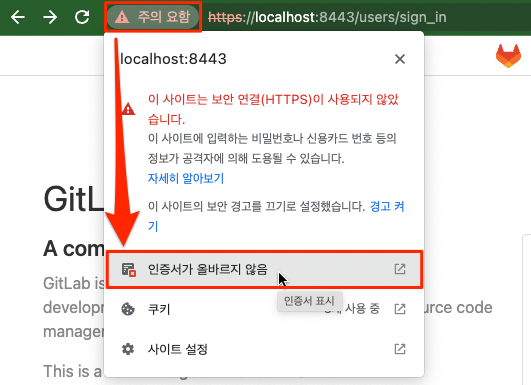
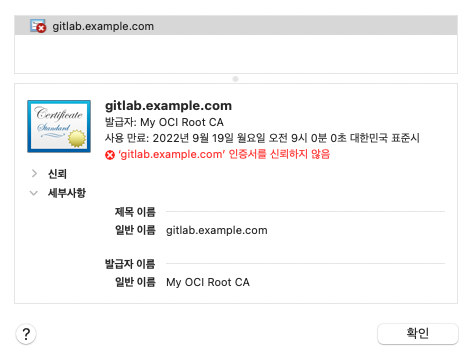
-
You can check the certificate issuer (CA) and certificate information.
-
Confirm the root password. If you run gitlab-ctl reconfigure 24 hours after initial installation, it may be deleted.
sudo cat /etc/gitlab/initial_root_password -
Confirm the connection as the root user.
-
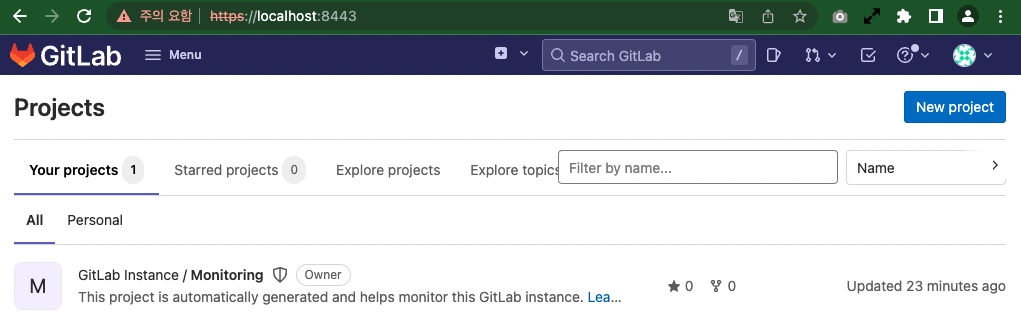
The basic configuration of the GitLab CE server to be used as a private Git server is complete.
Connect to Private Git Server from Resource Manager
Create GitLab Repository to store Terraform configuration information and access account
-
Create a new GitLab project.
- Create a new blank project.
- Project name: Ex) orm-project
-
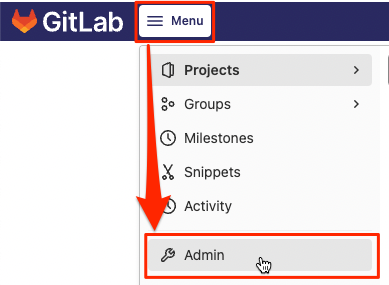
Go to the Admin page from the menu.
-
Create a user to connect to in Resource Manager.
- From the Admin menu, click Overview > Users.
- Click New user in the upper right corner.
- Create a user by entering basic user information.
- Click the Edit button at the top right of the user account and enter the temporary password.
-
Add users to the created project.
- Go to the project page.
- Go to Project Information > Members menu.
- Add the user created through Invite Member as the Maintainer role.
-
Log in as the user you created.
-
Create an Access Token for use in Resource Manager.
-
Moves to the user profile change screen.
-
Click Access Token in the left User Settings menu.
-
In case of GitLab, it is created by adding read_api permission.
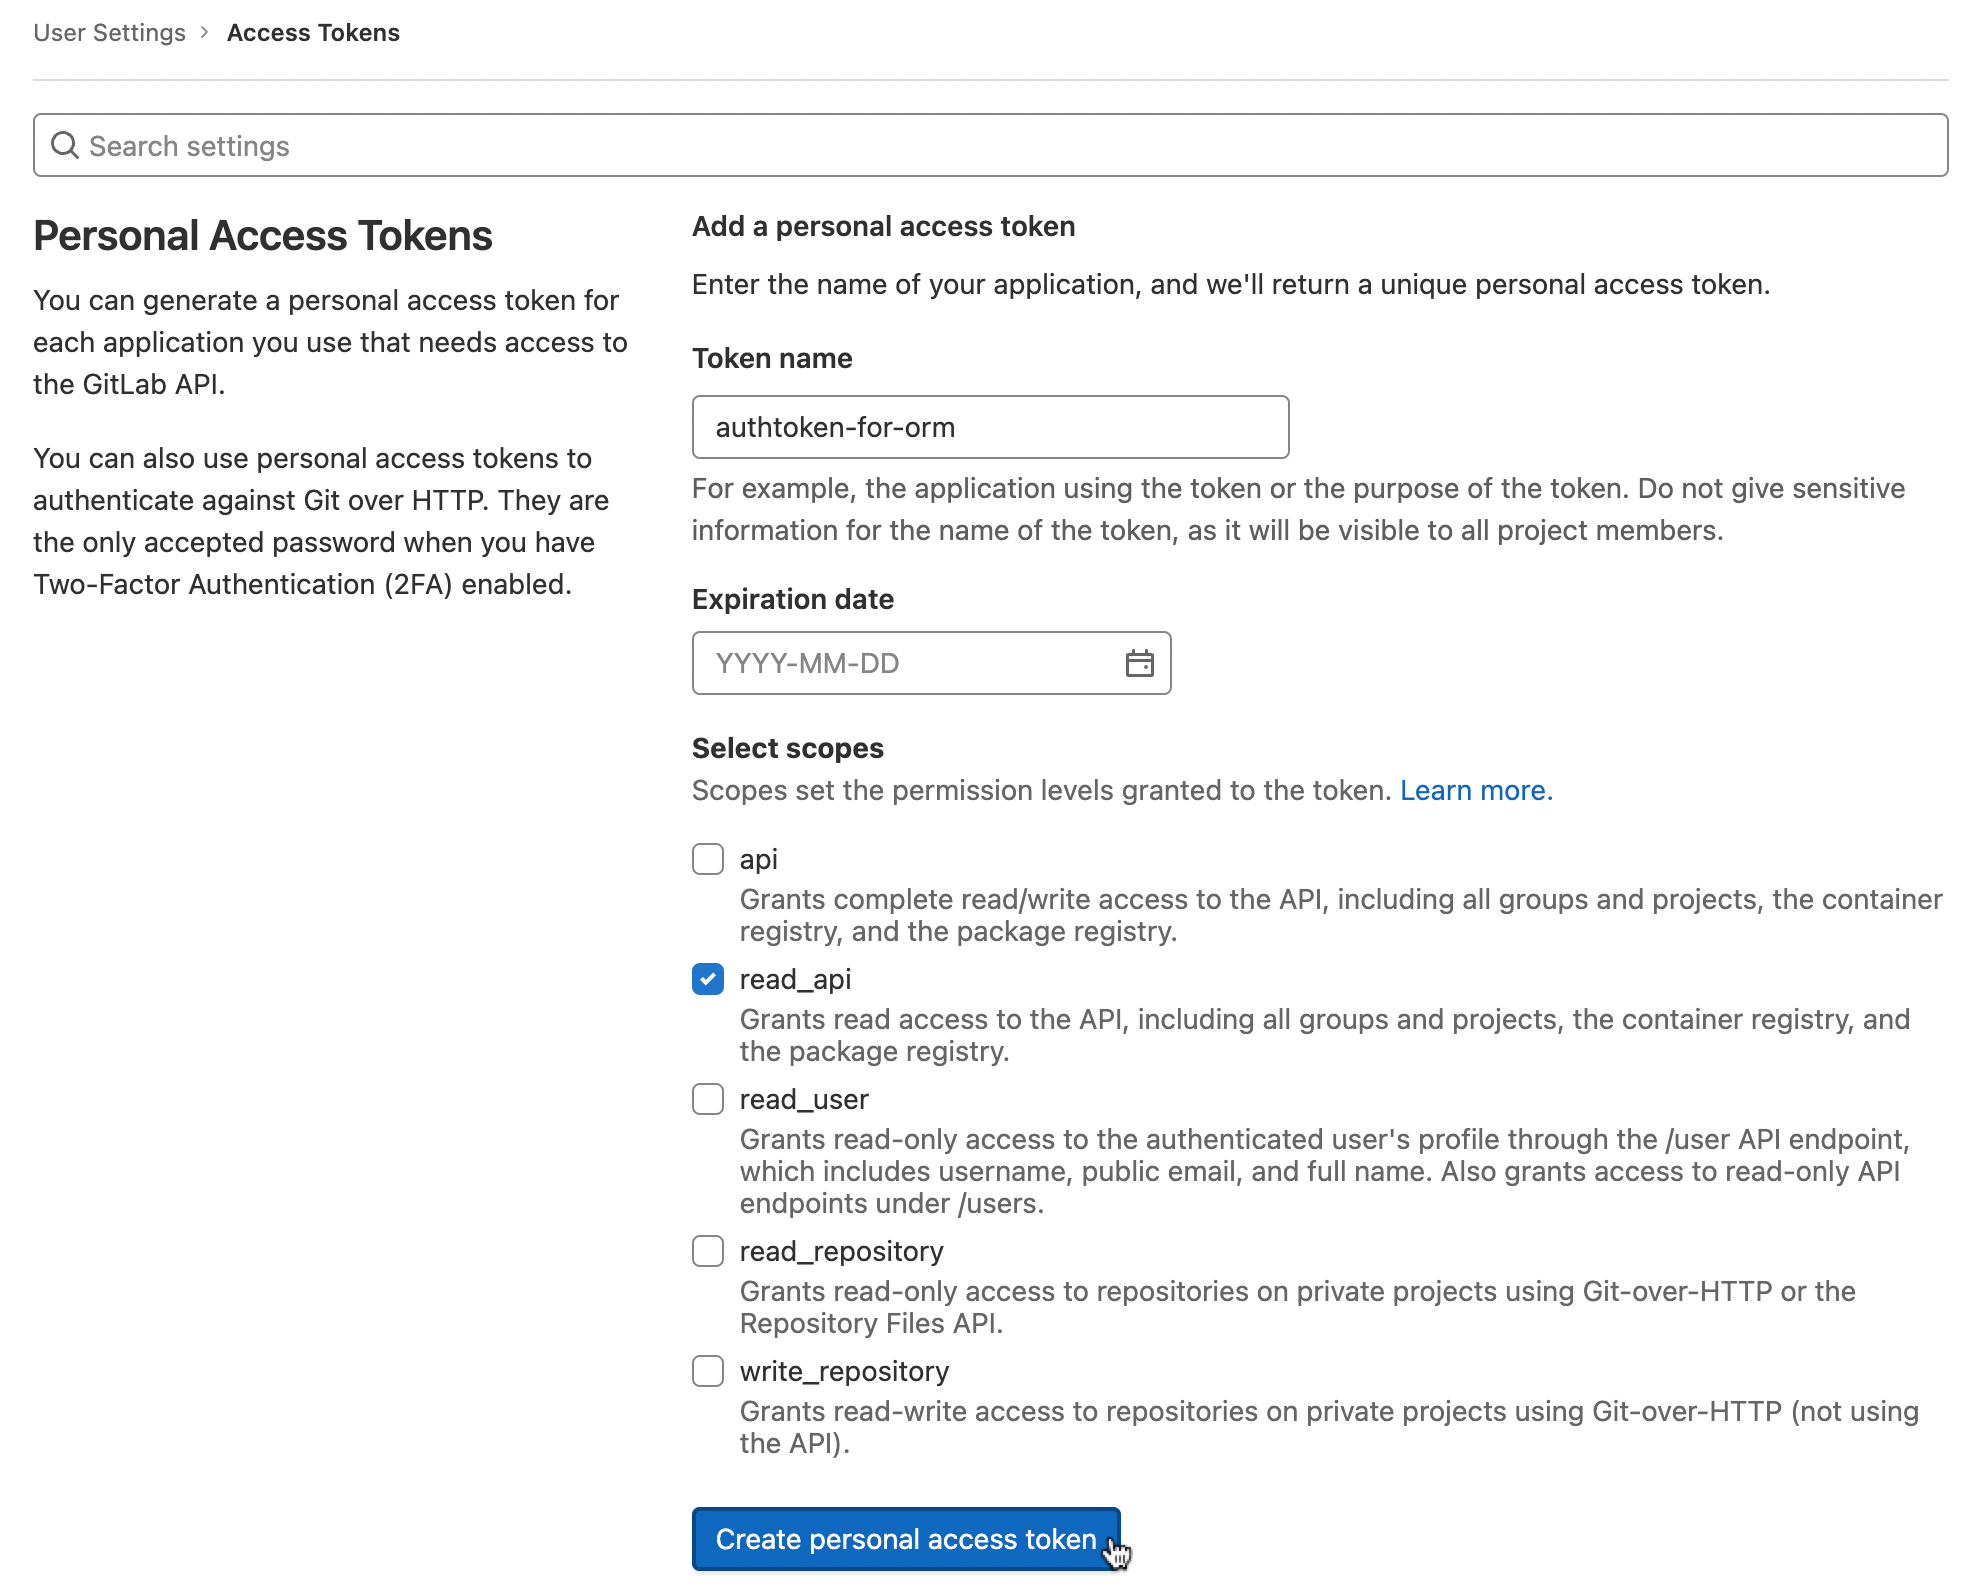
-
Copy the generated Personal Access Token.
-
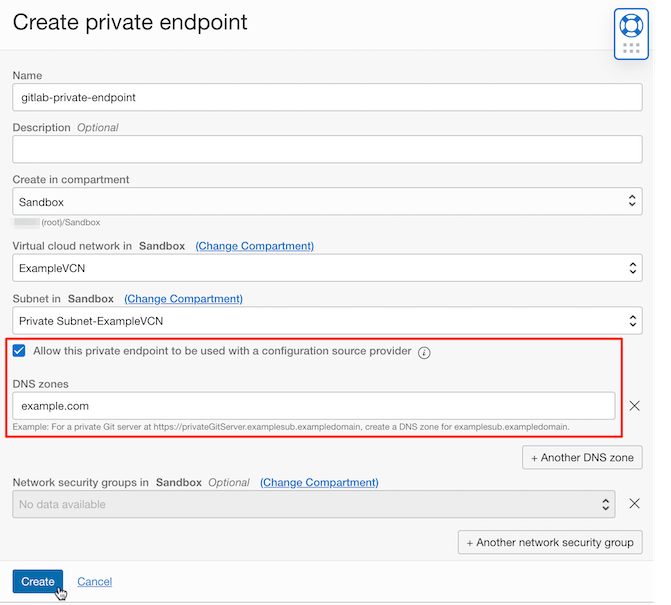
Create Private Endpoint
Private Access means accessing the user’s private environment without going through the Internet in the OCI service. OCI Resource Manager also creates a private endpoint, which is a connection point, in a private subnet to access the target server, in this case, the private git server, through the user’s private IP rather than through the Internet.
-
In the OCI console, click Developer Services » Resource Manager » Private Endpoints in the navigation menu.
-
Click Create private endpoint.
-
Create with private endpoint creation information.
- Name: Example, gitlab-private-endpoint
- VCN, Subnet: Select a subnet that can access the GitLab server.
- Example, Private Subnet-ExampleVCN
- To set as Source Provider in Resource Manager, check the following.
- Allow this private endpoint to be used with a configuration source provider
-
It takes some time to do the internal configuration for the Private Endpoint. In our test environment, it took about 5-6 minutes for the private endpoint to become active.
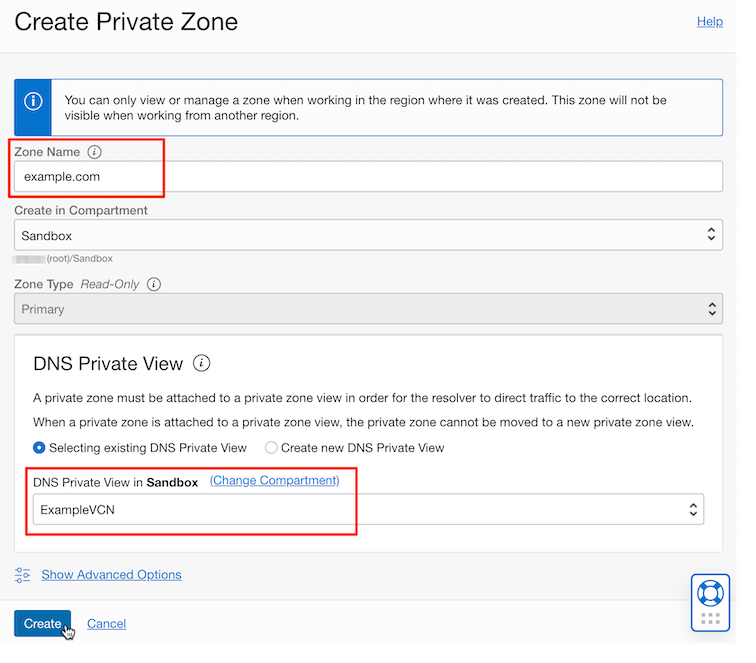
Create Private DNS Zone
-
In the OCI console, click Networking » DNS Management » Zones in the navigation menu.
-
Click the Private Zones tab.
-
The internal DNS Zone information created when VCN is created is displayed. Click Create Zone to create a new Zone.

-
Add Zone for Private Git Server in DNS Private View that belongs to Private Endpoint.
-
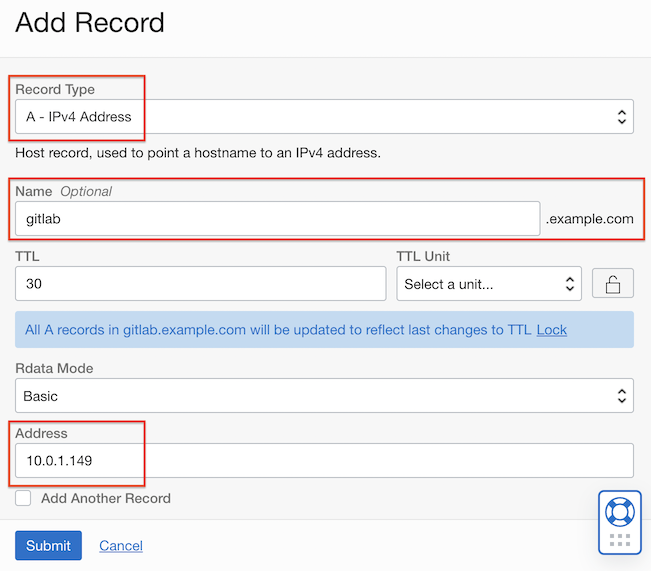
Add a record for Private Git Server to the created Zone.
-
Add the DNS name and Private IP address of GitLab CE created earlier as shown below.
-
Click Publish Changes to apply the changes.
-
Now, gitlab.example.com and Private IP are mapped within the VCN. In the same VCN merchant JumpBox, the query is as shown below.
[opc@jumpbox ~]$ nslookup gitlab.example.com
Server:		169.xxx.xxx.xxx
Address:	169.xxx.xxx.xxx#53

Non-authoritative answer:
Name:	gitlab.example.com
Address: 10.0.1.149

[opc@jumpbox ~]$
Create Source Provider
-
Go back to the Resource Manager.
-
In the OCI console, click Developer Services » Resource Manager » Configuration Source Providers in the navigation menu.
-
Click Create Configuration Source Provider.
-
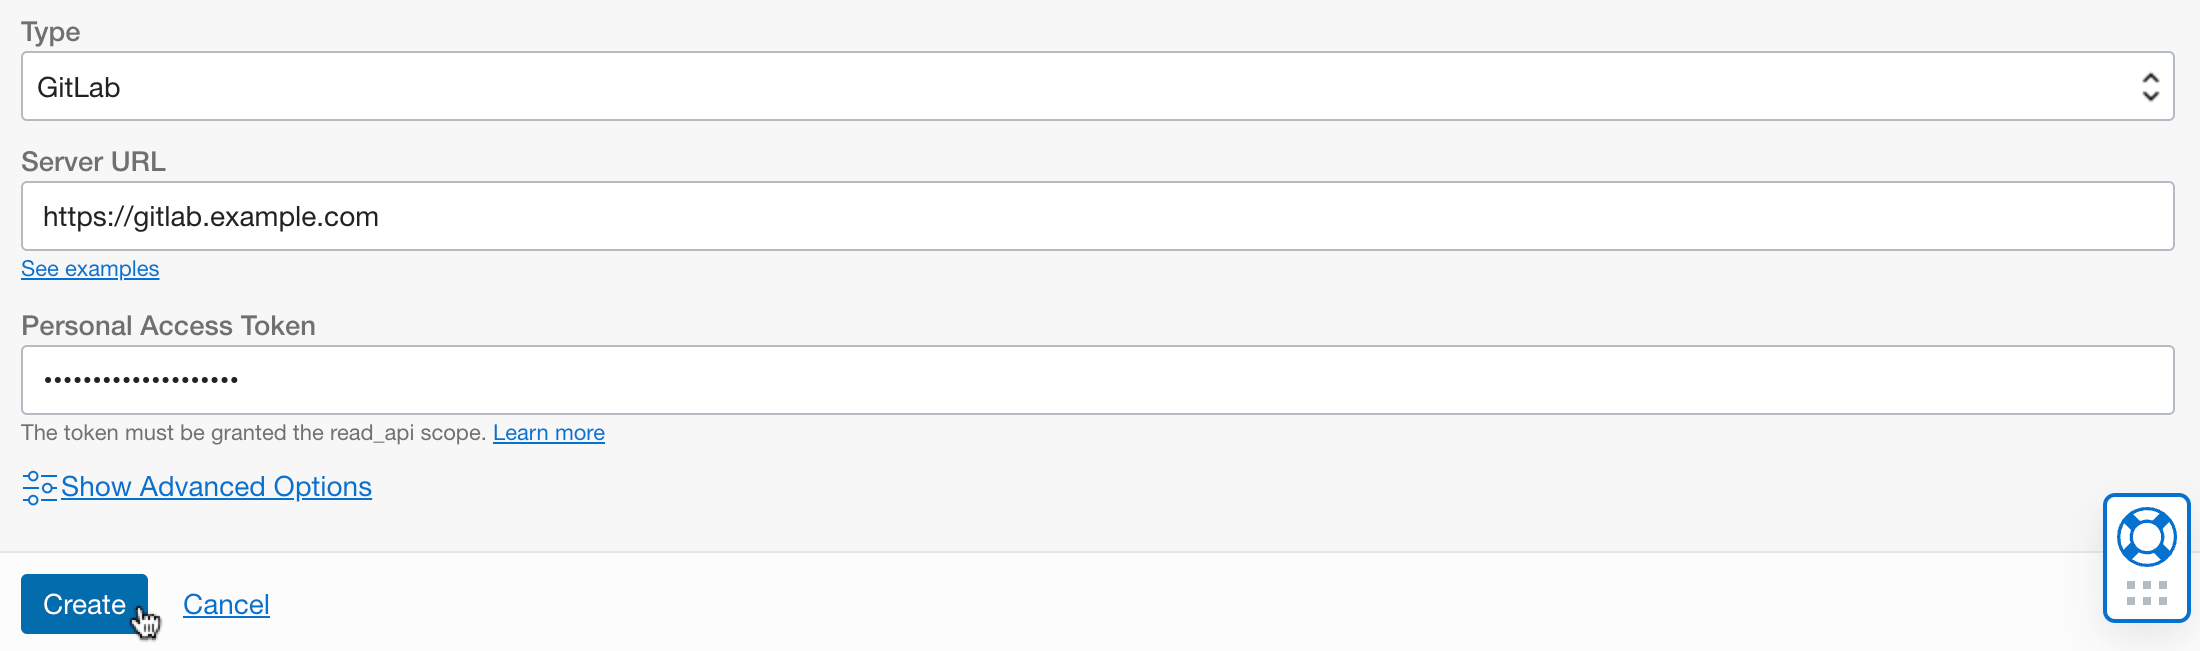
Enter the Source Provider information to create it.
- Name: Example, private-gitlab
- Select Private endpoint type
- Private Endpoints: select the gitlab-private-endpoint created earlier
- SSL certificate: Select the OCI certificate being used by the GitLab CE server
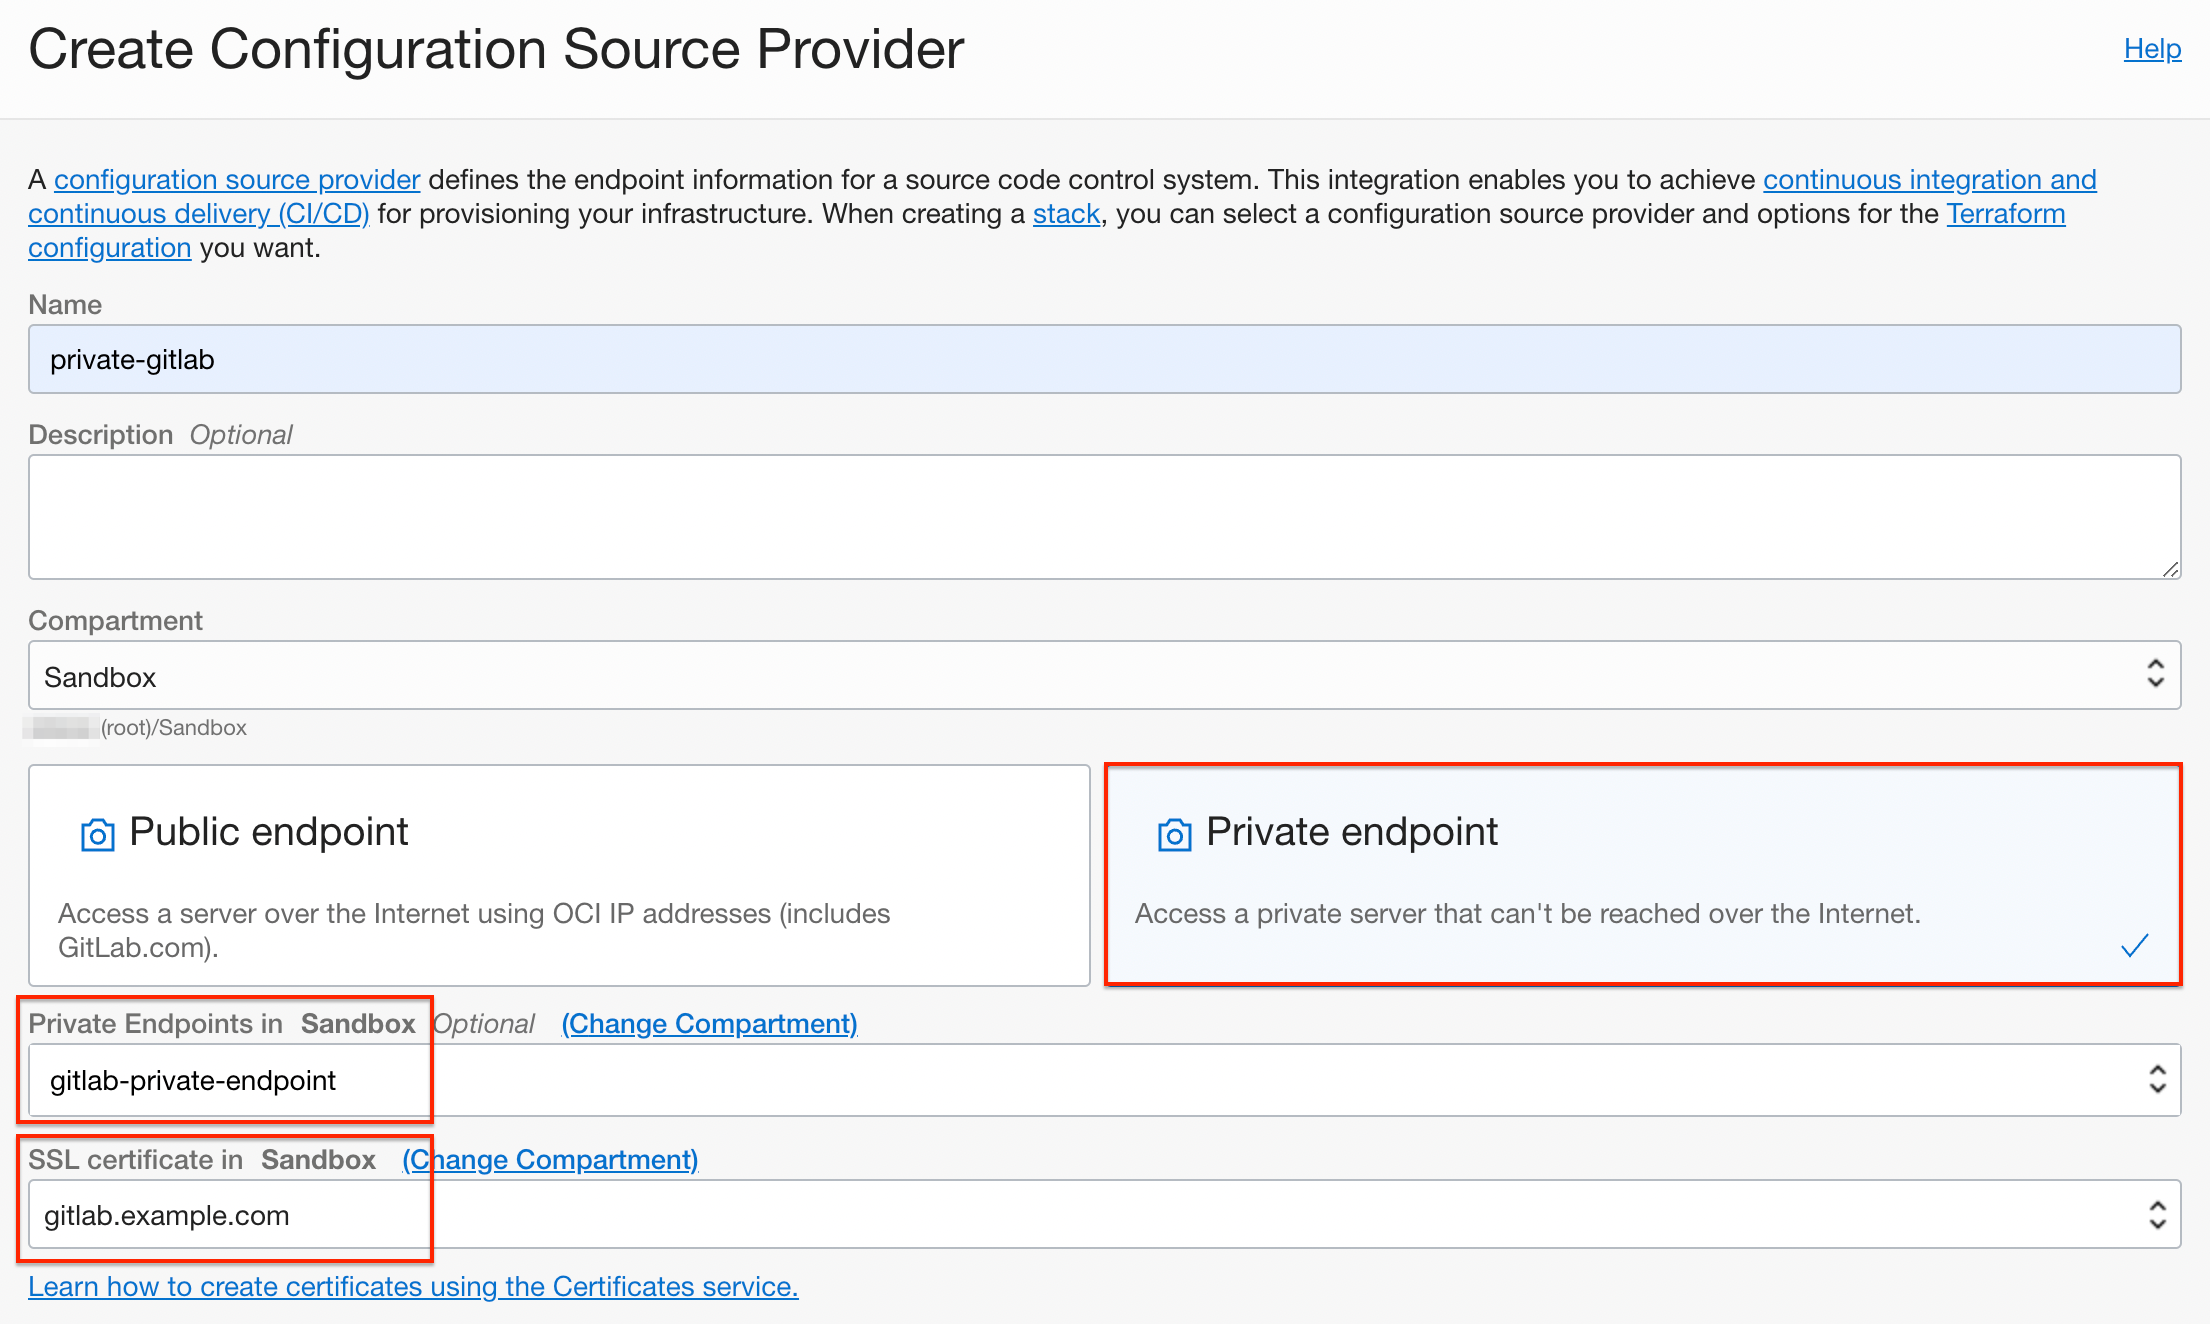
- Type: Select GitLab
- Server URL: Enter the address using the EXTERNAL_URL when installing GitLab CE server and the DNS name registered as a Common Name when generating OCI Certificate.
- Personal Access Token: Enter the user’s Access Token that was additionally created in GitLab CE before for use in Resource Manager
-
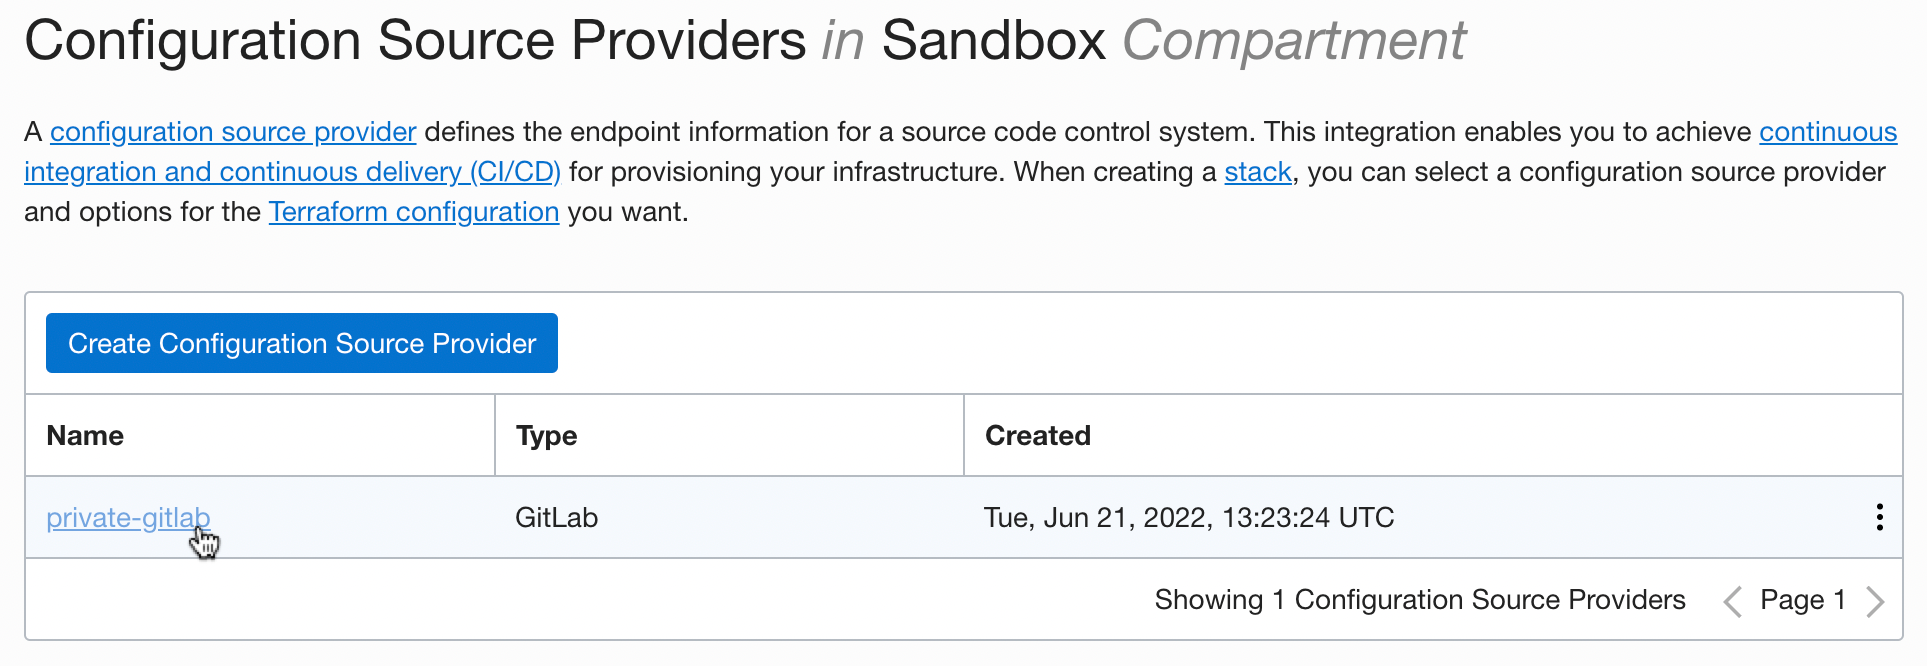
Click the created Source Provider.
-
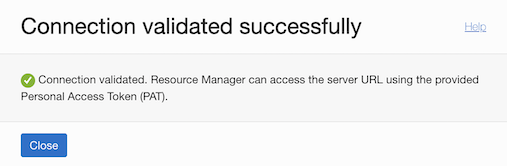
Click Validate connection to test the connection.
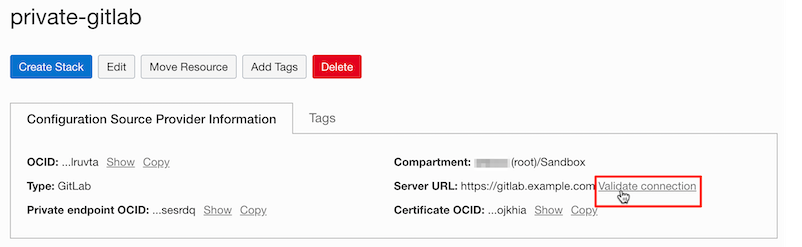
-
Connection was successful.
-
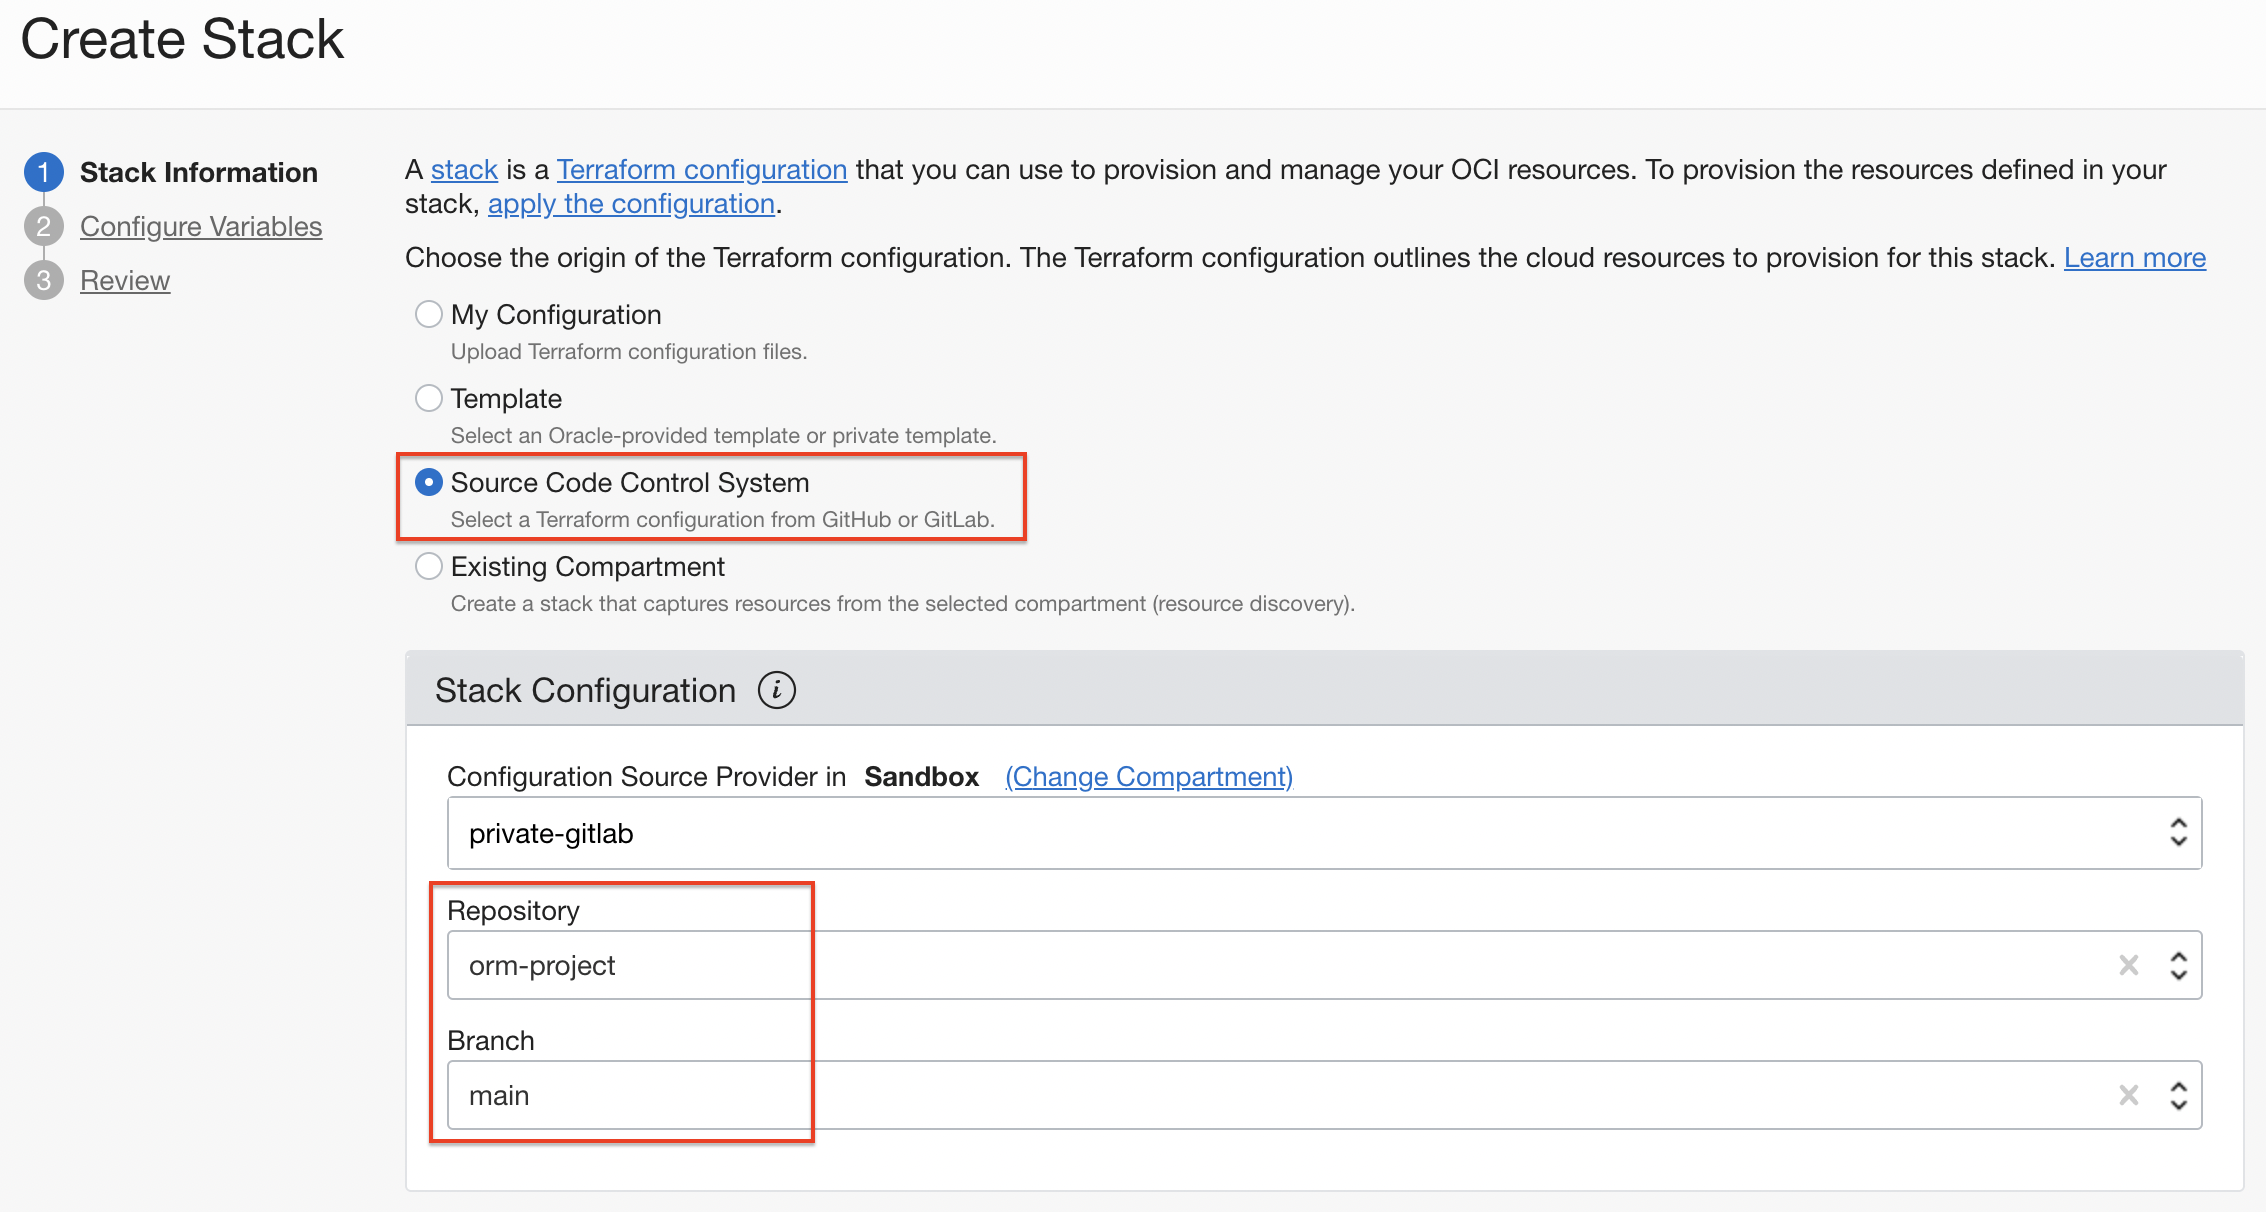
In Source Provider, click Create Stack.
-
Private Git Repository Lookup Test
- The Private Git server created earlier is automatically selected as the source of the Terraform configuration.
- You can see that the Repository in the server is inquired.
-
Here, just test a lookup and go to the next stage.
Creating Terraform Settings on Private Git Server
-
Connect to JumpBox that can access the Private Git Server via SSH.
-
Go to the detail screen of the OCI Certificate created earlier in the Oracle Cloud Console.
-
Download Certificate Chain PEM
-
Click the icon on the right side of the generated certificate screen and click View Content
-
Copy the value of the Certificate Chain PEM area below and save it as my-oci-root-ca.crt file name.
-
-
Add the Root CA created in the OCI Certificate service to JumpBox as a trusted CA as follows.
- Commands based on Oracle Linux.
sudo cp my-oci-root-ca.crt /etc/pki/ca-trust/source/anchors/ sudo update-ca-trust -
Go back to the GitLab connection browser and copy the address of the Repository.
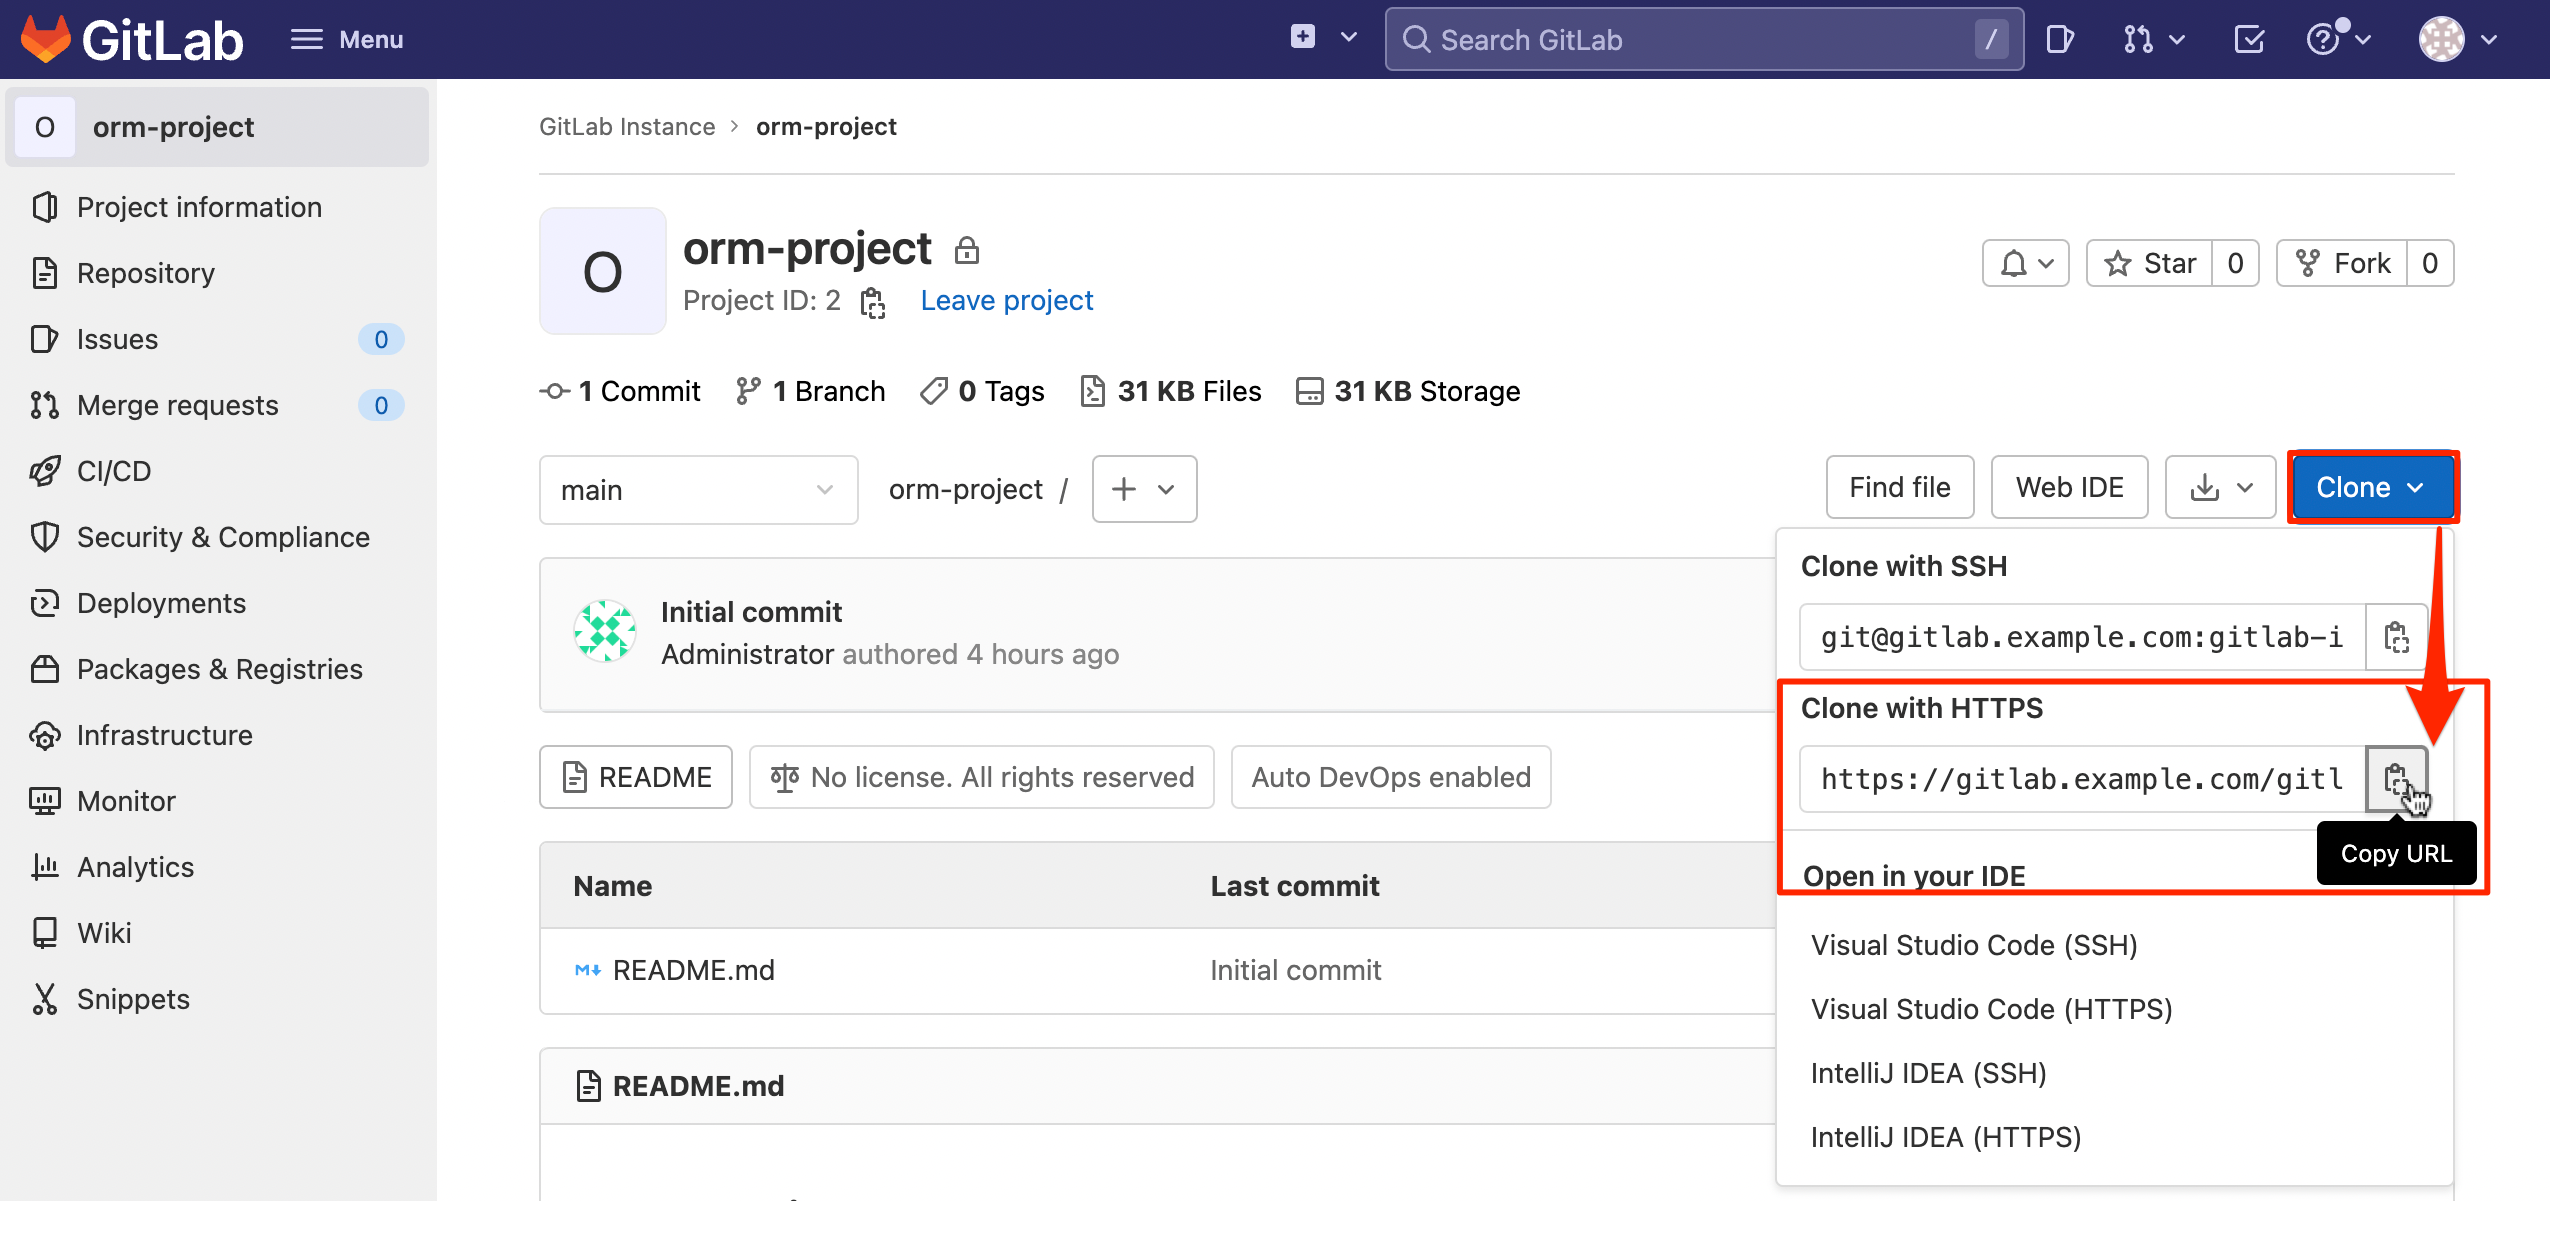
-
Execute the git clone command in JumpBox.
- Use the GitLab user and password you created earlier.
- Because the Root CA was registered, cloning was successful without SSL related errors.
[opc@jumpbox ~]$ git clone https://gitlab.example.com/gitlab-instance-ed05d7b9/orm-project.git Cloning into 'orm-project'... Username for 'https://gitlab.example.com': orm-user Password for 'https://orm-user@gitlab.example.com': remote: Enumerating objects: 3, done. remote: Counting objects: 100% (3/3), done. remote: Compressing objects: 100% (2/2), done. remote: Total 3 (delta 0), reused 0 (delta 0), pack-reused 0 Receiving objects: 100% (3/3), done. -
Navigate to the cloned project folder.
-
Here, refer to the previous guide (15.1 Using Resource Manager) to create the Terraform configuration file.
-
Reflect the changed file.

Creating resources through Private Git Server in Resource Manager
-
In the Oracle Cloud Console, click Developer Services » Resource Manager » Stack in the navigation menu.
-
Click Create Stack.
-
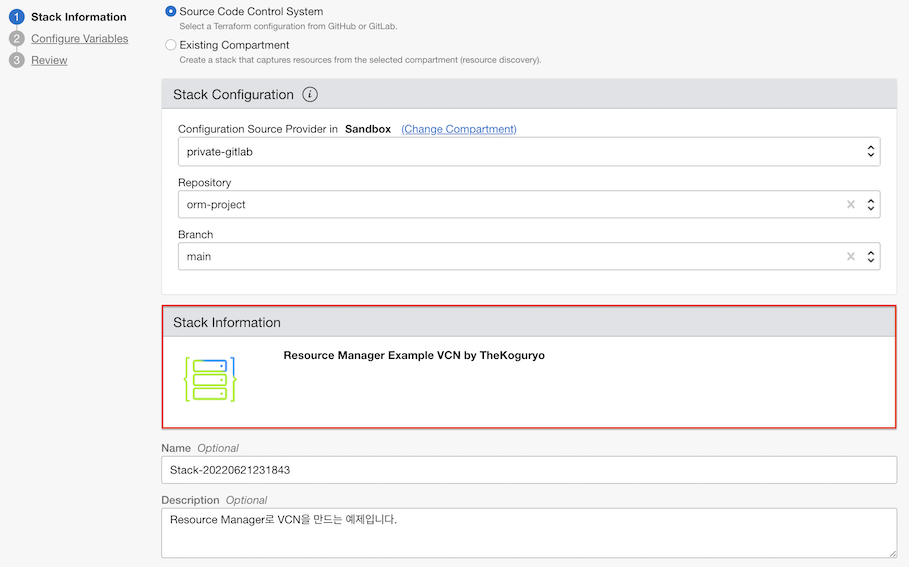
Select the location of the configuration file as Source Code Control System.
-
Select the Repository with Terraform settings in the private-gitlab Source Provider you set up earlier.
-
As shown in the figure below, you can see that schema information in the Repository is normally imported.
-
Create a Stack using the remaining values as default values.
-
Click Apply on the created Stack to apply Terraform settings.
-
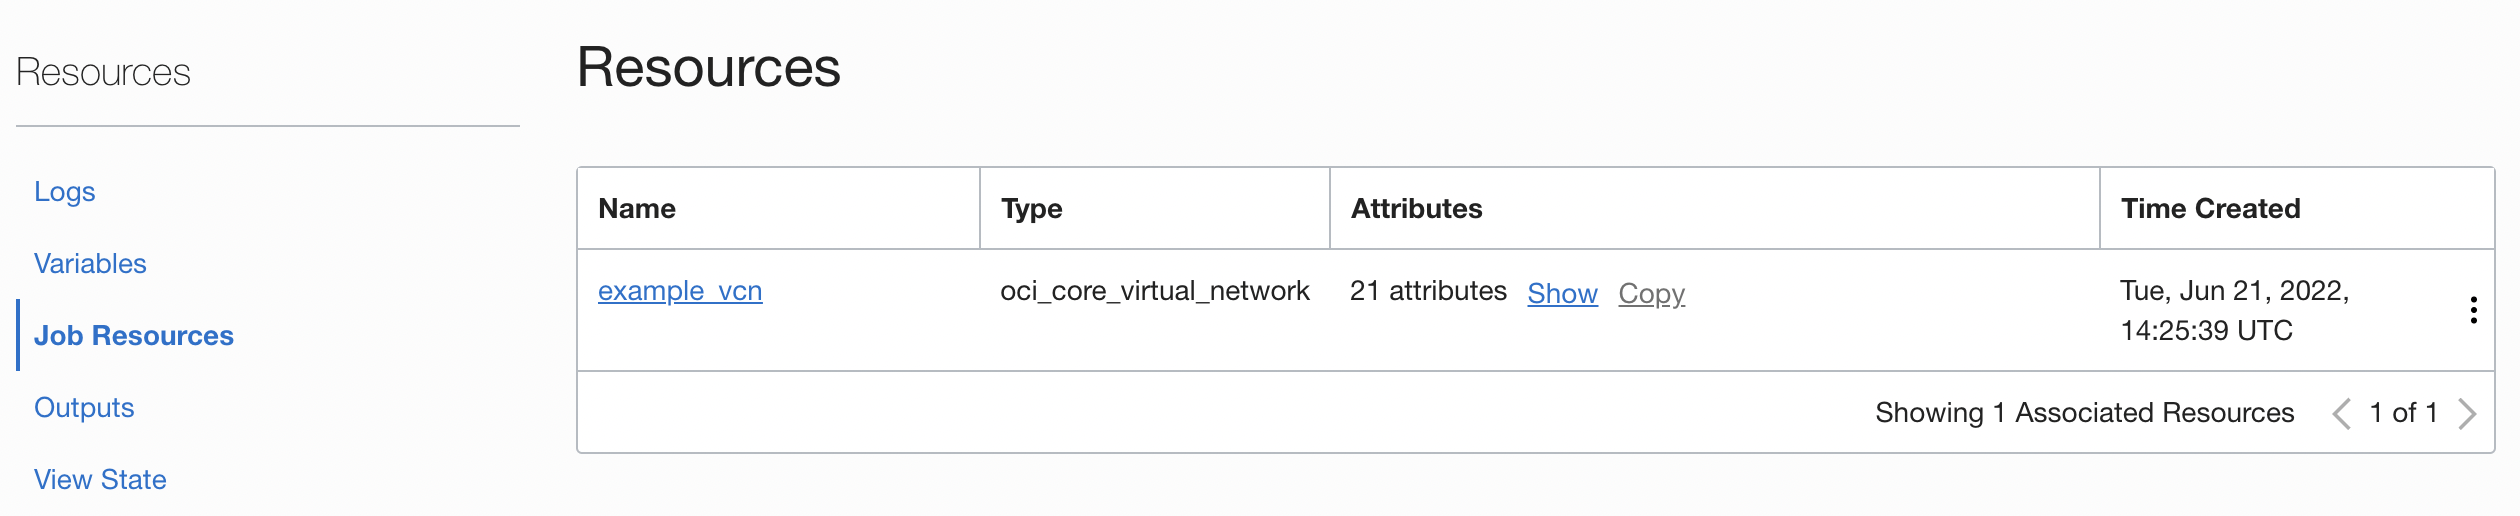
You can see that it was created normally through Terraform settings on the Private Git Server.
As an individual, this article was written with my personal time. There may be errors in the content of the article, and the opinions in the article are personal opinions.